
Exercise (Video): Setting up Git
Exercise (Instructions): Setting up Git
Objectives and Outcomes
In this exercise you will learn to install Git on your computer. Git is required for using all the remaining Node.js and Node based tools that we encounter in the rest of the course. At the end of this exercise, you would be able to: - Install Git on your computer - Ensure that Git can be used from the command-line or command-prompt on your computer - Set up some of the basic global configuration for GitDownloading and Installing Git
- To install Git on your computer, go toSome Global Configuration for Git
- Open a cmd window or terminal on your computer. - Check to make sure that Git is installed and available on the command line, by typing the following at the command prompt: ``` $ git --version ```- To configure your user name to be used by Git, type the following at the prompt:
- To configure your email to be used by Git, type the following at the prompt:
Exercise (Video): Basic Git Commands
``` $ git config --list ```Conclusions
At the end of this exercise you should have Git available on the command-line of your computer.Exercise (Instructions): Basic Git Commands
Objectives and Outcomes
In this exercise you will get familiar with some basic Git commands. At the end of this exercise, you will be able to: - Set up a folder as a Git repository - Perform basic Git operations on your Git repositoryBasic Git Commands
- At a convenient location on your computer, create a folder named git-test.
- Open this git-test folder in your favorite editor.
- Add a file named index.html to this folder, and add the following HTML code to this file:
Checking your Git repository status
- Type the following at the prompt to check your Git repository\'s status: ``` $ git status ``` Adding files to the staging area - To add files to the staging area of your Git repository, type: ``` $ git add . ``` Commiting to the Git repository - To commit the current staging area to your Git repository, type: ``` $ git commit -m "first commit" ``` Checking the log of Git commits - To check the log of the commits to your Git repository, type ``` $ git log --oneline ``` - Now, modify the index.html file as follows: ``` <!DOCTYPE html> <html> <head></head> <body> <h1>This is a Header</h1> <p>This is a paragraph</p> </body> </html> ``` - Add a sub-folder named templates to your git-test folder, and then add a file named test.html to the templates folder. Then set the contents of this file to be the same as the index.html file above. - Then check the status and add all the files to the staging area. - Then do the second commit to your repository - Now, modify the index.html file as follows: ``` <html> <head></head> <body> <h1>This is a Header</h1> <p>This is a paragraph</p> <p>This is a second paragraph</p> </body> </html> ``` - Now add the modified index.html file to the staging area and then do a third commit.Checking out a file from an earlier commit
- To check out the index.html from the second commit, find the number of the second commit using the git log, and then type the following at the prompt: ``` $ git checkout <second commit's number> index.html ```Resetting the Git repository
- To discard the effect of the previous operation and restore index.html to its state at the end of the third commit, type: ``` $ git reset HEAD index.html ``` - Then type the following at the prompt: ``` $ git checkout -- index.html ``` - You can also use git reset to reset the staging area to the last commit without disturbing the working directory.Conclusions
At the end of this exercise, you should have learnt some basic Git commands. Experiment with these commands until you fully understand how to use Git.Exercise (Video): Online Git Repositories
Exercise (Instructions): Online Git Repositories
Objectives and Outcomes
In this exercise you will learn about how to set up and use an online Git repository and synchronize your local Git repository with your online repository. At the end of this exercise, you will be able to: - Set up the online repository as a remote repository for your local Git repository - Push your commits to the online repository - Clone an online Git repository to your computerSetting up an Online Git repository
- Sign up for an account either at Bitbucket ([https://bitbucket.org](https://bitbucket.org/)) or GitHub ([https://github.com](https://github.com/)). - Then set up an online Git repository named git-test. Note the URL of your online Git repository. Note that private repositories on GitHub requires a paid account, and is not available for free accounts.Set the local Git repository to set its remote origin
- At the prompt, type the following to set up your local repository to link to your online Git repository: ``` $ git remote add origin <repository URL> ```Pushing your commits to the online repository
- At the prompt, type the following to push the commits to the online repository: ``` $ git push -u origin master ```Cloning an online repository
- To clone an online repository to your computer, type the following at the prompt: ``` $ git clone <repository URL> ```Conclusions
In this exercise you have learnt to set up an online Git repository, synchronize your local repository with the remote repository, and clone an online repository.Module 4: Node.js and NPM
Exercise (Video): Setting up Node.js and NPM
Exercise (Instructions): Setting up Node.js and NPM
Note: Make sure you have installed Git on your machine before you install Node.js. Please complete the previous Git installation exercise before proceeding with this exercise.Objectives and Outcomes
In this exercise, you will learn to set up the Node.js environment, a popular Javascript based server framework, and node package manager (NPM) on your machine. To learn more about NodeJS, you can visit [https://nodejs.org](https://nodejs.org/). For this course, you just need to install Node.js on your machine and make use of it for running some front-end tools. You will learn more about the server-side support using Node.js in a subsequent course. At the end of this exercise, you will be able to: - Complete the set up of Node.js and NPM on your machine - Verify that the installation was successful and your machine is ready for using Node.js and NPM.Installing Node
- To install Node on your machine, go to [https://nodejs.org](https://nodejs.org/) and click on the Download button. Depending on your computer\'s platform (Windows, MacOS or Linux), the appropriate installation package is downloaded. - As an example, on a Mac, you will see the following web page. Click on the Download button. Follow along the instructions to install Node on your machine. (Note: Now Node gives you the option of installing a mature and dependable LTS version and a more newer stable version. You should to install the LTS version. I will use this version in the course.) Note: On Windows machines, you may need to configure your PATH environmental variable in case you forgot to turn on the add to PATH during the installation steps.Verifying the Node Installation
- Open a terminal window on your machine. If you are using a Windows machine, open a cmd window or PowerShell window with admin privileges. - To ensure that your NodeJS setup is working correctly, type the following at the command prompt to check for the version of Node and NPM

Conclusions
At the end of this exercise, your machine is now ready with the Node installed for further development. We will examine web development tools next.Exercise (Video): Basics of Node.js and NPM
Exercise (Instructions): Basics of Node.js and NPM
Objectives and Outcomes
In this exercise you will learn the basics of Node and NPM. At the end of this exercise, you will be able to: - Set up package.json file in the project folder for configuring your Node and NPM for this project - Install a NPM module and make use of it within your projectInitializing package.json
- At the command prompt in your git-test folder, type > npm init - Follow along the prompts and answer the questions as follows: accept the default values for most of the entries, except set the entry point to index.html - This should create a package.json file in your git-test folder.Installing an NPM Module
- Install an NPM module, lite-server, that allows you to run a Node.js based development web server and serve up your project files. To do this, type the following at the prompt: > npm install lite-server --save-dev - You can check out more documentation on lite-server [here](https://github.com/johnpapa/lite-server). - Next, open package.json in your editor and modify it as shown below. Note the addition of two lines, line 7 and line 9. ``` { "name": "git-test", "version": "1.0.0", "description": "This is the Git and Node basic learning project", "main": "index.html", "scripts": { "start": "npm run lite", "test": "echo "Error: no test specified" && exit 1", "lite": "lite-server" }, "repository": { "type": "git", "url": "git+[https://[email protected]/jogesh_k_muppala/git-test.git]{.underline}" }, "author": "", "license": "ISC", "homepage": "[https://bitbucket.org/jogesh_k_muppala/git-test#readme]{.underline}", "devDependencies": { "lite-server": "^2.2.2" } } ``` - Next, start the development server by typing the following at the prompt: ``` $ npm start ``` - This should open your index.html page in your default browser. - If you now open the index.html page in an editor and make changes and save, the browser should immediately refresh to reflect the changes.Setting up .gitignore
- Next, create a file in your project directory named .gitignore (Note: the name starts with a period)Then, add the following to the .gitignore file ``` $ node_modules ``` - Then do a git commit and push the changes to the online repository. You will note that the node_modules folder will not be added to the commit, and will not be uploaded to the repository.Conclusions
In this exercise you learnt to set up package.json, install a npm package and start a development server.Setting up your Development Environment: Git and Node: Additional Resources
PDFs of Presentations
Git.pdf Git-Exercises.pdf NodeJS.pdf Exercises-Node-NPM.pdfAdditional Resources (Git)
- Git site [http://git-scm.com](http://git-scm.com/). - [Installing Git](https://git-scm.com/book/en/v2/Getting-Started-Installing-Git) chapter from Pro Git - [Git reference manual](https://git-scm.com/docs) - Quick reference guides: [GitHub Cheat Sheet](https://services.github.com/on-demand/downloads/github-git-cheat-sheet.pdf) (PDF) \| [Visual Git Cheat Sheet](http://ndpsoftware.com/git-cheatsheet.html) (SVG \| PNG) - [Atlassian comprehensive Git tutorial](https://www.atlassian.com/git/tutorials/)Additional Resources (Node.js and NPM)
- [Nodejs.org](https://nodejs.org/) - [Npmjs.com](https://www.npmjs.com/) - [Node API Documentation](https://nodejs.org/api/) - [NPM Documentation](https://docs.npmjs.com/) - [lite-server](https://github.com/johnpapa/lite-server)Module 4: Introduction to React: Objectives and Outcomes
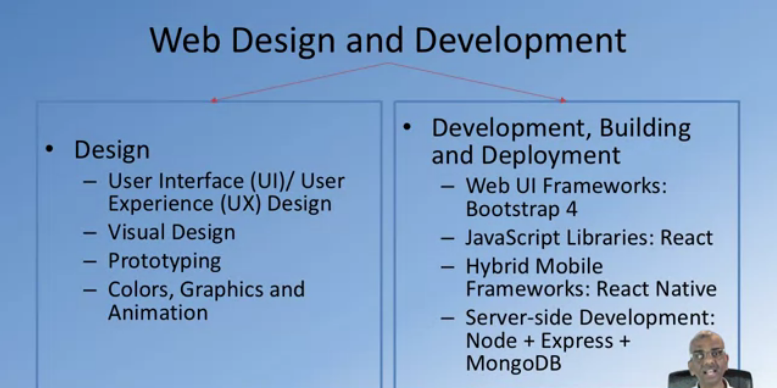
In this lesson you will be given a quick overview of JavaScript frameworks and libraries and then introduced to React in particular. We will learn some basics of React and how to configure a React application using the create-react-app the command line tool. At the end of this lesson, you will be able to: - Get a basic overview of JavaScript frameworks and libraries - Understand the architecture of an React application - Scaffold out a starter React application using create-react-app, the command line toolFront-end JavaScript Frameworks and Libraries Overview
Introduction to React
Exercise (Video): Getting Started with React
Exercise (Instructions): Getting Started with React
Objectives and Outcomes
In this first React exercise, you will first install create-react-app, the command line tool for scaffolding React applications. You will then use the tool to scaffold out a basic React application. We will thereafter develop this application into a full-fledged React application in the process of doing the exercises in this course. At the end of this exercise you will be able to: - Install create-react-app - Scaffold out a basic React applicationInstalling Yarn
- Yarn is another package manager like NPM, but is better suited and faster to work with for React applications. So let us install yarn and use it for building our React applications. - To install Yarn, you can find the instructions for your specific platform atInstalling create-react-app
From the React documentation we learn that the create-react-app CLI makes it easy to create an application that already works, right out of the box. It already follows the best practices suggested by the React community! - To install create-react-app globally, type the following at the prompt: > yarn global addGenerating and Serving a React Project using create-react-app
- At a convenient location on your computer, create a folder named React and move into that folder. - Then type the following at the prompt to create a new React application named confusion: ``` $ create-react-app confusion ``` - This should create a new folder named confusion within your React folder and create the React application in that folder. - Move to the confusion folder and type the following at the prompt: ``` $ yarn start ``` - This will compile the project and then open a tab in your default browser at the address <Your Computer\'s Name>:3000. - You can initialize your project to be a Git repository by typing the following commands at the prompt: ``` $ git init $ git add . $ git commit -m "Initial Setup" ``` - Thereafter you can set up an online Git repository and synchronize your project to the online repository. Make sure that the online Git repository is a private repository.Conclusions
In this exercise you installed the create-react-app CLI tool and created a basic React project and served up the compiled project to your browser.React App Overview
Introduction to JSX
Setting up your Development Environment
Software Requirements
1. Text editor of your choice: Any text editor that you are already familiar with can be used for editing the project files. I will be using Visual Studio Code (WEEK # 2
React Router and Single Page Applications
In this week, you will learn about various component types. You will learn about React router and its use in designing single page applications. You will also learn about single page applications and use React Router to design single page applications.[Presentational and Container Components](https://www.coursera.org/lecture/front-end-react/presentational-and-container-components-TZMPB) 6m
WEEK # 3
React Forms, Flow Architecture and Introduction to Redux
In this module you will be introduced to uncontrolled and controlled forms and briefly examine form validation in React applications. You will get an overview of the Flux architecture and introduced to Redux as a way of realizing the flux architecture.[Controlled Forms](https://www.coursera.org/lecture/front-end-react/controlled-forms-RYDaq) 5m
WEEK # 4
More Redux and Client-Server Communication
In this module you will explore Redux further including Redux action, combining reducers, and Redux thunk, client-server communication using Fetch and the REST API. You will get a brief introduction to animation in React. You will also learn about testing, building and deploying React applications.[Redux Actions](https://www.coursera.org/lecture/front-end-react/redux-actions-hUr1y) 8m
Exercise (Video): Combining Reducers 9m
Exercise (Video): Redux Actions 24m
Redux Thunk 10m
Exercise (Video): Redux Thunk 50m
Exercise (Video): React-Redux-Form Revisited 12m
Networking Essentials 17m Brief Representational State Transfer (REST) 16m Exercise (Video): Setting up a Server using json-server 6m Promises 10m Fetch 20m Exercise (Video): Fetch from Server 33m Exercise (Video): Fetch Handling Errors 15m Exercise (Video): Fetch Post Comment 18m React Animations 13m Exercise (Video): React Animations 9m Exercise (Video): React Animation Components 9m Assignment 4: Redux, Client-Server Communication and Fetch 4m Introduction to Webpack 7m Exercise (Video): Building and Deploying the React Application 11m 26 readings Redux Actions: Objectives and Outcomes 10m Exercise (Instructions): Combining Reducers 10m Exercise (Instructions): Redux Actions 10m Redux Actions: Additional Resources 10m Redux Thunk: Objectives and Outcomes 10m Exercise (Instructions): Redux Thunk 10m Exercise (Instructions): React-Redux-Form Revisited 10m Redux Thunk: Additional Resources 10m Client-Server Communication: Objectives and Outcomes 10m Exercise (Instructions): Setting up a Server using json-server 10m Client-Server Communication: Additional Resources 10m Fetch: Objectives and Outcomes 10m Exercise (Instructions): Fetch from Server 10m Exercise (Instructions): Fetch Handling Errors 10m Exercise (Instructions): Fetch Post Comment 10m Fetch: Additional Resources 10m React Animations: Objectives and Outcomes 10m Exercise (Instructions): React Animations 10m Exercise (Instructions): React Animation Components 10m React Animations: Additional Resources 10m Assignment 4: Redux, Client-Server Communication and Fetch: Additional Resources 10m Building and Deployment: Objectives and Outcomes 10m Exercise (Instructions): Building and Deploying the React Application 10m Building and Deployment: Additional Resources 10m Project Implementation: Objectives and Outcomes 10m Final Report Template 10m # Exercise (Instructions): Setting up GitObjectives and Outcomes
In this exercise you will learn to install Git on your computer. Git is required for using all the remaining Node.js and Node based tools that we encounter in the rest of the course. At the end of this exercise, you would be able to: - Install Git on your computer - Ensure that Git can be used from the command-line or command-prompt on your computer - Set up some of the basic global configuration for GitDownloading and Installing Git
- To install Git on your computer, go toSome Global Configuration for Git
- Open a cmd window or terminal on your computer. - Check to make sure that Git is installed and available on the command line, by typing the following at the command prompt: ``` $ git --version ``` - To configure your user name to be used by Git, type the following at the prompt: ``` $ git config --global user.name "Your Name" ``` - To configure your email to be used by Git, type the following at the prompt: ``` $ git config --global user.email <your email address> ``` - You can check your default Git global configuration, you can type the following at the prompt: ``` $ git config --list ```Conclusions
At the end of this exercise you should have Git available on the command-line of your computer.Exercise (Video): Basic Git Commands
Exercise (Instructions): Basic Git Commands
Objectives and Outcomes
In this exercise you will get familiar with some basic Git commands. At the end of this exercise you will be able to: - Set up a folder as a Git repository - Perform basic Git operations on your Git repositoryBasic Git Commands
- At a convenient location on your computer, create a folder named git-test. - Open this git-test folder in your favorite editor. - Add a file named index.html to this folder, and add the following HTML code to this file: ``` <!DOCTYPE html> <html> <head></head> <body> <h1>This is a Header</h1> </body> </html> ```Initializing the folder as a Git repository
- Go to the git-test folder in your cmd window/terminal and type the following at the prompt to initialize the folder as a Git repository: ``` $ git init ```Checking your Git repository status
- Type the following at the prompt to check your Git repository\'s status: ``` $ git status ```Adding files to the staging area
- To add files to the staging area of your Git repository, type: ``` $ git add . ```Commiting to the Git repository
- To commit the current staging area to your Git repository, type: ``` $ git commit -m "first commit" ```Checking the log of Git commits
- To check the log of the commits to your Git repository, type ``` $ git log --oneline ``` - Now, modify the index.html file as follows: ```This is a Header
This is a paragraph
```- Add a sub-folder named templates to your git-test folder,
and then add a file named test.html to the templates folder. Then
set the contents of this file to be the same as the index.html
file above.
- Then check the status and add all the files to the staging area.
- Then do the second commit to your repository
- Now, modify the index.html file as follows:
This is a Header
This is a paragraph
This is a second paragraph
``` - Now add the modified index.html file to the staging area and then do a third commit.Checking out a file from an earlier commit
- To check out the index.html from the second commit, find the number of the second commit using the git log, and then type the following at the prompt: ``` $ git checkout <second commit's number> index.html ```Resetting the Git repository
- To discard the effect of the previous operation and restore index.html to its state at the end of the third commit, type:
- Then type the following at the prompt:
- You can also use git reset to reset the staging area to the last commit without disturbing the working directory.
Conclusions
At the end of this exercise you should have learnt some basic Git commands. Experiment with these commands until you fully understand how to use Git.Online Git Repositories
Exercise (Instructions): Online Git Repositories
Objectives and Outcomes
In this exercise you will learn about how to set up and use an online Git repository and synchronize your local Git repository with your online repository. At the end of this exercise, you will be able to: - Set up the online repository as a remote repository for your local Git repository - Push your commits to the online repository - Clone an online Git repository to your computerSetting up an Online Git repository
- Sign up for an account either at Bitbucket ([https://bitbucket.org](https://bitbucket.org/)) or GitHub ([https://github.com](https://github.com/)). - Then set up an online Git repository named git-test. Note the URL of your online Git repository. Note that private repositories on GitHub requires a paid account, and is not available for free accounts.Set the local Git repository to set its remote origin
- At the prompt, type the following to set up your local repository to link to your online Git repository: ``` $ git remote add origin <repository URL> ```Pushing your commits to the online repository
- At the prompt, type the following to push the commits to the online repository: ``` $ git push -u origin master ```Cloning an online repository
- To clone an online repository to your computer, type the following at the prompt: ``` $ git clone <repository URL> ```Conclusions
In this exercise you have learnt to set up an online Git repository, synchronize your local repository with the remote repository, and clone an online repository.Node.js and NPM
JavaScript which was designed as a scripting language for the browser, has seen deployment far beyond the browser. Node.js has played a significant role in this shift of JavaScript from the browser to the desktop. Let\'s now learn a little bit about what node.js is and what role does NPM, the Node Package Manager, play in the context of node.js. Node.js as I mentioned earlier, allows us to bring the power of JavaScript to the desktop. Node.js is based on the JavaScript runtime engine that has been built for the Chrome browser. The Chrome V8 JavaScript engine has been ported from the browser to run on the desktop and support the execution of JavaScript programs on the desktop. Node.js is built around an event driven non blocking I/O model which makes it very efficient to run JavaScript programs on the desktop and synchronous Javascript on the desktop. Now, this is where node finds its true pouch. Right now, we will examine Node.js In the context of its use as a JavaScript runtime. We\'ll look at the server-side application of Node.js In detail in the last course of this specialization. This is the typical architecture of Node.js. In this, the Chrome V8 engine is at the bottom layer together with libuv forms, the layer that interacts with the underlying computer system to support the execution of JavaScript programs. On top of it, we have Node Bindings which are also implemented in C++. At the top layer, you have the Node.js and standard library which are all implemented in JavaScript, and this is what enables us to write JavaScript programs and run them on the desktop. Naturally, the ability to run JavaScript programs on the desktop energize the web development community to explore using JavaScript to develop a significant number of web development tools. Tools such as Bower, Grunt, Gulp, Yeoman, and many others. We will explore some of these in the later part of this course and in subsequent courses. The last course in the specialization, as I mentioned, looks at the use of Node.js on the server side. How we can develop Web server, Business logic, all implemented in JavaScript on the server site. Together with Node, you often hear people talking about the Node Package Manager or NPM. When you install Node on your computer, NPM automatically gets installed. The Node Package Manager is the manager for the node ecosystem that manages all the node modules and packages that have been made publicly available by many different users. A typical node package consist of JavaScript files together with a file called package.json which is the manifest file for this node module. We will look at how we can use the package.json file in more detail in the subsequent exercises.Exercise (Video): Setting up Node.js and NPM
Exercise (Instructions): Setting up Node.js and NPM
Note: Make sure you have installed Git on your machine before you install Node.js. Please complete the previous Git installation exercise before proceeding with this exercise.Objectives and Outcomes
In this exercise, you will learn to set up the Node.js environment, a popular Javascript based server framework, and node package manager (NPM) on your machine. To learn more about NodeJS, you can visit [https://nodejs.org](https://nodejs.org/). For this course, you just need to install Node.js on your machine and make use of it for running some front-end tools. You will learn more about the server-side support using Node.js in a subsequent course. At the end of this exercise, you will be able to: - Complete the set up of Node.js and NPM on your machine - Verify that the installation was successful and your machine is ready for using Node.js and NPM.Installing Node
- To install Node on your machine, go to [https://nodejs.org](https://nodejs.org/) and click on the Download button. Depending on your computer\'s platform (Windows, MacOS or Linux), the appropriate installation package is downloaded. - As an example, on a Mac, you will see the following web page. Click on the Download button. Follow along the instructions to install Node on your machine. (Note: Now Node gives you the option of installing a mature and dependable LTS version and a more newer stable version. You should to install the LTS version. I will use this version in the course.) Note: On Windows machines, you may need to configure your PATH environmental variable in case you forgot to turn on the add to PATH during the installation steps.Verifying the Node Installation
- Open a terminal window on your machine. If you are using a Windows machine, open a cmd window or PowerShell window with admin privileges. - To ensure that your NodeJS setup is working correctly, type the following at the command prompt to check for the version of Node and NPM
```
$ npm -v
```
Conclusions
At the end of this exercise, your machine is now ready with the Node installed for further development. We will examine web development tools next.Exercise (Instructions): Basics of Node.js and NPM
Objectives and Outcomes
In this exercise you will learn the basics of Node and NPM. At the end of this exercise, you will be able to: - Set up package.json file in the project folder for configuring your Node and NPM for this project - Install a NPM module and make use of it within your projectInitializing package.json
- At the command prompt in your git-test folder, type ``` $ npm init ``` - Follow along the prompts and answer the questions as follows: accept the default values for most of the entries, except set the entry point to index.html - This should create a package.json file in your git-test folder. Installing an NPM Module - Install an NPM module, lite-server, that allows you to run a Node.js based development web server and serve up your project files. To do this, type the following at the prompt: ``` $ npm install lite-server --save-dev ``` - You can check out more documentation on lite-server [here](https://github.com/johnpapa/lite-server). - Next, open package.json in your editor and modify it as shown below. Note the addition of two lines, line 7 and line 9. ``` "start": "npm run lite", "test": "echo "Error: no test specified" && exit 1", "lite": "lite-server" }, "repository": { "type": "git", "url": "git+[https://[email protected]/jogesh_k_muppala/git-test.git]{.underline}" }, "author": "", "license": "ISC", "homepage": "[https://bitbucket.org/jogesh_k_muppala/git-test#readme]{.underline}", "devDependencies": { "lite-server": "^2.2.2" } } ``` - Next, start the development server by typing the following at the prompt: ``` $ npm start ``` - This should open your index.html page in your default browser. - If you now open the index.html page in an editor and make changes and save, the browser should immediately refresh to reflect the changes.Setting up .gitignore
- Next, create a file in your project directory named .gitignore (Note: the name starts with a period)Then, add the following to the .gitignore file ``` $ node_modules ``` - Then do a git commit and push the changes to the online repository. You will note that the node_modules folder will not be added to the commit, and will not be uploaded to the repository.Conclusions
In this exercise you learnt to set up package.json, install a npm package and start a development server.Setting up your Development Environment: Git and Node: Additional Resources
PDFs of Presentations
Git.pdf PDF File Git-Exercises.pdf PDF File NodeJS.pdf PDF File Exercises-Node-NPM.pdf PDF FileAdditional Resources (Git)
- Git site [http://git-scm.com](http://git-scm.com/). - [Installing Git](https://git-scm.com/book/en/v2/Getting-Started-Installing-Git) chapter from Pro Git - [Git reference manual](https://git-scm.com/docs) - Quick reference guides: [GitHub Cheat Sheet](https://services.github.com/on-demand/downloads/github-git-cheat-sheet.pdf) (PDF) \| [Visual Git Cheat Sheet](http://ndpsoftware.com/git-cheatsheet.html) (SVG \| PNG) - [Atlassian comprehensive Git tutorial](https://www.atlassian.com/git/tutorials/)Additional Resources (Node.js and NPM)
- [Nodejs.org](https://nodejs.org/) - [Npmjs.com](https://www.npmjs.com/) - [Node API Documentation](https://nodejs.org/api/) - [NPM Documentation](https://docs.npmjs.com/) - [lite-server](https://github.com/johnpapa/lite-server)Introduction to React: Objectives and Outcomes
In this lesson you will be given a quick overview of JavaScript frameworks and libraries and then introduced to React in particular. We will learn some basics of React and how to configure a React application using the create-react-app the command line tool. At the end of this lesson, you will be able to: - Get a basic overview of JavaScript frameworks and libraries - Understand the architecture of an React application - Scaffold out a starter React application using create-react-app, the command line toolFront-end JavaScript Frameworks and Libraries Overview
Introduction to React
We ended the previous lecture with a question, is React a library or is it a framework and what exactly is React? Let\'s examine these questions in a bit more detail in this lecture. Let\'s start out with the very first question. What exactly is React and how is it different from the other frameworks or libraries that we have mentioned in the previous lecture? When you visit React website, you see it clearly specified right on the front page that React is a JavaScript library for building user interfaces. Now again, depending on who you ask some people tend to call React a library and others tend to call it a framework. Now, let\'s not bother ourselves too much in splitting our hairs over whether it is a framework, or a library but let\'s concentrate more on what it actually helps us accomplish. It is more important for us to understand that rather than worrying about whether it is a framework or a library. The React approach to implementing them applications is what we are after in this course. So, React also states that it uses a declarative approach. Now that leaves you in a confused state because we saw that frameworks generally tend to use the declarative approach. But in React, the declarative approach used by React as specified on its website says that, it makes it easy to create interactive UIs with simple views for each state within your application. And also React takes care of automatically updating the UI and then rendering any changes to their specific components as required on your page. You just heard me mentioning the term Component. React Indeed is a component based approach. In a Component based approach, we encapsulate behaviors into small units called Components. We will examine Components in more detail in the next lesson. There it will become more clear to you how, and why a component based approach is useful for implementing our Web applications in React. Furthermore, React makes no assumptions about the entire technology stack that you\'re going to use for implementing your Web applications. React plays well with any technology stack that you can use behind the seats. React itself concentrates only on the user interface side of the story, and that leaves it up to the application designer to decide how they want to implement the architecture and how they want your application to interact with the back-end server. So, as we go through this course, we will examine one approach that we use for implementing the entire technology stack which includes the Flux architecture approach, and in specifically the use of Redux for implementing a state based storage for our Web application and also the use of Fetch for interacting with our back-end server. Again, I\'ve mentioned a few terms like Flux, Redux, and Fetch. We will examine these towards the second half of this course. It\'s obviously useful to examine the history behind the React approach. So, to understand where React originated, and how it came about to the state it is today. React was first designed by Jordan Walke who was part of the Facebook team. It was first deployed for Facebook\'s news feed around 2011. Subsequently in 2013, React was open sourced at this JS conference. React took off as an approach for implementing Web applications from then onwards. React is designed for speed, speed of implementing the application, simplicity, and scalability. The three essence of React, and why it has become so popular in the real value. As we examine React more in this course, you\'ll become more and more familiar with why this approach is very suited for implementing Web applications. As you enter the React world you will be bombarded with a lot of vocabulary that is used in the React world. You will hear people talking about One-way data flow especially in the context of the Flux Architecture. You will often hear people mentioning about JSX, we will examine JSX in the very next lecture and understand what role it plays in developing a React application. We\'ll hear about Components which we will examine in the next lesson and also in the second module of this course in more detail and we\'ll here about the state and how a React Component interacts with the state of your application and the way you store the state of your application, or do you store the state in a specific component. We\'ll also hear about Props, a way of passing data between the various components. Also, we\'ll hear about Virtual Dom, and how is it different from Real DOM. Why React manipulate the Virtual DOM, and how the Virtual DOM eventually gets incorporated, or rendered onto the Real DOM. And Element, the React Element, which is the smallest unit of building up a React application. A component being a collection of React elements. Then we hear about the Flux and Redux architectures in a bit more detail. Again, as we go along this course we will examine these concepts and these terminology in more detail. Again, don\'t get overwhelmed with the vocabulary that you hear in the React world. If you learn step by step, you\'ll begin to pretty soon get a very good handle on all this vocabulary and you can easily go ahead and impress people by throwing these words at them, and trying to impress them or how much you know about React. So, this is the jargon that you will end up learning also at the end of this course. Enough of the jargon. Let\'s go ahead and get our hands dirty by starting to build a full fledged React application, which will form part of all the exercises as you go through the rest of this course. We will start with our first exercise where we\'ll install the create-react-app, which we will use to scaffold out our very first React application in the first exercise, and then we will start building upon this application throughout the remaining exercises of this course.Exercise (Video): Getting Started with React
Now that we have examined React briefly in the previous two lectures, I\'m sure you\'re curious about getting started with React, getting your hands dirty with starting out on a React application. So, in this exercise, we will look at how we will get started with React. I\'m sure by now your computer is already configured with Note and you have access to NPM, the package manager that comes with Note.Exercise (Instructions): Getting Started with React
Objectives and Outcomes
In this first React exercise, you will first install create-react-app, the command line tool for scaffolding React applications. You will then use the tool to scaffold out a basic React application. We will thereafter develop this application into a full-fledged React application in the process of doing the exercises in this course. At the end of this exercise you will be able to: - Install create-react-app - Scaffold out a basic React applicationInstalling Yarn
- Yarn is another package manager like NPM, but is better suited and faster to work with for React applications. So let us install yarn and use it for building our React applications. - To install Yarn, you can find the instructions for your specific platform atInstalling create-react-app
From the React documentation we learn that the create-react-app CLI makes it easy to create an application that already works, right out of the box. It already follows the best practices suggested by the React community! - To install create-react-app globally, type the following at the prompt: ``` $ yarn global add [email protected] ``` Use sudo on a Mac and Linux. Alternately you can use npm, by typing \"npm install -g [email protected]\". - This will make the command line tool for creating React applications. To learn more about the various commands that this CLI provides, type at the prompt: ``` $ create-react-app --help ```Generating and Serving a React Project using create-react-app
- At a convenient location on your computer, create a folder named React and move into that folder. - Then type the following at the prompt to create a new React application named confusion: ``` $ create-react-app confusion ``` - This should create a new folder named confusion within your React folder and create the React application in that folder. - Move to the confusion folder and type the following at the prompt: ``` $ yarn start ``` - This will compile the project and then open a tab in your default browser at the address <Your Computer\'s Name>:3000. - You can initialize your project to be a Git repository by typing the following commands at the prompt: ``` $ git commit -m "Initial Setup" $ git init $ git add . ``` - Thereafter you can set up an online Git repository and synchronize your project to the online repository. Make sure that the online Git repository is a private repository.Conclusions
In this exercise you installed the create-react-app CLI tool and created a basic React project and served up the compiled project to your browser.React App Overview
Introduction to JSX
Exercise (Video): Configuring your React Application
Exercise (Instructions): Configuring your React Application
Objectives and Outcomes
In this exercise we will set up our project to use Reactstrap (a package supporting easy to use React based Bootstrap 4 components). We will then introduce our first reactstrap component into our application. At the end of this exercise you will be able to: - Configure your React project to use reactstrap. - Start using reactstrap components in your application.Configure your React Project to use Reactstrap
- To configure your project to use reactstrap, type the following at the prompt to install reactstrap, and Bootstrap 4: ``` $ yarn add [email protected] $ yarn add [email protected] $ yarn add [email protected] ``` Note: You can also install the same using npm using the \"npm install <package> \--save\" option if you are using npm instead of yarn.Configure to use Bootstrap 4
- Next, open index.js file in the src folder and add the following line into the imports: ``` . . . import 'bootstrap/dist/css/bootstrap.min.css'; . . . ```Adding a Navigation Bar:
- Open App.js in the src folder and update it as follows: ``` class App extends Component { render() { return (Conclusions
In this exercise we learnt to configure our React application to use Reactstrap.Introduction to React: Additional Resources
PDFs of Presentations
1-JavaScript-Frameworks.pdf PDF File 2-Intro-React.pdf PDF File 3-React-App-Overview.pdf PDF File 4-Intro-JSX.pdf PDF FileReact Resources
- [Reactjs.org](https://reactjs.org/) - [create-react-app](https://github.com/facebook/create-react-app) - [reactstrap](https://reactstrap.github.io/) - [reactstrap Navbar](https://reactstrap.github.io/components/navbar/) - [Introducing JSX](https://reactjs.org/docs/introducing-jsx.html) - [Convert JSX using Online Babel Compiler](https://babeljs.io/repl/#?presets=react&code_lz=GYVwdgxgLglg9mABACwKYBt1wBQEpEDeAUIogE6pQhlIA8AJjAG4B8AEhlogO5xnr0AhLQD0jVgG4iAXyJA)Definitions
- [Framework](https://en.wikipedia.org/wiki/Software_framework) - [Hollywood Principle](https://en.wikipedia.org/wiki/Hollywood_principle) - [Inversion of Control](https://en.wikipedia.org/wiki/Inversion_of_control) - [Imperative vs Declarative Programming](https://netguru.co/blog/imperative-vs-declarative) - [Imperative vs Declarative](http://latentflip.com/imperative-vs-declarative)Blog Articles
- [5 Best JavaScript Frameworks in 2017](https://hackernoon.com/5-best-javascript-frameworks-in-2017-7a63b3870282#.tt1k09l1d) - [Top JavaScript Frameworks & Topics to Learn in 2017](https://medium.com/javascript-scene/top-javascript-frameworks-topics-to-learn-in-2017-700a397b711#.pe809bf0u) - [Declarative vs. Imperative Programming for the Web](http://codenugget.co/2015/03/05/declarative-vs-imperative-programming-web.html) - [Is React library or a framework?](https://develoger.com/is-reactjs-library-or-a-framework-a14786f681a0) - [Is React a library or a framework and why?](https://www.quora.com/Is-React-a-library-or-a-framework-and-why) - [An Introduction to the React Framework](https://www.upwork.com/hiring/development/an-introduction-to-the-react-framework/) - [React is a framework](https://www.sohamkamani.com/blog/2016/11/16/react-is-a-framework/) - [Why isn\'t React called framework? What does it lack to be a framework?](https://hashnode.com/post/why-isnt-react-called-framework-what-does-it-lack-to-be-a-framework-ciwm324og010xzx53wjfq354i)React Components: Objectives and Outcomes
In this lesson you will learn about React components and how we construct an React component and design its views. At the end of this lesson you will be able to: - Create a React component - Construct the React component code and the view for your component using JSX and JavaScriptReact Components
Exercise (Video): React Components Part 1
Exercise (Instructions): React Components Part 1
Exercise Resources
images ZIP FileObjectives and Outcomes
In this exercise you will add the first component to your React application and update its view using JSX. At the end of this exercise you will be able to: - Add components to your React application - Use JSX to define the views of your component.Adding a Menu Component
- First, download the images.zip file provided above and then unzip the file. Create a folder named assets in the public folder. Move the resulting images folder containing some PNG files to the React project\'s public/assets folder. These image files will be useful for our exercises. - Next, add a new folder named components in the src folder, and create a new file named MenuComponent.js in this folder. - Add the following code to MenuComponent.js: ``` this.state = { dishes: [ { id: 0, name:'Uthappizza', image: 'assets/images/uthappizza.png', category: 'mains', label:'Hot', price:'4.99', description:'A unique combination of Indian Uthappam (pancake) and Italian pizza, topped with Cerignola olives, ripe vine cherry tomatoes, Vidalia onion, Guntur chillies and Buffalo Paneer.' > }, { id: 1, name:'Zucchipakoda', image: 'assets/images/zucchipakoda.png', category: 'appetizer', label:'', price:'1.99', description:'Deep fried Zucchini coated with mildly spiced Chickpea flour batter accompanied with a sweet-tangy tamarind sauce' }, { id: 2, name:'Vadonut', image: 'assets/images/vadonut.png', category: 'appetizer', label:'New', price:'1.99', description:'A quintessential ConFusion experience, is it a vada or is it a donut?' }, { id: 3, name:'ElaiCheese Cake', image: 'assets/images/elaicheesecake.png', category: 'dessert', label:'', price:'2.99', description:'A delectable, semi-sweet New York Style Cheese Cake, with Graham cracker crust and spiced with Indian cardamoms' } class Menu extends Component { constructor(props) { super(props); import React, { Component } from 'react'; import { Media } from 'reactstrap'; ``` - Next, open App.js file and update it as follows: ``` . . . import Menu from './components/MenuComponent'; . . .Conclusions
In this exercise we added a new component to our React application, added data to its class, and then updated the app to show the information in the web page.React Components: State and Props
Exercise (Video): React Components Part 2
Exercise (Instructions): React Components Part 2
Objectives and Outcomes
In this exercise we will continue modifying the menu component from the previous exercise. Instead of a list, we will use a Card component from reactstrap to display the menu in a different way. Also we will use the Card component to display the details of a selected dish. At the end of this exercise you will be able to: - Make use of the Card component to display a list of items. - Use the Card component to display detailed information.Exercise Resources
dishes JS FileUpdating the Menu Component
- Open MenuComponent.js and update its contents as follows. Note that we have removed the dishes variable from the state of the component, and updated it to use the Card: ``` > constructor(props) { > super(props); > this.state = { > selectedDish: null > } > } > onDishSelect(dish) { > this.setState({ selectedDish: dish}); > } > renderDish(dish) { > if (dish != null) > return( >React Components: Lifecycle Methods Part 1
React Components: Additional Resources
PDFs of Presentations
5-Component-Part1.pdf PDF File 6-Component-Part2.pdf PDF File 7-Lifecycle-Methods.pdf PDF FileReact Resources
- [React Components](https://reactjs.org/docs/components-and-props.html) - [React Component State](https://reactjs.org/docs/state-and-lifecycle.html) - [React Component Props](https://reactjs.org/docs/components-and-props.html) - [reactstrap Media Object](https://reactstrap.github.io/components/media/) - [React.Component and Lifecycle Methods](https://reactjs.org/docs/react-component.html) - [reactstrap Card](https://reactstrap.github.io/components/card/) - [Bootstrap unstyled list](http://getbootstrap.com/docs/4.0/content/typography/#unstyled) - [React Dev Tools](https://github.com/facebook/react-devtools) - [React Dev Tools Chrome Extension](https://chrome.google.com/webstore/detail/react-developer-tools/fmkadmapgofadopljbjfkapdkoienihi)Assignment 1 Requirements (Video): React Components
Peer-graded Assignment: React Components
DeadlineOct 23, 11:59 PM PDT It looks like this is your first peer-graded assignment. [Learn more](https://learner.coursera.help/hc/articles/208279926-Submit-peer-reviewed-assignments) Ready for the assignment? You will find instructions below to submit. In this assignment you will add a new component to the React application to show the details of a selected dish. You will use the Card component and the Bootstrap unstyled list component to prepare the view for this new component.Step-By-Step Assignment Instructions
less Objectives and Outcomes In this assignment, you will continue to work with the React application that you have been developing in the exercises. You will add a new component named DishdetailComponent that will display the details of a selected dish. You will then design the view for the component using the card component. At the end of this assignment, you should have completed the following tasks: - Created a new DishdetailComponent and added it to your React application. - Updated the view of the DishdetailComponent to display the details of the selected dish using an reactstrap card component. - Updated the view of the DishdetailComponent to display the list of comments about the dish using the Bootstrap unstyled list component. Assignment Requirements This assignment requires you to complete the following tasks. Detailed instructions for each task are given below. The picture of the completed web page included below indicates the location within the web page that will be updated by the three tasks. Task 1 In this task you will be adding a new DishdetailComponent to your React application and include the component into the menu component\'s view so that the details of a specific dish are displayed there: - Replace the card showing the selected dish in MenuComponent\'s view with the DishdetailComponent, and make sure to pass the selected dish information as props to the DishdetailComponent. - Create a new DishDetail class in a file named DishdetailComponent.js in the components folder - Export the DishDetail class from this file so that it can be imported in MenuComponent.js and used to construct the view of the selected dish. - Return a <div> from the render() function. This <div> should use the Bootstrap row class to position the content within the <div>. This div will display both the details of the dish in a Card and the list of comments side-by-side for medium to extra large screens, but will stack them for xs and sm screens. - The card should be enclosed inside a <div> appropriate Bootstrap column classes so that it occupies the entire 12 columns for the xs and sm screen sizes, and 5 columns for md screens and above. Also apply a class of m-1 to this div. - The comments should be enclosed in a <div> to which you apply appropriate column classes so that it occupies the entire 12 columns for the xs and sm screen sizes, and 5 columns for md screens and above. Also apply a class of m-1 to this div. - If the dish is null then you should return an empty <div> Task 2 In this task you will be adding a card component to the DishdetailComponent view to display the details of the dish given above: - Implement a function named renderDish() that takes the dish as a parameter and returns the JSX code for laying out the details of the dish in a reactstrap Card. You have already seen this as part of the MenuComponent class in the exercise earlier. - Display the name of the dish as the Card title, and the description as the Card text. Task 3 In this task you will use the comments that are included in the dish object above to display a list of the comments for the dish. Please use your JavaScript knowledge to recall how you would access an inner property in a JavaScript object that itself points to an array of JavaScript objects (comments). This task involves the following steps: - Implement a function named renderComments() that takes the comments array as a parameter and lays out each comment as shown in the image below. You should use the Bootstrap list-unstyled class on the list. - Each comment should be displayed on two lines, the first one showing the comment, and the second line showing the comment author\'s name and the date. - The comments should contain a <h4> header with the word \"Comments\". - Remember to enclose the header and comments inside a <div> before returning the JSX code. Otherwise React will not do the layout correctly. - If the comments are null, then you should return an empty <div>.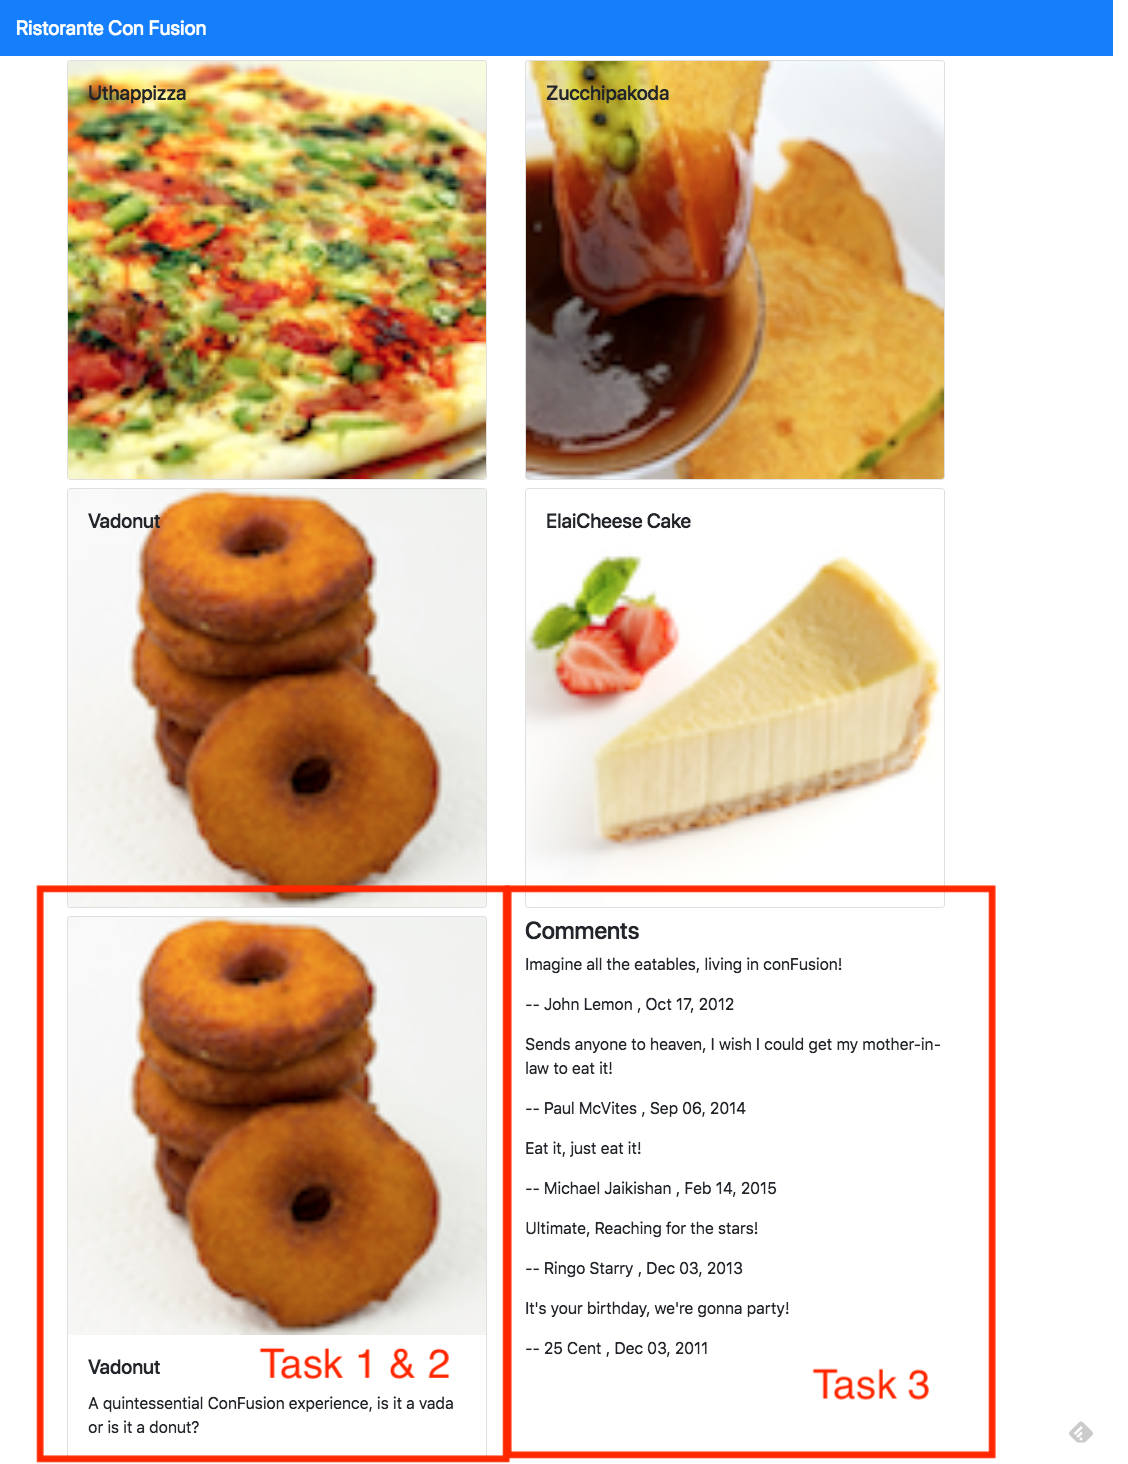

Review criteria
less Upon completion of the assignment, your submission will be reviewed based on the following criteria: Task 1: - A new DishdetailComponent has been added to your React > application. - Included the DishDetail into your MenuComponent\'s view to show the > selected dish. - Passing the selected dish as props to the DishDetail Component. - Used the appropriate Bootstrap classes to the card so that it > occupies the entire row for xs and sm screen sizes, and 5 columns > for md screens and above. - Used the appropriate Bootstrap classes to the div containing the > list of comments so that it occupies the entire row for xs and sm > screen sizes, and 5 columns for md screens and above. Task 2: - Used the Card component to display the details of the dish. Task 3: - Included a list of comments about the dish into the dishdetail view.Assignment 1: React Components: Additional Resources
Assignment 1 Screenshots
React Resources
- [React Components](https://reactjs.org/docs/components-and-props.html) - [React Component State](https://reactjs.org/docs/state-and-lifecycle.html) - [React Component Props](https://reactjs.org/docs/components-and-props.html) - [reactstrap Media Object](https://reactstrap.github.io/components/media/) - [reactstrap Card](https://reactstrap.github.io/components/card/) - [Bootstrap unstyled list](http://getbootstrap.com/docs/4.0/content/typography/#unstyled) - [Bootstrap Grid](http://getbootstrap.com/docs/4.0/layout/grid/)Module 5: Ideation: Objectives and Outcomes
The first step in your journey towards the implementation of the Capstone project begins with an idea. In this module you will develop the idea for your project, the set of expected features, survey the market to look at similar ideas to enable you to differentiate your project from others, while at the same time drawing inspiration from them. You are required to submit a formal ideation report following the structure given in the template. This will enable your peers to provide you feedback and suggestions for your project. Before you get started on a project, the first step is to develop the idea for the project. In this module you will explore how you develop your idea and come up with possible set of features for your project. At the end of this step you should be able to: - Clearly express the central idea of your project, and identify the problem being addressed - Delineate a set of features that you expect your website and app should support - Identify other projects that might have similar features and would act as exemplars for your projectIdeation Report Template
Project Title
1. Introduction
- A brief introduction to your website idea. State the goals of the project. - The values / benefits (tangible and intangible) this application can bring to a company/organization/end-user.2. Expected List of Features
- A brief list of features that you expect your website to support. - Brief justifications for including these features.3. Market Survey
- Do a survey of the Web to find about five web sites that might have similar ideas as yours. - Briefly compare the features of these applications with your application idea.4. References
- Give references to any material / websites / books etc. relevant to your application idea - Give the links to the websites relevant to your idea, that you listed in the section above.Honors Peer-graded Assignment: Ideation
DeadlineOct 23, 11:59 PM PDT Ready for the assignment? You will find instructions below to submit. In this assignment you will be submitting a written report describing the general idea of your project, the expected list of features and a survey of existing projects, websites and/or apps that are similar to your ideas and/or have some features similar to your proposed project. The structure of the written report should adhere to the report template given in this module, and emphasize the points specified in the template. The written submission needs to be no more than three standard Letter/A4 sized pages.Review criteria
less Your submission will be reviewed based on the following criteria by peers in order to provide you with constructive feedback on your project idea: 1. Does the Ideation report clearly state the idea of the project and > the primary aim and purpose of the proposed website ? 2. Does the Ideation report list the expected features that will be > supported by the website? 3. Did the user provide a survey of related ideas/projects/websites > that have some similarities to the proposed idea? 4. Does the Ideation report provide references to suitable sources in > support of the project idea?Ideation: Additional Resources
General Resources
- [Ideation (creative process)](https://en.wikipedia.org/wiki/Ideation_(creative_process))Volunteer your Services
- [VolunteerMatch.org](http://www.volunteermatch.org/) - [Free Code Camp](https://www.freecodecamp.com/)Module 6: React Component Types: Objectives and Outcomes
In this lesson you will learn about various types of React components: Presentational, Container and Functional components. At the end of this lesson you will be able to: - Identify the salient features and uses for the various types of components - Create presentational, container and functional components in your React applicationPresentational and Container Components
NotesExercise (Video): Presentational and Container Components
Exercise (Instructions): Presentational and Container Components
Objectives and Outcomes
In this exercise we understand about how presentational components deal with the look and feel of the app and container components deal with the data and behavior. At the end of this exercise you will learn about: - Organizing your React app into presentational and container components - Enable your presentational components to be concerned with the look and feel of your app - Enable container components to deal with the state, provide the data and handle user interactions.Add a Container Component
- Add a new component named MainComponent.js in the components folder and update its contents as follows: ``` > import React, { Component } from 'react'; > import { Navbar, NavbarBrand } from 'reactstrap'; > import Menu from './MenuComponent'; > import DishDetail from './DishdetailComponent'; > import { DISHES } from '../shared/dishes'; > > class Main extends Component { > > constructor(props) { > super(props); > this.state = { > dishes: DISHES, > selectedDish: null > }; > } > > onDishSelect(dishId) { > this.setState({ selectedDish: dishId}); > } > > render() { > return ( >Turn Menu Component into a Presentational Component
- Open MenuComponent.js and update its contents by removing the state and removing the DishdetailComponent reference, and make use of the onClick supplied by MainComponent through the props to deal with the clicking of a menu item: ``` > . . . >Conclusions
In this exercise you learnt how to structure your app into presentational and container components.React Components: Lifecycle Methods Part 2
Functional Components
Exercise (Video): Functional Components
Exercise (Instructions): Functional Components
Objectives and Outcomes
In this lesson we explore the design of functional components in React. We will reimplement both the MenuComponent and DishdetailComponent as pure functional components. At the end of this exercise you will be able to: - Implement functional components in React - Illustrate the reimplementation of presentational components as pure functional componentsImplementing Functional Components
- Open MenuComponent.js and update it as follows: ``` > import React from 'react'; > import { Card, CardImg, CardImgOverlay, > CardTitle } from 'reactstrap'; > > function RenderMenuItem ({dish, onClick}) { > return ( >Conclusions
In this exercise we have learnt to implement our components as pure functional components.React Component Types: Additional Resources
PDFs of Presentations
1-Component-Types-Part1.pdf PDF File 2-Component-Types-Part2.pdf PDF File Other Resources - [Presentational and Container Components](https://medium.com/@dan_abramov/smart-and-dumb-components-7ca2f9a7c7d0) - [Presentational and Container Components (Redux Perspective)](https://redux.js.org/basics/usage-with-react) - [React Component Patterns](https://levelup.gitconnected.com/react-component-patterns-ab1f09be2c82) - [Functional Stateless Components in React](https://javascriptplayground.com/functional-stateless-components-react/)Module 8: React Router: Objectives and Outcomes
In this lesson we cover the basics of React router. We examine how the router enables the navigation among views of various components that form part of a React application. At the end of this lesson you will be able to: - Set up the router module to enable navigation among multiple component views - Set up the routes to enable the navigationReact Virtual DOM
Exercise (Video): Header and Footer
Exercise (Instructions): Header and Footer
Objectives and Outcomes
In this exercise you will add in a header and a footer to our React application using two React components. This will illustrate the use of multiple components put together form the application\'s view. You will also add in the Font Awesome icons and Bootstrap-social for use within your application. At the end of this exercise you will be able to: - Use multiple components and their views to put together the view of the application. - Make use of Font Awesome icons and Bootstrap-social within your React applicationUsing Font Awesome Icons and Bootstrap-Social
- First use yarn or npm to fetch Font Awesome and Bootstrap-social to the project by typing the following at the prompt: ``` > yarn add [email protected] > yarn add [email protected] ``` - Then, open index.js file and update it as follows to enable your application to use Font Awesome and Bootstrap Social: ``` > . . . > > import 'font-awesome/css/font-awesome.css'; > import 'bootstrap-social/bootstrap-social.css'; > > . . . ```Adding a Header and a Footer
- Create a new file named HeaderComponent.js and add the following to it: ``` > import React, { Component } from 'react'; > import { Navbar, NavbarBrand, Jumbotron } from 'reactstrap'; > > class Header extends Component { > render() { > return( >Ristorante con Fusion
>We take inspiration from the World's best cuisines, and create a unique fusion experience. Our lipsmacking creations will tickle your culinary senses!
> > > >Links
>Our Address
> > 121, Clear Water Bay RoadIntegrating Header and Footer into the React Application
- Now we open MainComponent.js and update it to integrate the header and footer into our application: ``` > . . . > > > > import Header from './HeaderComponent'; > > import Footer from './FooterComponent'; > > > > . . . > > > >Conclusions
In this exercise we updated the React application to use Font Awesome and Bootstrap Social, and also integrated two new components, Header and Footer, into our application.React Router
Exercise (Video): React Router
Exercise (Instructions): React Router
Objectives and Outcomes
In this exercise we learn to use the React Router to configure and set
up navigation among various pages in a React application. At the end of
this exercise you will be able to:
- Install and configure your application to use React Router
- Configure the routes for React router to enable you to navigate to
various pages within your React application
Installing and Configuring React Router
- First install React Router into your project by typing the following
at the prompt:
> yarn add [email protected]
- Then, open App.js and update it as follows:
```
> . . .
>
>
>
> import { BrowserRouter } from 'react-router-dom';
>
>
>
> . . .
>
>
>
>
>
>
>
>
>
>
>
> . . .
```
Add a Home Component
- Create a new file named HomeComponent.js in the components folder
and add the following to it:
```
> import React from 'react';
>
>
>
> function Home(props) {
>
> return(
>
>
>
> Home
>
>
>
> );
>
> }
>
>
>
> export default Home;
```
Configuring the Router
- Open MainComponent.js file and update it as follows:
```
> . . .
>
> import Home from './HomeComponent';
>
> . . .
>
> import { Switch, Route, Redirect } from 'react-router-dom';
>
> . . .
>
> render() {
>
> const HomePage = () => {
> return(
> />
> );
> }
>
> . . .
>
>
>
>
> . . .
>
>
```
- Open HeaderComponent.js and update its contents with the
following:
```
> import { Nav, Navbar, NavbarBrand, NavbarToggler, Collapse, NavItem, Jumbotron } from 'reactstrap';
>
> import { NavLink } from 'react-router-dom';
>
>
>
> class Header extends Component {
>
> constructor(props) {
>
> super(props);
>
>
>
> this.toggleNav = this.toggleNav.bind(this);
>
> this.state = {
>
> isNavOpen: false
>
> };
>
> }
>
>
>
> toggleNav() {
>
> this.setState({
>
> isNavOpen: !this.state.isNavOpen
>
> });
>
> }
>
>
>
> render() {
>
> return(
>
>
>
>
>
>
>
>
>
>
>
>
>
> Home
>
>
>
>
>
> About Us
>
>
>
>
>
> Menu
>
>
>
>
>
> Contact Us
>
>
```
- Then, open FooterComponent.js and update it as follows:
```
> . . .
>
>
>
> import { Link } from 'react-router-dom';
>
>
>
> . . .
>
>
>
> Home About Us Menu Contact Us Conclusions
In this exercise you learn about installing, configuring and using the
React Router for navigation within your React app.
React Router: Additional Resources
PDFs of Presentations
3-VirtualDOM.pdf
PDF File
4-React-Router.pdf
PDF File
React Resources
- [react-router](https://github.com/ReactTraining/react-router)
- [react-router-dom](https://github.com/ReactTraining/react-router/tree/master/packages/react-router-dom)
- [React Router
Documentation](https://reacttraining.com/react-router/)
- [React Router Dom
Documentation](https://reacttraining.com/react-router/web/guides/philosophy)
Other Resources
- [React Router DOM: set-up, essential components, & parameterized
routes](https://blog.logrocket.com/react-router-dom-set-up-essential-components-parameterized-routes-505dc93642f1)
- [Basic intro to React Router
v4](https://medium.com/@thejasonfile/basic-intro-to-react-router-v4-a08ae1ba5c42)
- [A Simple React Router v4
Tutorial](https://medium.com/@pshrmn/a-simple-react-router-v4-tutorial-7f23ff27adf)
Module 09: Single Page Applications: Objectives and Outcomes
In this lesson you will explore single page applications (SPA) and React
support for SPA. You will learn to use the routes and React router that
enables the development of SPAs. At the end of this lesson, you will be
able to:
- Design SPA using React
- Use the React router to construct SPA
Single Page Applications (video)
Exercise (Video): Single Page Applications Part 1
Exercise (Instructions): Single Page Applications Part 1
Objectives and Outcomes
In this exercise you will continue to develop the React application as a
single page application, integrating the various components. At the end
of this exercise you will be able to:
- Leverage the React router to enable the development of single page
applications
- Provide a way of navigating among various pages using the React
router support.
Exercise Resources
dishes
JS File
promotions
JS File
leaders
JS File
comments
JS File
Integrating the Contact Component
- Add a new file named ContactComponent.js file and update its
contents as follows:
```
> import React from 'react';
>
> function Contact(props) {
> return(
>
>
>
> Location Information
>
>
> Our Address
>
> 121, Clear Water Bay Road: +852 1234 5678: +852 8765 4321: [email protected]
>
>
>
>
> Map of our Location
>
>
>
>
> Call
>
> Skype
>
> Email
>
>
>
>
>
> );
> }
>
> export default Contact;
```
- Update the MainComponent.js file to integrate the ContactComponent
by adding in the following:
```
> . . .
>
>
>
> import Contact from './ContactComponent';
>
>
>
> . . .
>
>
>
> } />
>
>
```
Updating the Home Component
- First update dishes.js file in the shared folder to update the
dishes as follows. (NOTE: Alternately you can download
dishes.js, comments.js, promotions.js and leaders.js given above
in Exercise resources and move them to the shared folder):
```
> export const DISHES =
> [
> {
> id: 0,
> name:'Uthappizza',
> image: '/assets/images/uthappizza.png',
> category: 'mains',
> label:'Hot',
> price:'4.99',
> featured: true,
>
> description:'A unique combination of Indian Uthappam (pancake) and Italian pizza, topped with Cerignola olives, ripe vine cherry tomatoes, Vidalia onion, Guntur chillies and Buffalo Paneer.'
> },
> {
> id: 1,
> name:'Zucchipakoda',
> image: '/assets/images/zucchipakoda.png',
> category: 'appetizer',
> label:'',
> price:'1.99',
> featured: false,
>description:'Deep fried Zucchini coated with mildly spiced Chickpea flour batter accompanied with a sweet-tangy tamarind sauce'
>
> },
> {
> id: 2,
> name:'Vadonut',
> image: '/assets/images/vadonut.png',
> category: 'appetizer',
> label:'New',
> price:'1.99',
> featured: false,
> description:'A quintessential ConFusion experience, is it a vada or is it a donut?'
> },
> {
> id: 3,
> name:'ElaiCheese Cake',
> image: '/assets/images/elaicheesecake.png',
> category: 'dessert',
> label:'',
> price:'2.99',
> featured: false,
```
- Now add a new file named comments.js to the shared folder and
update it as follows. We are now moving the comments about the
dishes into its own file:
```
> export const COMMENTS =
>
> [
>
> {
>
> id: 0,
>
> dishId: 0,
>
> rating: 5,
>
> comment: "Imagine all the eatables, living in conFusion!",
>
> author: "John Lemon",
>
> date: "2012-10-16T17:57:28.556094Z"
>
> },
>
> {
>
> id: 1,
>
> dishId: 0,
>
> rating: 4,
>
> comment: "Sends anyone to heaven, I wish I could get my mother-in-law to eat it!",
>
> author: "Paul McVites",
>
> date: "2014-09-05T17:57:28.556094Z"
>
> },
>
> {
>
> id: 2,
>
> dishId: 0,
>
> rating: 3,
>
> comment: "Eat it, just eat it!",
>
> author: "Michael Jaikishan",
>
> date: "2015-02-13T17:57:28.556094Z"
>
> },
>
> {
>
> id: 3,
>
> dishId: 0,
>
> rating: 4,
>
> comment: "Ultimate, Reaching for the stars!",
>
> author: "Ringo Starry",
>
> date: "2013-12-02T17:57:28.556094Z"
>
> },
>
> {
>
> id: 4,
>
> dishId: 0,
>
> rating: 2,
>
> comment: "It's your birthday, we're gonna party!",
>
> author: "25 Cent",
- Next add a new file named promotions.js file to the shared folder
and update its contents as follows:
> export const PROMOTIONS = [
>
> {
>
> id: 0,
>
> name: 'Weekend Grand Buffet',
>
> image: '/assets/images/buffet.png',
>
> label: 'New',
>
> price: '19.99',
>
> featured: true,
>
> description: 'Featuring mouthwatering combinations with a choice of five different salads, six enticing appetizers, six main entrees and five choicest desserts. Free flowing bubbly and soft drinks. All for just $19.99 per person'
>
> }
>
> ];
- Next add a new file named leaders.js file to the shared folder and
update its contents as follows:
> export const LEADERS = [
>
> {
>
> id: 0,
>
> name: 'Peter Pan',
>
> image: '/assets/images/alberto.png',
>
> designation: 'Chief Epicurious Officer',
>
> abbr: 'CEO',
>
> featured: false,
>
> description: "Our CEO, Peter, credits his hardworking East Asian immigrant parents who undertook the arduous journey to the shores of America with the intention of giving their children the best future. His mother's wizardy in the kitchen whipping up the tastiest dishes with whatever is available inexpensively at the supermarket, was his first inspiration to create the fusion cuisines for which The Frying Pan became well known. He brings his zeal for fusion cuisines to this restaurant, pioneering cross-cultural culinary connections."
>
> },
>
> {
>
> id: 1,
>
> name: 'Dhanasekaran Witherspoon',
>
> image: '/assets/images/alberto.png',
>
> designation: 'Chief Food Officer',
>
> abbr: 'CFO',
>
> featured: false,
>
> description: 'Our CFO, Danny, as he is affectionately referred to by his colleagues, comes from a long established family tradition in farming and produce. His experiences growing up on a farm in the Australian outback gave him great appreciation for varieties of food sources. As he puts it in his own words, Everything that runs, wins, and everything that stays, pays!'
>
> },
>
> {
>
> id: 2,
>
> name: 'Agumbe Tang',
>
> image: '/assets/images/alberto.png',
>
> designation: 'Chief Taste Officer',
>
> abbr: 'CTO',
>
> featured: false,
>
> description: 'Blessed with the most discerning gustatory sense, Agumbe, our CFO, personally ensures that every dish that we serve meets his exacting tastes. Our chefs dread the tongue lashing that ensues if their dish does not meet his exacting standards. He lives by his motto, You click only if you survive my lick.'
>
> },
>
> {
>
> id: 3,
>
> name: 'Alberto Somayya',
>
> image: '/assets/images/alberto.png',
>
> designation: 'Executive Chef',
>
> abbr: 'EC',
>
> featured: true,
>
> description: 'Award winning three-star Michelin chef with wide International experience having worked closely with whos-who in the culinary world, he specializes in creating mouthwatering Indo-Italian fusion experiences. He says, Put together the cuisines from the two craziest cultures, and you get a winning hit! Amma Mia!'
>
> }
>
> ];
- Now update the HomeComponent.ts file to fetch and display the
featured dish, promotion and leader as follows:
```
> import React from 'react';
> import { Card, CardImg, CardText, CardBody,
> CardTitle, CardSubtitle} from 'reactstrap';
> function RenderCard({item}) {
> return(
>
>
> {item.name}
> {item.designation ? {item.designation} : null }
> {item.description}
>
>
> );
> }
> function Home(props) {
> return(
>
>
>
>
>
> dish={this.state.dishes.filter((dish) => dish.featured)[0]}
> promotion={this.state.promotions.filter((promo) => promo.featured)[0]}
> leader={this.state.leaders.filter((leader) => leader.featured)[0]}
> />
> );
> }
> . . .
```
- Save all the changes and do a Git commit with the message \"Single
Page Applications Part 1\".
Conclusions
In this exercise you developed the Angular application further by
integrating the components into a single page application.
Module 7: React Router: Parameters
Exercise (Video): Single Page Applications Part 2
Exercise (Instructions): Single Page Applications Part 2
Objectives and Outcomes
In this exercise you will integrate the DishdetailComponent into your
single page application. You will use a route parameter in the URL to
pass in the details of the selected dish to the DishdetailComponent. At
the end of this exercise you will be able to:
- Configure the routes in your React router configuration to enable
the use of route parameters within the URL to pass information to a
component.
Updating to Use Parameters on Routes
- Open MenuComponent.js and add the following changes to it to
enable the information about the selected dish to be passed to the
DishdetailComponent:
```
. . .
>
> import { Card, CardImg, CardImgOverlay,
> CardTitle, Breadcrumb, BreadcrumbItem } from 'reactstrap';
> import { Link } from 'react-router-dom';
>
> function RenderMenuItem ({dish, onClick}) {
> return (
>
>
>
> {dish.name}
>
>
>
> );
> }
> . . .
> return (
>
>
>
> Home Menu
>
>
> Menu
>
> {menu}
>
>
> );
> . . .
```
- Open MainComponent.js and update it as follows:
```
> . . .
> const DishWithId = ({match}) => {
> return(
> dish.id === parseInt(match.params.dishId,10))[0]}
> comments={this.state.comments.filter((comment) => comment.dishId === parseInt(match.params.dishId,10))} />
> );
> };
> . . .
>
> . . .
```
Updating DishDetail Component
- Open DishdetailComponent.js and update it as follows:
```
> . . .
> import { Card, CardImg, CardText, CardBody,
> CardTitle, Breadcrumb, BreadcrumbItem } from 'reactstrap';
> import { Link } from 'react-router-dom';
> . . .
> return (
>
>
>
> Menu {props.dish.name}
>
>
> {props.dish.name}
>
Adding Breadcrumbs to ContactComponent
- Open ContactComponent.js and add Breadcrumbs to it as follows:
```
. . .
import { Breadcrumb, BreadcrumbItem } from 'reactstrap';
import { Link } from 'react-router-dom';
. . .
Home Contact Us
Contact Us
- Save all the changes and do a Git commit with the message \"Single
Page Applications Part 2\".
Conclusions
In this exercise you have seen the use of parameters within the URL to
pass information to another component.
Single Page Applications: Additional Resources
PDFs of Presentations
5-Single-Page-Apps.pdf
PDF File
6-React-Router-Parameters.pdf
PDF File
React Resources
- [react-router](https://github.com/ReactTraining/react-router)
- [react-router-dom](https://github.com/ReactTraining/react-router/tree/master/packages/react-router-dom)
- [React Router
Documentation](https://reacttraining.com/react-router/)
- [React Router Dom
Documentation](https://reacttraining.com/react-router/web/guides/philosophy)
Other Resources
- [Arrow
Functions](https://developer.mozilla.org/en-US/docs/Web/JavaScript/Reference/Functions/Arrow_functions)
- [Single Page Applications
(Wikipedia)](https://en.wikipedia.org/wiki/Single-page_application)
- [Deep linking](https://en.wikipedia.org/wiki/Deep_linking)
- [Single Page Apps in depth](http://singlepageappbook.com/)
- [SPA and the Single Page Myth](http://www.johnpapa.net/pageinspa/)
Assignment 2: React Router and Single Page Applications
Peer-graded Assignment: React Router and Single Page Applications
DeadlineOct 30, 11:59 PM PDT
Ready for the assignment?
You will find instructions below to submit.
1. [Instructions](https://www.coursera.org/learn/front-end-react/peer/ptyN7/react-router-and-single-page-applications)
2. [My
submission](https://www.coursera.org/learn/front-end-react/peer/ptyN7/react-router-and-single-page-applications/submit)
3. [Discussions](https://www.coursera.org/learn/front-end-react/peer/ptyN7/react-router-and-single-page-applications/discussions)
In this assignment you will continue working with the React application
by adding a new component named AboutComponent to serve up the details
of the corporate leaders, and you will then integrate the AboutComponent
into the single page application.
Step-By-Step Assignment Instructions
less
Assignment Resources
AboutComponent
JS File
Objectives and Outcomes
At the end of this assignment, you should have completed the following
tasks:
- Integrated the AboutComponent given above into the single page
application.
- Added a new functional component named <RenderLeader> through the
RenderLeader() function to AboutComponent.js that renders the
details of a given leader using the reactstrap <Media>
component.
- Construct and render the list of leaders in the About Us page using
the <RenderLeader> component implemented above.
Assignment Requirements
This assignment requires you to complete the following tasks. Detailed
instructions for each task are given below. The picture of the completed
web page included below indicates the location within the web page that
will be updated by the three tasks.
Task 1
In this task you will be integrating the AboutComponent into the single
page application:
- First, download the AboutComponent.js given above and move it to
the components folder, and
- Update the MainComponent.js file to integrate the AboutComponent
into the single page application. You should be able to navigate
to the AboutComponent by clicking the links in the navigation bar
and the footer.
Task 2
In this task you will implement a new functional component named
<RenderLeader> through the RenderLeader() function:
- The RenderLeader() function receives the details of a leader as its parameter,
- Implement RenderLeader() function to use the Leader information received as a parameter
and render the leader information as shown in the screenshot below using the reactstrap
<Media> component. Recall how we used the <Media> component in the first
module to render the details of a dish in the MenuComponent.
- This will make available the <RenderLeader> component for use within your AboutComponent.
Task 3
In this task you will use the <RenderLeader> component created in the
previous task to render a list of leaders within your AboutComponent:
- Update the leaders variable within the AboutComponent() function to make use of the
<RenderLeader> component to render the list of leaders.
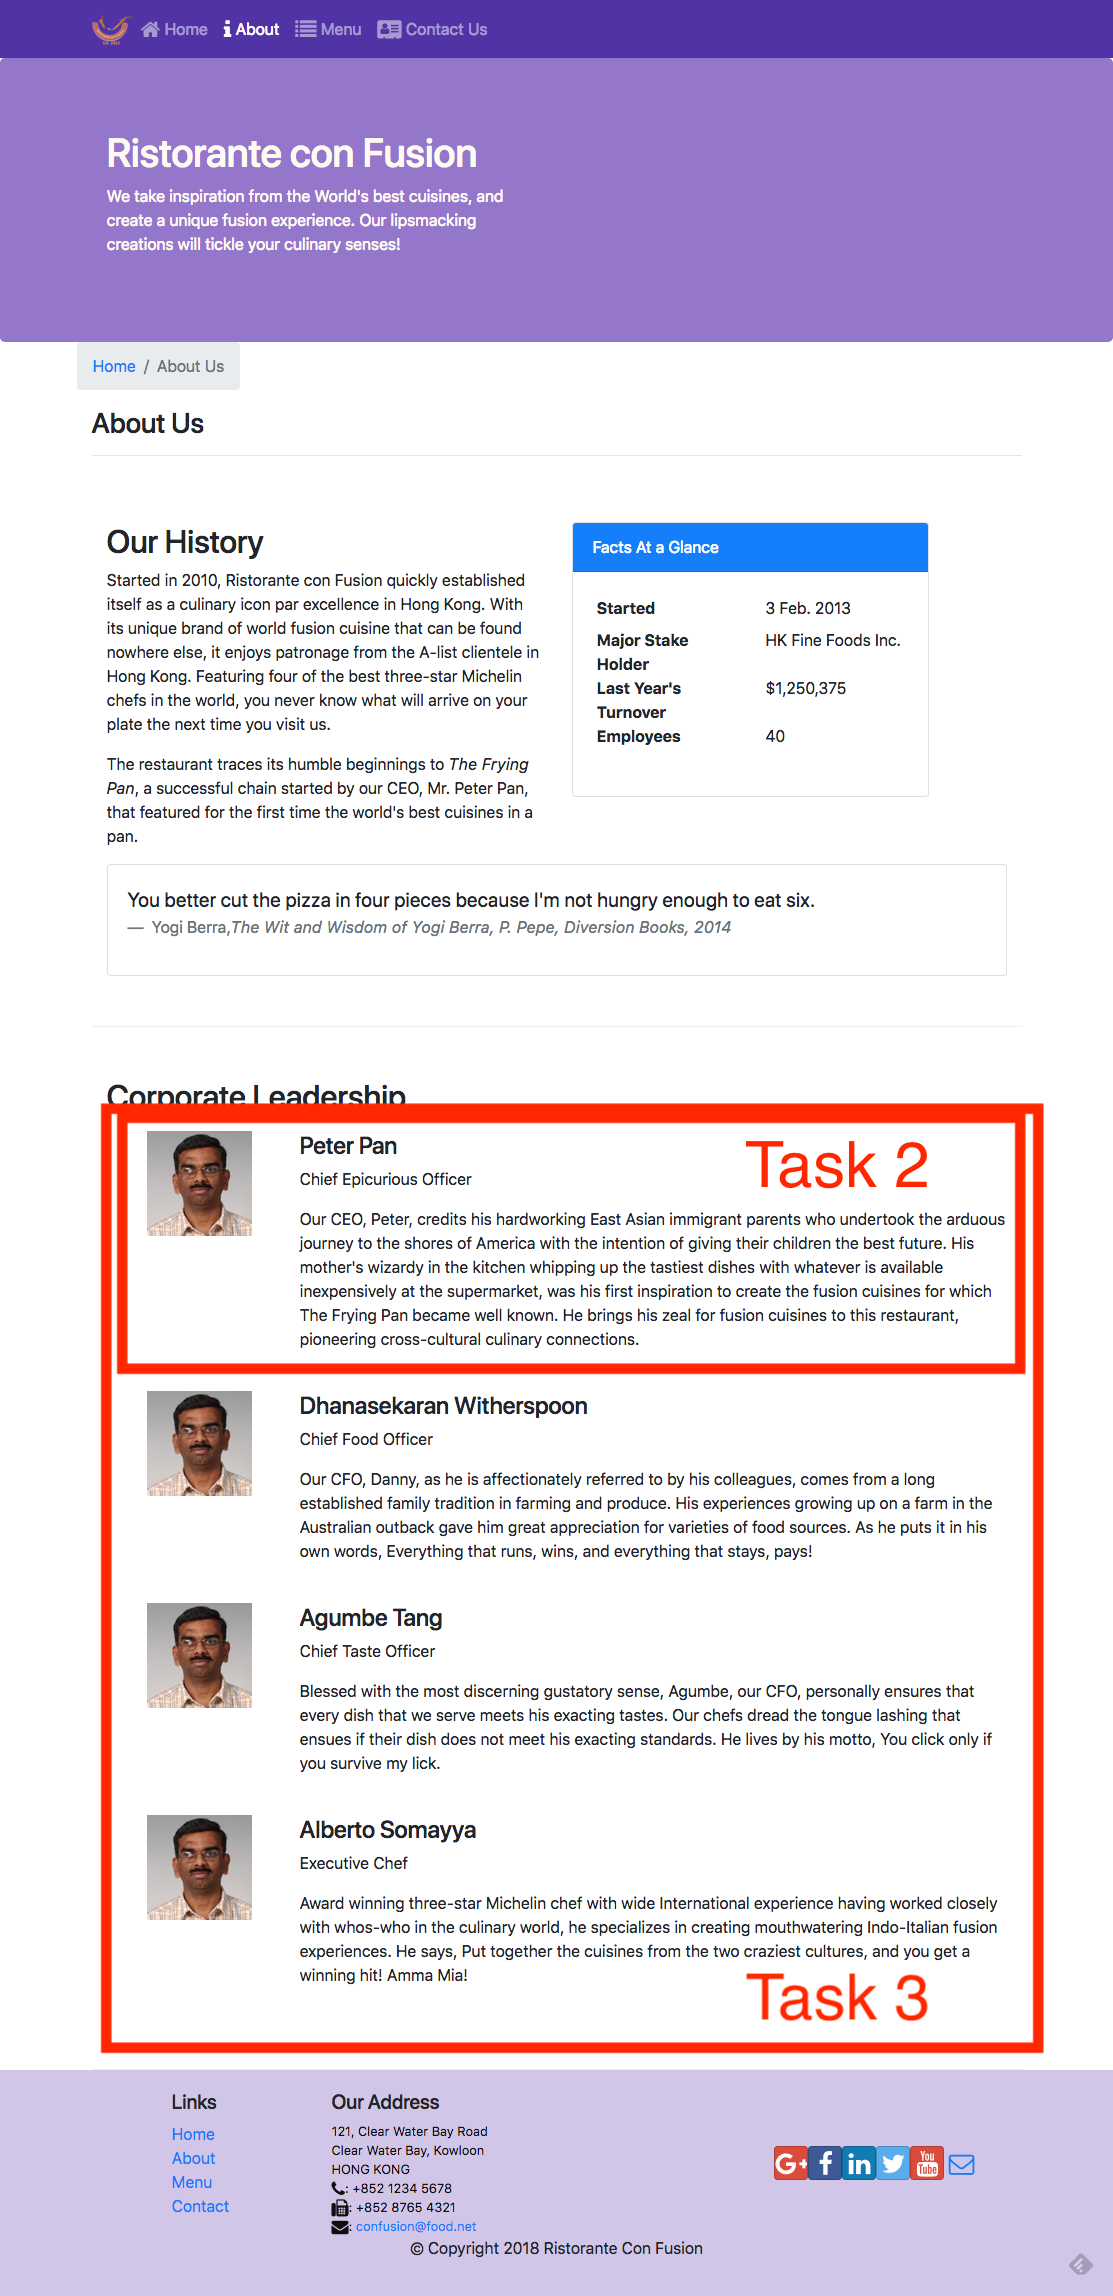
Review criteria
less
Upon completion of the assignment, your submission will be reviewed based on the
following criteria:
Task 1:
- The AboutComponent.js file has been downloaded and integrated into
our React application.
- The React application has been appropriately updated to enable
navigation to the About Us page of our application.
Task 2:
- Implemented a new <RenderLeader> functional component in your
application.
- Used the reactstrap <Media> component to render the details of a
leader.
Task 3:
- Updated the leaders variable within the AboutComponent() function to make use of the
<RenderLeader> component to render the list of leaders.
Assignment 2: React Router and Single Page Applications: Additional Resources
Assignment Resources
AboutComponent
JS File
Screenshots
React Resources
- [react-router](https://github.com/ReactTraining/react-router)
- [react-router-dom](https://github.com/ReactTraining/react-router/tree/master/packages/react-router-dom)
- [React Router
Documentation](https://reacttraining.com/react-router/)
- [React Router Dom
Documentation](https://reacttraining.com/react-router/web/guides/philosophy)
- [reactstrap <Media>
component](https://reactstrap.github.io/components/media/)
UI Design and Prototyping: Objectives and Outcomes
Now that you are more clear about your project idea, it\'s time to
conceive how your project is going to look like for the end-users. This
is the time to design the user interface and the flow of your
application. User interface design and prototyping helps you to
conceptualize the look and feel of your application. This can be
achieved in two ways: using wireframe diagrams, or using prototyping
tools. We provide links to wireframing and prototyping tools in the
additional resources. The focus in this lesson is to be able to visually
represent various UI elements to enable designing your application. The
aim is to deliver a reasonable representation of the end-user experience
with your application At the end of this lesson, you should be able to:
- Construct a wireframe diagram to visually represent the structure of
your user interface
- Construct a prototype to enable understanding the flow of your
application
UI Design and Prototyping Report Template
Project Title
1. Introduction
- Give a brief introduction to your project and the list of features.
Summarize in a few sentences what you proposed in the ideation
report.
2. User Interface Design and Prototype
- Give some sample user interface layouts for your application. You
can use either wireframe diagrams or prototyping tools to construct
the mock representations of your UI design
- Briefly explain the rationale behind designing your UI and how it is
geared towards supporting the list of features for your application.
3. Navigation Structure
- Give a brief overview of the navigation structure for your
application.
- Briefly indicate a typical flow of your application in terms of user
experience. You can use any way of representing the flow. You can
also construct a prototype using one of the prototyping tools to
illustrate this.
4. References
- Provide any references relevant to the report.
Honors Peer-graded Assignment: UI Design and Prototyping
DeadlineOct 30, 11:59 PM PDT
Ready for the assignment?
You will find instructions below to submit.
1. [Instructions](https://www.coursera.org/learn/front-end-react/peer/ivQry/ui-design-and-prototyping)
2. [My
> submission](https://www.coursera.org/learn/front-end-react/peer/ivQry/ui-design-and-prototyping/submit)
3. [Discussions](https://www.coursera.org/learn/front-end-react/peer/ivQry/ui-design-and-prototyping/discussions)
In this assignment you will be submitting a written report that includes
some user interface designs and the flow of your application and the
navigation structure. The report should follow the report template
structure given earlier in this lesson.
Review criteria
less
Your submission will be reviewed based on the following criteria by
peers in order to provide you with constructive feedback on your project
idea:
1. Does the report provide a brief overview of the project and the list
> of features ?
2. Does the report contain some user interface designs that showcase
> the realization of the features listed above?
3. Does the report contain information about the application flow and
> navigation structure?
4. Does the report provide references to suitable sources in support of
> the project?
UI Design and Prototyping: Additional Resources
Wireframing, Mockups and UI Design
- [Wireframe.cc](https://wireframe.cc/)
- [Moqups.com](https://moqups.com/)
- [Axure](http://www.axure.com/)
- [proto.io](https://proto.io/)
- [framerjs.com](http://framerjs.com/)
- [The 20 best wireframe
tools](http://www.creativebloq.com/wireframes/top-wireframing-tools-11121302)
- [Web Design Inspirations](http://www.webdesign-inspiration.com/)
- [Adobe Experience
Design](http://www.adobe.com/products/experience-design.html)
- [Free Bootstrap Wireframing Set for
PowerPoint](https://onextrapixel.com/free-bootstrap-wireframing-set-for-powerpoint/)
UI Templates
- [Bootstrap Expo](http://expo.getbootstrap.com/)
- [Ionic Showcase](http://showcase.ionicframework.com/)
Information Architecture
- [A visual vocabulary for describing information architecture and
interaction design](http://www.jjg.net/ia/visvocab/)
- [The Elements of User Experience](http://www.jjg.net/elements/)
- [The Elements of User Experience: User-Centered Design for the Web
and Beyond (2nd Edition) (Voices That
Matter)](http://www.amazon.com/The-Elements-User-Experience-User-Centered/dp/0321683684/ref=pd_cp_14_1?ie=UTF8&refRID=0RXJWKFHY0TNF5QM2764)
Controlled Forms: Objectives and Outcomes
In this lesson you will learn about controlled components and how they
can be used to design controlled forms in your React application. At the
end of this exercise you will be able to:
- Design a controlled form in your React application.
Controlled Forms
Exercise (Video): Controlled Forms
Exercise (Instructions): Controlled Forms
Objectives and Outcomes
In this exercise you will learn about using controlled components to
design controlled forms in your React application. At the end of this
exercise you will be able to:
- Design a controlled form in your React application.
Importing the Necessary Components
- You will start out by importing the necessary components from
reactstrap into ContactComponent.js as follows:
```
> . . .
> import React, { Component } from 'react';
> import { Breadcrumb, BreadcrumbItem,
> Button, Form, FormGroup, Label, Input, Col } from 'reactstrap';
> . . .
```
- You will then change the ContactComponent to a class-based
component as follows:
```
. . .
class Contact extends Component {
render() {
. . .
}
}
```
Creating the Controlled Form
- Update the ContactComponent.js file as follows to set up the
Controlled Form:
```
. . .
constructor(props) {
super(props);
this.state = {
firstname: '',
lastname: '',
telnum: '',
email: '',
agree: false,
contactType: 'Tel.',
message: ''
};
this.handleInputChange = this.handleInputChange.bind(this);
this.handleSubmit = this.handleSubmit.bind(this);
}
handleInputChange(event) {
const target = event.target;
const value = target.type === 'checkbox' ? target.checked : target.value;
const name = target.name;
this.setState({
[name]: value
});
}
handleSubmit(event) {
console.log('Current State is: ' + JSON.stringify(this.state));
alert('Current State is: ' + JSON.stringify(this.state));
event.preventDefault();
}
. . .
```
- Then add the controlled form to it as follows:
```
> . . .
>
>
> Send us your Feedback
>
>
>
>
> First Name
>
> placeholder="First Name"
> value={this.state.firstname}
> onChange={this.handleInputChange} />
>
>
>
> Last Name
>
> placeholder="Last Name"
> value={this.state.lastname}
> onChange={this.handleInputChange} />
>
>
>
> Contact Tel.
>
> placeholder="Tel. number"
> value={this.state.telnum}
> onChange={this.handleInputChange} />
>
>
>
> Email
>
>
> placeholder="Email"
```
- Save all changes and do a Git commit with the message \"Controlled
Forms\".
Conclusions
In this exercise you have learnt to create a controlled form within your
React application.
Exercise (Video): Controlled Form Validation
Exercise (Instructions): Controlled Form Validation
Objectives and Outcomes
In this exercise you will be introduced to simple form validation for
controlled forms in React. At the end of this exercise you will be able
to:
- Configure and perform simple form validation for your controlled
forms
Simple Form Validation
- Open ContactComponent.js and update it as follows to introduce the
support to track form errors and perform validation:
```
> . . .
>
> import { Breadcrumb, BreadcrumbItem, Button, Form, FormGroup, Label, Input, Col, Row, FormFeedback } from 'reactstrap';
>
> . . .
>
>
>
> class Contact extends Component {
>
>
>
> constructor(props) {
>
> super(props);
>
>
>
> this.state = {
>
> firstname: '',
>
> lastname: '',
>
> telnum: '',
>
> email: '',
>
> agree: false,
>
> contactType: 'Tel.',
>
> message: '',
>
> touched: {
>
> firstname: false,
>
> lastname: false,
>
> telnum: false,
>
> email: false
>
> }
>
> }
>
> this.handleSubmit = this.handleSubmit.bind(this);
>
> this.handleInputChange = this.handleInputChange.bind(this);
>
> this.handleBlur = this.handleBlur.bind(this);
>
> }
>
>
>
> . . .
>
>
>
> handleBlur = (field) => (evt) => {
>
> this.setState({
>
> touched: { ...this.state.touched, [field]: true }
>
> });
>
> }
>
>
>
> validate(firstname, lastname, telnum, email) {
>
> const errors = {
>
> firstname: '',
```
- Now that we have introduced some functions that can be used for form
validation, let us update the form itself to make use of these as
follows:
```
> . . .
>
>
>
>
>
> First Name
>
>
>
>
> placeholder="First Name"
>
> value={this.state.firstname}
>
> valid={errors.firstname === ''}
>
> invalid={errors.firstname !== ''}
>
> onBlur={this.handleBlur('firstname')}
>
> onChange={this.handleInputChange} />
>
> {errors.firstname}
>
>
>
>
>
>
>
> Last Name
>
>
>
>
> placeholder="Last Name"
>
> value={this.state.lastname}
>
> valid={errors.lastname === ''}
>
> invalid={errors.lastname !== ''}
>
> onBlur={this.handleBlur('lastname')}
>
> onChange={this.handleInputChange} />
>
> {errors.lastname}
>
>
>
>
>
>
>
> Contact Tel.
>
>
>
>
> placeholder="Tel. Number"
>
> value={this.state.telnum}
>
> valid={errors.telnum === ''}
>
> invalid={errors.telnum !== ''}
>
> onBlur={this.handleBlur('telnum')}
>
> onChange={this.handleInputChange} />
>
> {errors.telnum}
>
>
```
- You can now test your form by typing in invalid input and check how
the form validation works.
- Save all the changes and do a Git commit with the message
\"Controlled Form Validation\"
Conclusions
In this exercise you have learnt about doing simple form validation for
controlled forms in React.
Controlled Forms: Additional Resources
PDFs of Presentations
1-Controlled-Components-Forms.pdf
PDF File
React Resources
- [Controlled Components](https://reactjs.org/docs/forms.html)
- [reactstrap Form](https://reactstrap.github.io/components/form/)
Other Resources
- [Controlled / Uncontrolled React
Components](https://www.viget.com/articles/controlling-components-react/)
- [Controlled and Uncontrolled Input Values in
React](https://medium.com/@peter.yun.kim/controlled-and-uncontrolled-input-values-in-react-907119cc98d4)
- [Controlled and uncontrolled form inputs in React don\'t have to be
complicated](https://goshakkk.name/controlled-vs-uncontrolled-inputs-react/)
- [How to Work with Forms, Inputs and Events in
React](https://medium.com/capital-one-developers/how-to-work-with-forms-inputs-and-events-in-react-c337171b923b)
- [Some Thoughts On Forms in
React](https://medium.com/javascript-inside/some-thoughts-on-forms-in-react-9ca2d9078c20)
- [Instant form field validation with React\'s controlled
inputs](https://goshakkk.name/instant-form-fields-validation-react/)
Module 8: Uncontrolled Forms: Objectives and Outcomes
Forms in React can be approached in two ways, either through
uncontrolled components, or controlled components. In this lesson we
will deal with uncontrolled forms. At the end of this lesson you will be
able to:
- Create uncontrolled forms through uncontrolled components in React
- Handle the form submission in the React application
Uncontrolled Components
Exercise (Video): Uncontrolled Forms
Exercise (Instructions): Uncontrolled Forms
In this exercise we will create an uncontrolled form within our React
application using the uncontrolled component approach. At the end of
this exercise you will be able to:
- Create uncontrolled forms through uncontrolled components in React
- Handle the form submission in the React application
Adding a Modal to Host the Form
- Update HeaderComponent.js as follows to add a new Modal to the
application to host the form:
```
> . . .
> import { Navbar, NavbarBrand, Nav, NavbarToggler, Collapse, NavItem, Jumbotron,
> Button, Modal, ModalHeader, ModalBody,
> Form, FormGroup, Input, Label } from 'reactstrap';
> . . .
> this.state = {
> isNavOpen: false,
> isModalOpen: false
> };
> . . .
> this.toggleModal = this.toggleModal.bind(this);
> . . .
> toggleModal() {
> this.setState({
> isModalOpen: !this.state.isModalOpen
> });
> }
> . . .
> <Modal isOpen={this.state.isModalOpen} toggle={this.toggleModal}>
> <ModalHeader toggle={this.toggleModal}>Login</ModalHeader>
>
>
>
> . . .
```
- Then, add a button to the Navbar to enable toggling the modal:
```
> . . .
>
>
> Login
>
>
> . . .
```
Adding the Uncontrolled Form
- Add the form to the modal body as shown below:
. . .
```
>
>
> Username
> innerRef={(input) => this.username = input} />
>
>
> Password
> innerRef={(input) => this.password = input} />
>
>
>
> innerRef={(input) => this.remember = input} />
> Remember me
>
>
> Login
>
> . . .
```
- Then, add the following function to the class to handle the form
submission:
```
> . . .
> this.handleLogin = this.handleLogin.bind(this);
> . . .
> handleLogin(event) {
> this.toggleModal();
> alert("Username: " + this.username.value + " Password: " + this.password.value
> + " Remember: " + this.remember.checked);
> event.preventDefault();
> }
> . . .
```
- Save all the changes and do a Git commit with the message
\"Uncontrolled Form\"
Conclusions
In this exercise we learnt to use an uncontrolled component approach to
add a form to our React application.
Uncontrolled Forms: Additional Resources
PDFs of Presentations
2-Uncontrolled-Components-Forms.pdf
PDF File
React Resources
- [Uncontrolled
Components](https://reactjs.org/docs/uncontrolled-components.html)
- [reactstrap Form](https://reactstrap.github.io/components/form/)
- [reactstrap Modal
Component](https://reactstrap.github.io/components/modals/)
Other Resources
- [Controlled / Uncontrolled React
Components](https://www.viget.com/articles/controlling-components-react/)
- [Controlled and Uncontrolled Input Values in
React](https://medium.com/@peter.yun.kim/controlled-and-uncontrolled-input-values-in-react-907119cc98d4)
- [Controlled and uncontrolled form inputs in React don\'t have to be
complicated](https://goshakkk.name/controlled-vs-uncontrolled-inputs-react/)
- [How to Work with Forms, Inputs and Events in
React](https://medium.com/capital-one-developers/how-to-work-with-forms-inputs-and-events-in-react-c337171b923b)
- [Some Thoughts On Forms in
React](https://medium.com/javascript-inside/some-thoughts-on-forms-in-react-9ca2d9078c20)
Introduction to Redux: Objectives and Outcomes
In this lesson you will learn about the Flux architecture as a way of
structuring your React application. You will also be introduced to
Redux, a realization of the flux architecture. At the end of this lesson
you will be able to:
- Install and Configure Redux in your application
- Enable your React app to make use of Redux
Module 9: The Model-View-Controller Framework
Module 10: The Flux Architecture
Module xx: Introduction to Redux
Chapter 1: Exercise (Video): Introduction to Redux
Chapter 2: Exercise (Instructions): Introduction to Redux
Objectives and Outcomes
In this exercise you will learn to use Redux. You will install and
configure Redux and use it within your React application. At the end of
this exercise you will be able to:
- Install and configure Redux within your application
- Configure your React application to make use of Redux
Installing and Configuring Redux
- As a first step you will install Redux and React-Redux into your
application as follows:
```
$ yarn add [email protected]
>
$ yarn add [email protected]
```
- Next, create a folder named redux in the src folder and then add
a file named reducer.js with the code below:
```
> import { DISHES } from '../shared/dishes';
> import { COMMENTS } from '../shared/comments';
> import { PROMOTIONS } from '../shared/promotions';
> import { LEADERS } from '../shared/leaders';
>
> export const initialState = {
> dishes: DISHES,
> comments: COMMENTS,
> promotions: PROMOTIONS,
> leaders: LEADERS
> };
>
> export const Reducer = (state = initialState, action) => {
> return state;
> };
```
- Then, add a file named configureStore.js in the redux folder and
add the following code to it:
```
> import {createStore} from 'redux';
>
> import { Reducer, initialState } from './reducer'
>
> export const ConfigureStore = () => {
> const store = createStore(
> Reducer, // reducer
> initialState, // our initialState
> );
>
> return store;
> }
```
- Next, open App.js and update it as follows:
```
> . . .
>
> import { Provider } from 'react-redux';
> import { ConfigureStore } from './redux/configureStore';
>
> const store = ConfigureStore();
>
> . . .
>
>
>
>
>
>
> . . .
```
- Finally, update MainComponent.js to connect it to Redux store and
use it:
```
> . . .
> import { Switch, Route, Redirect, withRouter } from 'react-router-dom'
> import { connect } from 'react-redux';
> const mapStateToProps = state => {
> return {
> dishes: state.dishes,
> comments: state.comments,
> promotions: state.promotions,
> leaders: state.leaders
> }
> }
> . . .
> const HomePage = () => {
> return(
> dish={this.props.dishes.filter((dish) => dish.featured)[0]}
> promotion={this.props.promotions.filter((promo) => promo.featured)[0]}
> leader={this.props.leaders.filter((leader) => leader.featured)[0]}
> />
> );
> }
> const DishWithId = ({match}) => {
> return(
> dish.id === parseInt(match.params.dishId,10))[0]}
> comments={this.props.comments.filter((comment) => comment.dishId === parseInt(match.params.dishId,10))} />
> );
> };
> return (
>
>
>
```
- Save all the changes and do a Git commit with the message \"Intro.
to Redux\".
Conclusions
In this exercise you learnt to install and configure Redux and use it in
your React application.
Introduction to Redux: Additional Resources
PDFs of Presentations
3-MVC.pdf
PDF File
4-Flux-Arch.pdf
PDF File
5-Intro-Redux.pdf
PDF File
React Resources
- [Redux](https://redux.js.org/)
- [Redux on Github](https://github.com/reactjs/redux)
- [React and Redux](https://redux.js.org/basics/usage-with-react)
- [Redux Basics Documentation](https://redux.js.org/basics)
```{=html}
```
- [The Flux Architecture](https://facebook.github.io/flux/)
Other Resources
- [Redux
Tutorials](https://github.com/markerikson/react-redux-links/blob/master/redux-tutorials.md)
- [Flux Architecture In Depth
Overview](https://facebook.github.io/flux/docs/in-depth-overview.html#content)
Module xx: React Redux Form: Objectives and Outcomes
In this lesson we will learn to create forms using react-redux-form that
enables us to store form information in the Redux store, and brings
additional benefits. At the end of this lesson you will be able to:
- Configure and use react-redux-form to create Controlled forms
- Store the form state in the Redux store
Chapter 1. React Redux Forms
Chapter 2. Exercise (Video): React Redux Form
Chapter 3. Exercise (Instructions): React Redux Form
Objectives and Outcomes
In this exercise you will install react-redux-form and then convert the
controlled form that we created earlier into a form supported by
react-redux-form. At the end of this exercise you will be able to:
- Install and configure react-redux-form
- Implement a controlled form using react-redux-form
Installing and Using react-redux-form
- We first install the react-redux-form into our project as follows:
```
> yarn add
```
- Then open ContactComponent.js and update the Feedback Form to use
react-redux-form:
```
> . . .
> import { Breadcrumb, BreadcrumbItem,
> Button, Row, Col, Label } from 'reactstrap';
> import { Control, LocalForm, Errors } from 'react-redux-form';
> . . .
> handleSubmit(values) {
> console.log('Current State is: ' + JSON.stringify(values));
> alert('Current State is: ' + JSON.stringify(values));
> // event.preventDefault();
> }
> . . .
> this.handleSubmit(values)}>
>
> First Name
>
> placeholder="First Name"
> className="form-control"
> />
>
>
>
> Last Name
>
> placeholder="Last Name"
> className="form-control"
> />
>
>
>
> Contact Tel.
>
> Conclusions
In this exercise we installed and used the react-redux-form to design a
controlled form.
Module xx: Exercise (Video): React Redux Form Validation
Chapter 2: Exercise (Instructions): React Redux Form Validation
Objectives and Outcomes
In this exercise we will explore simple form validation for
react-redux-form. At the end of this exercise you will be able to:
- Configure and implement simple form validation for controlled forms
designed using react-redux-form.
Implementing Simple Form Validation
- Open ContactComponent.js and update it as follows to implement
form validation:
```
> . . .
> const required = (val) => val && val.length;
> const maxLength = (len) => (val) => !(val) || (val.length <= len);
> const minLength = (len) => (val) => val && (val.length >= len);
> const isNumber = (val) => !isNaN(Number(val));
> const validEmail = (val) => /^[A-Z0-9._%+-]+@[A-Z0-9.-]+.[A-Z]{2,4}$/i.test(val);
> . . .
>
> First Name
>
> placeholder="First Name"
> className="form-control"
> validators={{
> required, minLength: minLength(3), maxLength: maxLength(15)
> }}
> />
> className="text-danger"
> model=".firstname"
> show="touched"
> messages={{
> required: 'Required',
> minLength: 'Must be greater than 2 characters',
> maxLength: 'Must be 15 characters or less'
> }}
> />
>
>
>
> Last Name
>
> placeholder="Last Name"
> className="form-control"
> validators={{
```
- Save all the changes and do a Git commit with the message \"React
Redux Form Validation\"
Conclusions
In this exercise you learnt about implementing simple form validation
using react-redux-form.
Chapter 2: React Redux Form: Additional Resources
PDFs of Presentations
6-React-Redux-Form.pdf
PDF File
React Resources
- [React Redux Form
Documentation](https://davidkpiano.github.io/react-redux-form/docs.html)
Other Resources
- [The boring React Redux
forms](https://medium.com/@steida/the-boring-react-redux-forms-a15ee8a6b52b)
- [How to populate react-redux-form with dynamic default
values](https://swizec.com/blog/populate-react-redux-form-dynamic-default-values/swizec/8158)
- [Should you store your form state in
Redux?](https://goshakkk.name/should-i-put-form-state-into-redux/)
Assignment 3: React Forms and Redux
Peer-graded Assignment: React Forms and Redux
DeadlineNov 6, 11:59 PM PST
Ready for the assignment?
You will find instructions below to submit.
In this assignment you will be updating the React application with a
react-redux-form based local form and do the form validation in code.
Step-By-Step Assignment Instructions
less
Assignment Overview
In this assignment you will update the DishdetailComponent.js to
include a form and do the form validation in code. At the end of this
assignment, you should have completed the following tasks to update the
page:
- Added a new class component named CommentForm to
> DishdetailComponent.js.
- Provide a form to enable users to submit their comments
- Validate the information entered by the users in the form
Assignment Requirements
Task 1
In this task you will add a new class component named CommentForm. You
need to complete the following:
- Add a new class component named CommentForm that will add a button
> to the view as shown in the image below.
- When the button is clicked, it toggles a modal that will display the
> comment form.
- The CommentForm component is used by the RenderComments function to
> display the button for toggling the modal.
Task 2
In this task you will construct the form for users to submit their
comments as shown in the image below. You need to complete the
following:
- Set up the form as a local form using the react-redux-form with the
> three fields: author, rating and comment.
- The rating field in the comment form is implemented using a select,
> the author is implemented using a text field, while the comment
> uses a textarea with six rows.
Task 3
In this task, you will enable form validation as shown in the images
below. You need to complete the following:
- The author field should at least be three characters long.
- The author field should be less than or equal to 15 characters.
- The user should be alerted by showing the invalid message displayed
at the bottom of the field.
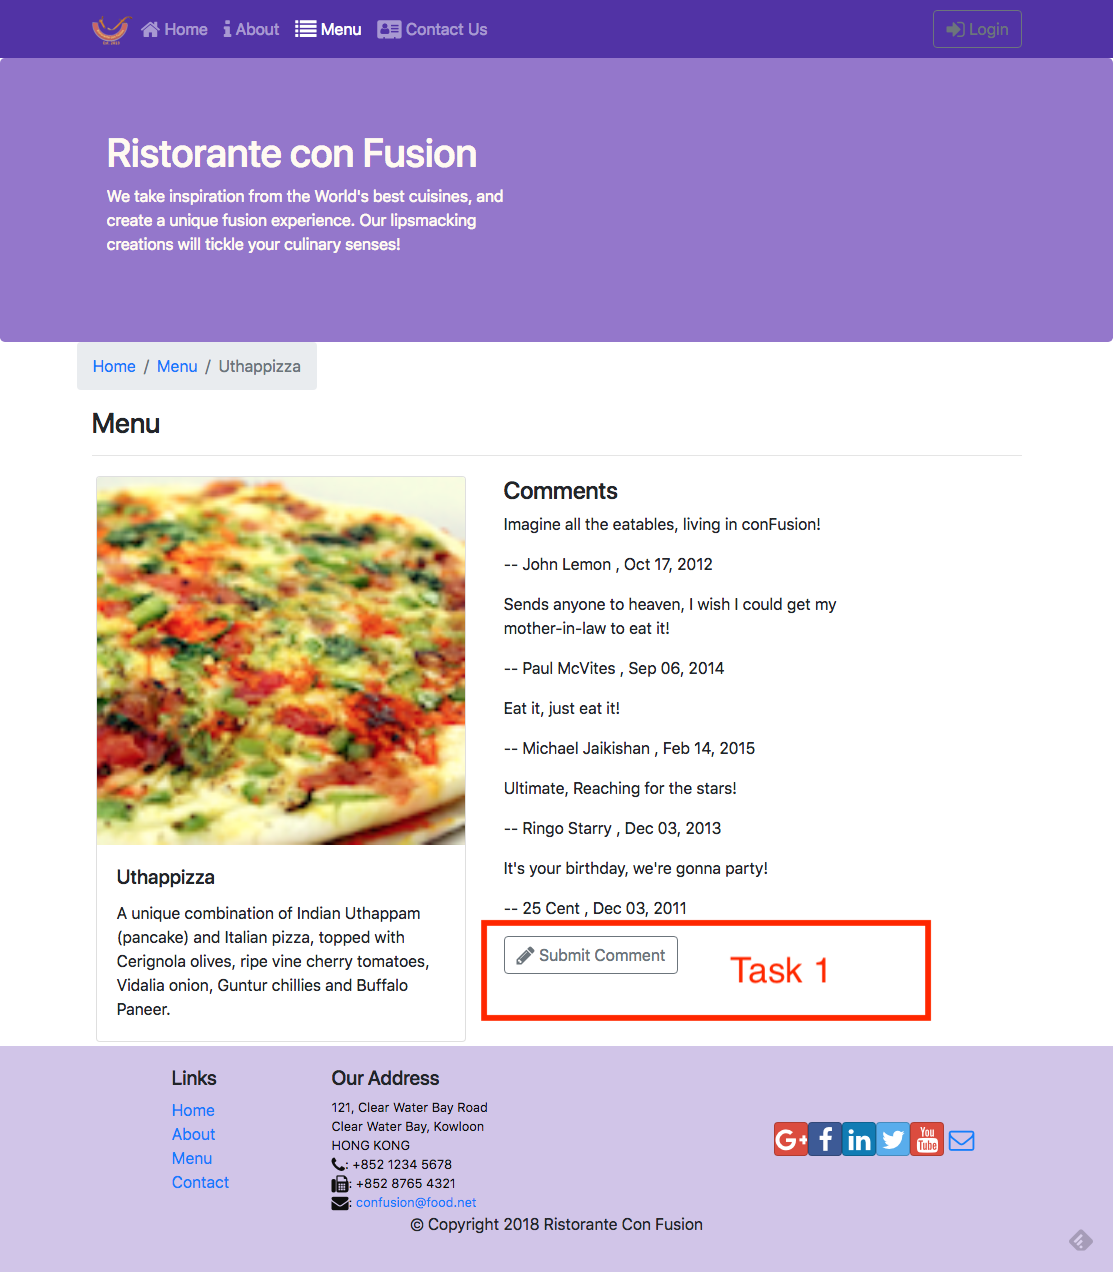
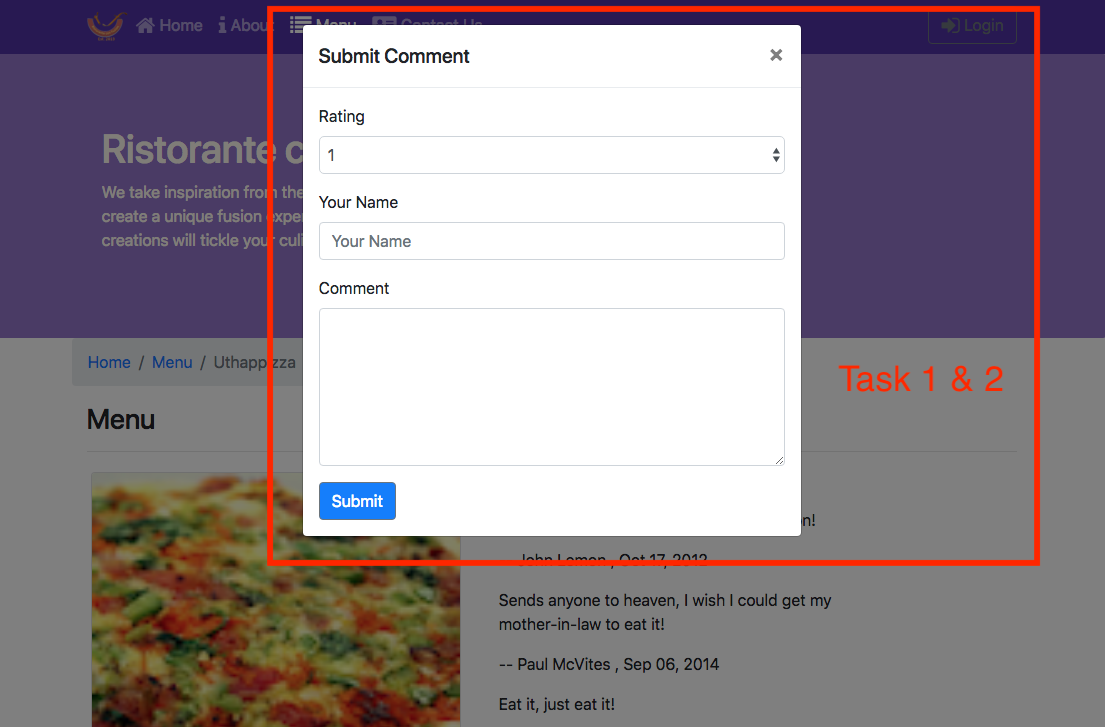
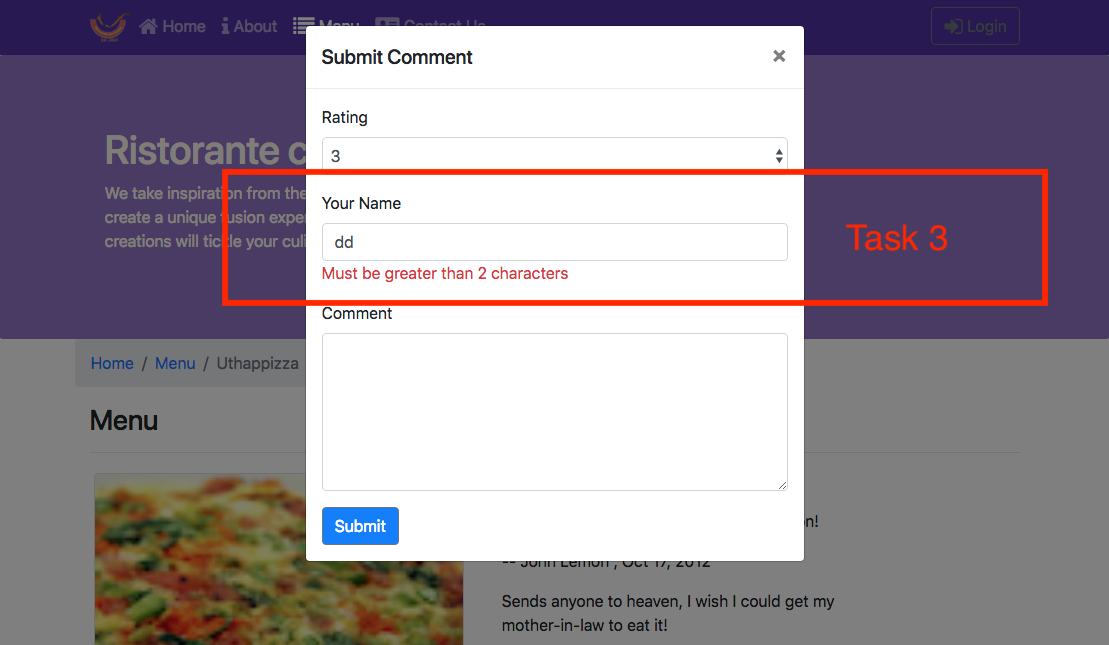
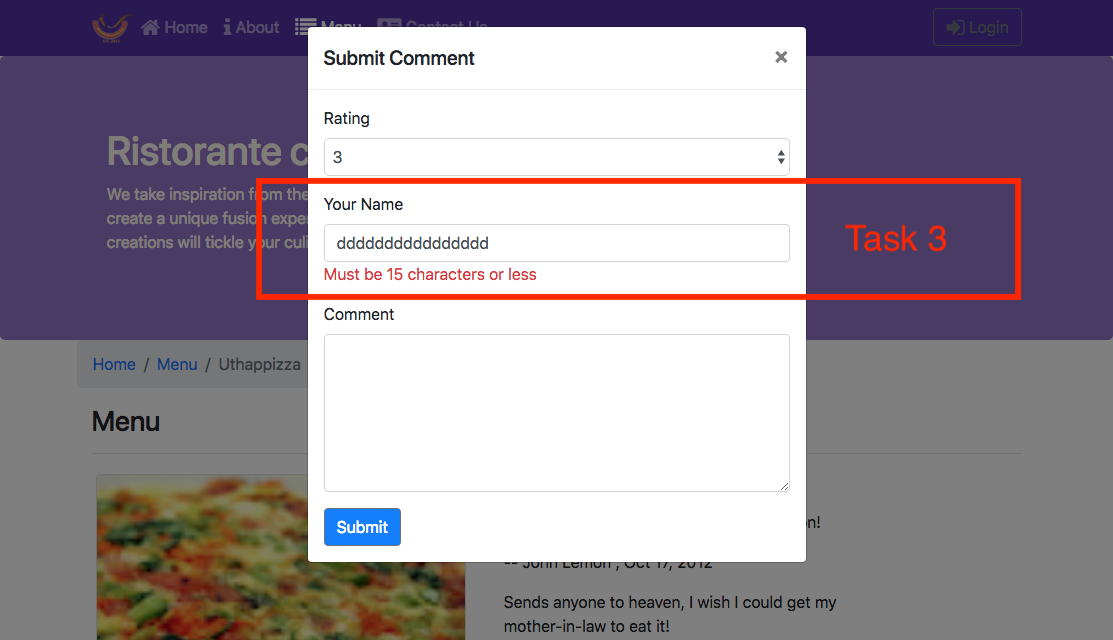
Review criteria
less
Upon completion of the assignment, your submission will be reviewed
based on the following criteria:
Task 1:
- A CommentForm component is implemented that adds a button to the
view, which when clicked will toggle a modal containing the form.
Task 2:
- The form is set up with the three fields correctly.
- A select is included in the form to enable users to submit the
rating, a text field for author and a text area for the comment.
Task 3:
- The author field is being properly validated. If incorrect, the user
is alerted.
Assignment 3: React Forms and Redux: Additional Resources
Assignment Screenshots
React Resources
- [reactstrap Modal
Component](https://reactstrap.github.io/components/modals/)
- [React Redux Form
Documentation](https://davidkpiano.github.io/react-redux-form/docs.html)
Redux Actions: Objectives and Outcomes
In this lesson we will look at how to create redux actions and how
action creators can be designed to return the action objects. Thereafter
we look at how to dispatch actions. We also look at how to split the
reducer into simpler functions and combine them. At the end of this
exercise, you will be able to:
- Define Redux actions
- Create action creator functions that return action objects
- Split the reducer function into multiple simpler functions and
combine the reducer functions
Module xx: Redux Actions
Module xx: Exercise (Video): Combining Reducers
Exercise (Instructions): Combining Reducers
Objectives and Outcomes
In this exercise you will learn about how we can have separate reducers
managing parts of the state, and how they can be combined together to
manage the whole state. At the end of this exercise you will be able to:
- Implement reducers that are responsible for only part of the state
- Combine the reducers to manage the entire state
Splitting the Reducer
- In the redux folder, create a new file named dishes.js and add the
following to it:
```
> import { DISHES } from '../shared/dishes';
> export const Dishes = (state = DISHES, action) => {
> switch (action.type) {
> default:
> return state;
> }
> };
```
- Then, create a file named comments.js and add the following to it:
```
> import { COMMENTS } from '../shared/comments';
> export const Comments = (state = COMMENTS, action) => {
> switch (action.type) {
> default:
> return state;
> }
> };
```
- Similarly, create a new file named promotions.js and add the
following to it:
```
> import { PROMOTIONS } from '../shared/promotions';
> export const Promotions = (state = PROMOTIONS, action) => {
> switch (action.type) {
> default:
> return state;
> }
> };
```
- And finally, create a new file named leaders.js and add the
following to it:
```
> import { LEADERS } from '../shared/leaders';
> export const Leaders = (state = LEADERS, action) => {
> switch (action.type) {
> default:
> return state;
> }
> };
```
- Now that we have split the management of state into different
reducers that manage partial state, we need to combine them
together. Open configureStore.js and update it as follows:
```
> import {createStore, combineReducers} from 'redux';
> import { Dishes } from './dishes';
> import { Comments } from './comments';
> import { Promotions } from './promotions';
> import { Leaders } from './leaders';
>
> export const ConfigureStore = () => {
> const store = createStore(
> combineReducers({
> dishes: Dishes,
> comments: Comments,
> promotions: Promotions,
> leaders: Leaders
> })
> );
> return store;
> }
```
- Now we can safely delete the reducer.js file from the project.
- Save all the changes and do a Git commit with the message
\"Combining Reducers\".
Conclusions
In this exercise we have learnt to split the reducer into multiple
reducers that manage partial state, and then combine them together.
Module xx: Exercise (Video): Redux Actions
Exercise (Instructions): Redux Actions
Objectives and Outcomes
In this exercise we will learn to define various Redux actions and
implement the action creators to dispatch the actions to the Redux
store. At the end of this exercise you will be able to:
- Define Redux actions and implement the action creators
- Dispatch actions from the action creators to update the system state
in the Redux store
Creating Actions
- In the redux folder create a new file named ActionTypes.js and
add the following to it:
```
> export const ADD_COMMENT = 'ADD_COMMENT';
```
- Then, create a file named ActionCreators.js and add the following
to it:
```
> import as ActionTypes from './ActionTypes';
> export const addComment = (dishId, rating, author, comment) => ({
> type: ActionTypes.ADD_COMMENT,
> payload: {
> dishId: dishId,
> rating: rating,
> author: author,
> comment: comment
> }
> });
```
- Next, update comments.js to initiate action when the action is
dispatched by the ActionCreator as follows:
```
> import { COMMENTS } from '../shared/comments';
> import as ActionTypes from './ActionTypes';
> export const Comments = (state = COMMENTS, action) => {
> switch (action.type) {
> case ActionTypes.ADD_COMMENT:
> var comment = action.payload;
> comment.id = state.length;
> comment.date = new Date().toISOString();
> console.log("Comment: ", comment);
> return state.concat(comment);
> default:
> return state;
> }
> };
```
- Now update MainComponent.js to make the action available for use
within the DishdetailComponent as follows:
```
> . . .
> import { addComment } from '../redux/ActionCreators';
> . . .
> const mapDispatchToProps = dispatch => ({
> addComment: (dishId, rating, author, comment) => dispatch(addComment(dishId, rating, author, comment))
> });
> . . .
> dish.id === parseInt(match.params.dishId,10))[0]}
> comments={this.props.comments.filter((comment) => comment.dishId === parseInt(match.params.dishId,10))}
> addComment={this.props.addComment}
> />
> . . .
>
> export default withRouter(connect(mapStateToProps, mapDispatchToProps)(Main));
```
- Finally, update DishdetailComponent.js as follows to initiate the
action upon the user submitting the comment form:
```
> . . .
> function RenderComments({comments, addComment, dishId}) {
> . . .
> addComment={props.addComment}
> dishId={props.dish.id}
> />
> . . .
```
- Save all the changes and do a Git commit with the message \"Redux
Actions\"
Conclusions
In this exercise we have learnt to create and dispatch actions to update
the system state in the Redux store.
Redux Actions: Additional Resources
PDFs of Presentations
Redux Resources
- [Redux Actions](https://redux.js.org/basics/actions)
- [Redux Reducers](https://redux.js.org/basics/reducers)
- [Redux Usage with
React](https://redux.js.org/basics/usage-with-react)
Module xx: Redux Thunk: Objectives and Outcomes
Redux Thunk
[middleware](https://github.com/reactjs/redux/blob/master/docs/advanced/Middleware.md)
allows you to write action creators that return a function instead of an
action. In this lesson you will see the use of redux thunk to return a
function. At the end of this lesson you will be able to:
- Use Redux Thunk middleware to return a function instead of an action
- Use a logger middleware to print a log of actions initiated on the
Redux store.
Redux Thunk
Exercise (Video): Redux Thunk
Notes
Exercise (Instructions): Redux Thunk
Objectives and Outcomes
Redux Thunk
[middleware](https://github.com/reactjs/redux/blob/master/docs/advanced/Middleware.md)
allows you to write action creators that return a function instead of an
action. In this exercise you will see the use of redux thunk to return a
function. At the end of this exercise you will be able to:
- Use Redux Thunk middleware to return a function instead of an action
- Use a logger to print a log of actions initiated on the Redux store.
Installing Redux Thunk and Logger
- Install Redux Thunk and Logger as shown below:
```
> yarn add [email protected]
>
> yarn add [email protected]
```
- Then open configureStore.js and update it to use the Thunk and
Logger as follows:
```
> import {createStore, combineReducers, applyMiddleware } from \'redux\';
> . . .
> import thunk from 'redux-thunk';
> import logger from 'redux-logger';
> . . .
> combineReducers({
> dishes: Dishes,
> comments: Comments,
> promotions: Promotions,
> leaders: Leaders
> }),
> applyMiddleware(thunk, logger)
> . . .
```
- Next, open ActionTypes.js and add new action types as follows:
```
. . .
export const DISHES_LOADING = \'DISHES_LOADING\';
export const DISHES_FAILED = \'DISHES_FAILED\';
export const ADD_DISHES = \'ADD_DISHES\';
```
- Then open ActionCreators.js and add new actions:
```
> . . .
> import { DISHES } from '../shared/dishes';
> . . .
> export const fetchDishes = () => (dispatch) => {
> dispatch(dishesLoading(true));
> setTimeout(() => {
> dispatch(addDishes(DISHES));
> }, 2000);
> }
> export const dishesLoading = () => ({
> type: ActionTypes.DISHES_LOADING
> });
> export const dishesFailed = (errmess) => ({
> type: ActionTypes.DISHES_FAILED,
> payload: errmess
> });
> export const addDishes = (dishes) => ({
> type: ActionTypes.ADD_DISHES,
> payload: dishes
> });
```
- Next, open dishes.js and add the code to respond to actions as
follows:
```
> import as ActionTypes from './ActionTypes';
> export const Dishes = (state = { isLoading: true,
> errMess: null,
> dishes:[]}, action) => {
> switch (action.type) {
> case ActionTypes.ADD_DISHES:
> return {...state, isLoading: false, errMess: null, dishes: action.payload};
> case ActionTypes.DISHES_LOADING:
> return {...state, isLoading: true, errMess: null, dishes: []}
> case ActionTypes.DISHES_FAILED:
> return {...state, isLoading: false, errMess: action.payload};
> default:
> return state;
> }
> };
```
- Add a new component named LoadingComponent.js to display a loading
message as follows:
```
> import React from 'react';
> export const Loading = () => {
> return(
>
>
> Loading . . .
>
> );
> };
```
- Now we will update the remaining components to use the actions.
First, open MainComponent.js and update it as follows:
```
> . . .
> import { addComment, fetchDishes } from '../redux/ActionCreators';
> . . .
> fetchDishes: () => { dispatch(fetchDishes())}
> . . .
> componentDidMount() {
> this.props.fetchDishes();
> }
> . . .
> const HomePage = () => {
> return(
> dish={this.props.dishes.dishes.filter((dish) => dish.featured)[0]}
> dishesLoading={this.props.dishes.isLoading}
> dishesErrMess={this.props.dishes.errMess}
> promotion={this.props.promotions.filter((promo) => promo.featured)[0]}
> leader={this.props.leaders.filter((leader) => leader.featured)[0]}
> />
> );
> }
> const DishWithId = ({match}) => {
> return(
> dish.id === parseInt(match.params.dishId,10))[0]}
>
> isLoading={this.props.dishes.isLoading}
> errMess={this.props.dishes.errMess}
> comments={this.props.comments.filter((comment) => comment.dishId === parseInt(match.params.dishId,10))}
> addComment={this.props.addComment}
> />
> );
> };
> . . .
```
- Open DishdetailComponent.js and update it as follows:
```
> . . .
> import { Loading } from './LoadingComponent';
> . . .
> if (props.isLoading) {
> return(
>
>
>
>
> );
> }
> else if (props.errMess) {
> return(
>
>
> {props.errMess}
>
>
> );
> }
> else if (props.dish != null)
> . . .
```
- Open HomeComponent.js and update it as follows:
```
> . . .
> import { Loading } from './LoadingComponent';
> . . .
> function RenderCard({item, isLoading, errMess}) {
> if (isLoading) {
> return(
> {errMess}
> );
> }
> else
> return(
>
>
> {item.name}
> {item.designation ? {item.designation} : null }
> {item.description}
>
>
> );
> }
> . . .
>
>
>
>
>
> {props.dishes.errMess}
>
>
>
> );
> }
> else
> . . .
```
- Save all the changes and do a Git commit with the message \"Redux
Thunk\".
Conclusions
In this exercise we saw the use of Redux Thunk and the Logger.
Exercise (Video): React-Redux-Form Revisited
Exercise (Instructions): React-Redux-Form Revisited
Objectives and Outcomes
In this exercise we will explore the interaction between
react-redux-form and the Redux store. We will see how to map the form
into the store so that the state of the form will be persisted in the
store. At the end of this exercise you will be able to:
- Use react-redux-form to interact with Redux store and store the
state of the form in the store.
Updating the Feedback Form
- Add a new file named forms.js in the redux folder and add the
following to it:
```
> export const InitialFeedback = {
> firstname: '',
> lastname: '',
> telnum: '',
> email: '',
> agree: false,
> contactType: 'Tel.',
> message: ''
> };
```
- Then, open configureStore.js and update it to add the form to the
reducers:
```
> . . .
> import { createForms } from 'react-redux-form';
> . . .
> import { InitialFeedback } from './forms';
> . . .
> combineReducers({
> dishes: Dishes,
> comments: Comments,
> promotions: Promotions,
> leaders: Leaders,
> ...createForms({
> feedback: InitialFeedback
> })
> }),
> . . .
```
- Next, open MainComponent.js and update it as follows:
```
> . . .
> import { actions } from \'react-redux-form';
> . . .
> resetFeedbackForm: () => { dispatch(actions.reset('feedback'))}
> . . .
> this.handleSubmit(values)}>
> . . .
>
> . . .
```
- Save all the changes and do a Git commit with the message \"React
Redux Forms Revisited\".
Conclusions
In this exercise we have seen how to use react-redux-form together with
Redux to persist form state.
Redux Thunk: Additional Resources
PDFs of Presentations
2-Redux-Thunk.pdf
PDF File
Redux Resources
- [Redux Middleware](https://redux.js.org/advanced/middleware)
- [Redux Thunk](https://github.com/gaearon/redux-thunk)
- [Redux Logger](https://github.com/evgenyrodionov/redux-logger)
- [React-redux-form](https://davidkpiano.github.io/react-redux-form/docs.html)
Module: Client-Server Communication: Objectives and Outcomes
In this lesson you will learn about communication between your React
application and a server. You will establish a simple server using the
json-server node module. At the end of this lesson, you will be able to:
- Set up a simple server that makes data available for clients
- Access the data from the server using a browser.
- Use the json-server as a simple static web server.
Networking Essentials
Brief Representational State Transfer (REST)
Exercise (Video): Setting up a Server using json-server
Exercise (Instructions): Setting up a Server using json-server
Exercise Resources
db
JSON File
images
ZIP File
Objectives and Outcomes
The Node module, json-server, provides a very simple way to set up a
web server that supports a full-fledged REST API server. It can also
serve up static web content from a folder. This lesson will leverage
these two features to provide the back-end for your React application.
In this exercise, you will configure and start a server using
json-server to enable serving your application data to your Angular
application. At the end of this exercise, you will be able to:
- Configure and start a simple server using the json-server module
- Configure your server to serve up static web content stored in a
folder named public.
Installing json-server
- json-server is a node module, and hence can be installed globally by
typing the following at the command prompt:
npm install json-server -g
If you are using OSX or Linux, use sudo at the front of the command.
This will install json-server that can be started from the command line
from any folder on your computer.
Configuring the Server
- At any convenient location on your computer, create a new folder
named json-server, and move to this folder.
- Download the db.json file provided above to this folder.
- Move to this folder in your terminal window, and type the following
at the command prompt to start the server:
```
> json-server --watch db.json -p 3001 -d 2000
```
- This should start up a server at port number 3001 on your machine.
The data from this server can be accessed by typing the following
addresses into your browser address bar:
```
> [http://localhost:3001/dishes]{.underline}
>
> [http://localhost:3001/promotions]{.underline}
>
> [http://localhost:3001/leaders]{.underline}
>
> [http://localhost:3001/feedback]{.underline}
```
- Type these addresses into the browser address and see the JSON data
being served up by the server. This data is obtained from the
db.json file
- The json-server also provides a static web server. Any resources
that you put in a folder named public in the json-server
folder above, will be served by the server at the following address:
```
> <http://localhost:3001/>
```
- Shut down the server by typing ctrl-C in the terminal window.
Serving up the Images
- Create a public folder in your json-server folder.
- Download the images.zip file that we provide above, unzip it and
move the images folder containing the images to the public folder.
- Restart the json-server as we did before. Now your server will serve
up the images for our React app. You can view these images by typing
the following into your browser address bar:
```
> [http://localhost:3001/images/].png
```
Conclusions
In this exercise, you learnt how to configure and start a simple server
using the json-server node module. You also learnt how the server
can serve up static web content.
Client-Server Communication: Additional Resources
PDFs of Presentations
3-Networking-Essentials.pdf
4-REST.pdf
Exercise Resources
db
JSON File
images
ZIP File
Other Resources
- [json-server](https://github.com/typicode/json-server)
- [Creating Demo APIs with
json-server](https://egghead.io/lessons/nodejs-creating-demo-apis-with-json-server)
- [JSON](http://www.json.org/)
Fetch: Objectives and Outcomes
In this lesson you will learn about Fetch as a means of communication
between your React application and a REST API server. At the end of this
lesson you will be able to:
- Install Fetch in your React application
- Use Fetch to communicate from your React application with a REST API
server
Promises
Fetch
Exercise (Video): Fetch from Server
Exercise (Instructions): Fetch from Server
Objectives and Outcomes
In this exercise you will incorporate Fetch into your React app and then
use it to communicate with the REST API server. At the end of this
exercise you will be able to:
- Incorporate Fetch into your React app
- Use Fetch to communicate with the REST API server
Fetch
- As a first step, let us install Fetch into our project as follows:
> yarn add [email protected]
- Now that we have installed Fetch, let us configure your application
to connect to the server. First, create a file named baseUrl.js in
the shared folder and add the following to it:
```
> export const baseUrl = '[http://localhost:3001/]{.underline}';
```
- Make sure that the json-server is running and servi
- ng up the data as illustrated in the previous exercise
- Next, open ActionTypes.js and add the following:
```
. . .
export const ADD_COMMENTS = 'ADD_COMMENTS';
export const COMMENTS_FAILED = 'COMMENTS_FAILED';
export const PROMOS_LOADING = 'PROMOS_LOADING';
export const ADD_PROMOS = 'ADD_PROMOS';
export const PROMOS_FAILED = 'PROMOS_FAILED\';
```
- Then, open ActionCreators.js and update it as follows:
```
> . . .
> import { baseUrl } from '../shared/baseUrl';
> . . .
> return fetch(baseUrl + 'dishes')
> .then(response => response.json())
> .then(dishes => dispatch(addDishes(dishes)));
> . . .
> export const fetchComments = () => (dispatch) => {
> return fetch(baseUrl + 'comments')
> .then(response => response.json())
> .then(comments => dispatch(addComments(comments)));
> };
> export const commentsFailed = (errmess) => ({
> type: ActionTypes.COMMENTS_FAILED,
> payload: errmess
> });
> export const addComments = (comments) => ({
> type: ActionTypes.ADD_COMMENTS,
> payload: comments
> });
> export const fetchPromos = () => (dispatch) => {
> dispatch(promosLoading());
> return fetch(baseUrl + 'promotions')
> .then(response => response.json())
> .then(promos => dispatch(addPromos(promos)));
> }
> export const promosLoading = () => ({
> type: ActionTypes.PROMOS_LOADING
```
- Next, open comments.js and update it as follows:
```
> import as ActionTypes from './ActionTypes';
> export const Comments = (state = { errMess: null, comments:[]}, action) => {
> switch (action.type) {
> case ActionTypes.ADD_COMMENTS:
> return {...state, errMess: null, comments: action.payload};
> case ActionTypes.COMMENTS_FAILED:
> return {...state, errMess: action.payload};
> case ActionTypes.ADD_COMMENT:
> var comment = action.payload;
> comment.id = state.comments.length;
> comment.date = new Date().toISOString();
> return { ...state, comments: state.comments.concat(comment)};
> default:
> return state;
> }
> };
```
- Similarly, open promotions.js and update it as follows:
```
> import as ActionTypes from './ActionTypes';
> export const Promotions = (state = { isLoading: true,
> errMess: null,
> promotions:[]}, action) => {
> switch (action.type) {
> case ActionTypes.ADD_PROMOS:
> return {...state, isLoading: false, errMess: null, promotions: action.payload};
> case ActionTypes.PROMOS_LOADING:
> return {...state, isLoading: true, errMess: null, promotions: []}
> case ActionTypes.PROMOS_FAILED:
> return {...state, isLoading: false, errMess: action.payload};
> default:
> return state;
> }
> };
```
- Now that the Redux actions are all updated, it\'s time to update the
components.
- Open MainComponent.js and update it as follows:
```
> . . .
> import { addComment, fetchDishes, fetchComments, fetchPromos } from '../redux/ActionCreators';
> . . .
> const mapDispatchToProps = dispatch => ({
> addComment: (dishId, rating, author, comment) => dispatch(addComment(dishId, rating, author, comment)),
> fetchDishes: () => { dispatch(fetchDishes())},
> resetFeedbackForm: () => { dispatch(actions.reset('feedback'))},
> fetchComments: () => dispatch(fetchComments()),
> fetchPromos: () => dispatch(fetchPromos())
> });
> . . .
> componentDidMount() {
> this.props.fetchDishes();
> this.props.fetchComments();
> this.props.fetchPromos();
> }
> . . .
> dish={this.props.dishes.dishes.filter((dish) => dish.featured)[0]}
> dishesLoading={this.props.dishes.isLoading}
> dishErrMess={this.props.dishes.errMess}
> promotion={this.props.promotions.promotions.filter((promo) => promo.featured)[0]}
> promoLoading={this.props.promotions.isLoading}
> promoErrMess={this.props.promotions.errMess}
> leader={this.props.leaders.filter((leader) => leader.featured)[0]}
> />
> . . .
> dish.id === parseInt(match.params.dishId,10))[0]}
> isLoading={this.props.dishes.isLoading}
> errMess={this.props.dishes.errMess}
```
- Then, open MenuComponent.js and update it as follows:
```
> . . .
> import { baseUrl } from '../shared/baseUrl';
> . . .
> Conclusions
In this exercise you have learnt to install Fetch and use it communicate
with the server.
Exercise (Video): Fetch Handling Errors
Exercise (Instructions): Fetch Handling Errors
Objectives and Outcomes
In this exercise you will learn how to handle errors encountered while
communicating with the server. At the end of this exercise you will be
able to:
- Configure your app to appropriately handle errors encountered while
communicating with the server
Handling Errors
- Open ActionCreators.js and update it as follows:
```
> . . .
> export const fetchDishes = () => (dispatch) => {
> dispatch(dishesLoading(true));
> return fetch(baseUrl + 'dishes')
> .then(response => {
> if (response.ok) {
> return response;
> } else {
> var error = new Error('Error ' + response.status + ': ' + response.statusText);
> error.response = response;
> throw error;
> }
> },
> error => {
> var errmess = new Error(error.message);
> throw errmess;
> })
> .then(response => response.json())
> .then(dishes => dispatch(addDishes(dishes)))
> .catch(error => dispatch(dishesFailed(error.message)));
> }
> . . .
> export const fetchComments = () => (dispatch) => {
> return fetch(baseUrl + 'comments')
> .then(response => {
> if (response.ok) {
> return response;
> } else {
> var error = new Error('Error ' + response.status + ': ' + response.statusText);
> error.response = response;
> throw error;
> }
> },
> error => {
> var errmess = new Error(error.message);
```
- Save all the changes and do a Git commit with the message \"Fetch
Handling Errors\".
Conclusions
In this exercise you learnt how to configure your app to handle errors
in communicating with the server.
Exercise (Video): Fetch Post Comment
Exercise (Instructions): Fetch Post Comment
Objectives and Outcomes
In this exercise you will learn how to configure Fetch to be able to
post data to the server. At the end of this exercise, you will be able
to:
- Configure Fetch to post data to the server
- Receive and process the response to the POST operation on the server
Posting a Comment
- Open ActionCreators.js and update it as follows:
```
> . . .
> export const addComment = (comment) => ({
> type: ActionTypes.ADD_COMMENT,
> payload: comment
> });
> export const postComment = (dishId, rating, author, comment) => (dispatch) => {
> const newComment = {
> dishId: dishId,
> rating: rating,
> author: author,
> comment: comment
> };
> newComment.date = new Date().toISOString();
> return fetch(baseUrl + 'comments', {
> method: "POST",
> body: JSON.stringify(newComment),
> headers: {
> "Content-Type": "application/json"
> },
> credentials: "same-origin"
> })
> .then(response => {
> if (response.ok) {
> return response;
> } else {
> var error = new Error('Error ' + response.status + ': ' + response.statusText);
> error.response = response;
> throw error;
> }
> },
> error => {
> throw error;
> })
> .then(response => response.json())
> .then(response => dispatch(addComment(response)))
> .catch(error => { console.log('post comments', error.message); alert('Your comment could not be postednError: '+error.message); });
```
- Open comment.js and remove the following two lines from it:
```
> . . .
> comment.id = state.comments.length;
> comment.date = new Date().toISOString();
> . . .
```
- Open MainComponent.js and update it as follows:
```
> . . .
> import { postComment, fetchDishes, fetchComments, fetchPromos } from '../redux/ActionCreators';
> . . .
>
> postComment: (dishId, rating, author, comment) => dispatch(postComment(dishId, rating, author, comment))
> . . .
> postComment={this.props.postComment}
> . . .
```
- Finally, open DishdetailComponent.js and update it as follows:
```
> . . .
> function RenderComments({comments, postComment, dishId}) {
> . . .
> Conclusions
In this exercise you learnt to use Fetch to post data to the server.
Fetch: Additional Resources
PDFs of Presentations
5-Promises.pdf
6-Fetch.pdf
Fetch Resources
- [Cross-Fetch](https://github.com/lquixada/cross-fetch)
Promise Resources
- [JavaScript
Promise](https://developer.mozilla.org/en/docs/Web/JavaScript/Reference/Global_Objects/Promise)
- [JS Promise (Part 1 -
Basics)](https://medium.com/@ramsunvtech/promises-of-promise-part-1-53f769245a53)
- [JavaScript Promises for
Dummies](https://scotch.io/tutorials/javascript-promises-for-dummies)
- [JavaScript Promises: an
Introduction](https://developers.google.com/web/fundamentals/getting-started/primers/promises)
Other Resources
- [Introduction to
fetch()](https://developers.google.com/web/updates/2015/03/introduction-to-fetch)
- [Using
Fetch](https://developer.mozilla.org/en-US/docs/Web/API/Fetch_API/Using_Fetch)
- [Fetch vs. Axios.js for making http
requests](https://medium.com/@thejasonfile/fetch-vs-axios-js-for-making-http-requests-2b261cdd3af5)
Module xx: React Animations: Objectives and Outcomes
In this lesson we will learn about adding various subtle animations to
our React app for a better user experience. At the end of this lesson
you will be able to:
- Add subtle animations using the react-transition-group
- Add additional component animations using react-animation-components
React Animations
Exercise (Video): React Animations
Exercise (Instructions): React Animations
Objectives and Outcomes
In this exercise you will learn to implement animations in your React
app using react-transition-group. At the end of this exercise you will
be able to:
- Configure your app to use react-transition-group for animations
- Implement simple animation using the react-transition-group
Installing React-Transition-Group
- Install react-transition-group in your React project as follows:
```
yarn add [email protected]
```
- Configure CSS classes for use in animation. Open App.css and add
the following classes:
```
> . . .
> .page-enter {
> opacity: 0.01;
> transform: translateX(-100%);
> }
> .page-enter-active {
> opacity: 1;
> transform: translateX(0%);
> transition: all 300ms ease-in;
> }
> .page-exit {
> opacity: 1;
> transform: translateX(0%);
> }
> .page-exit-active {
> opacity: 0.01;
> transform: translateX(100%);
> transition: all 300ms ease-out;
> }
```
- Then, open MainComponent.js and add in the following to configure
the animation:
```
> . . .
> import { TransitionGroup, CSSTransition } from 'react-transition-group';
> . . .
>
>
>
>
>
> . . .
```
- Save all the changes and do a Git commit with the message \"React
Animations\".
Conclusions
In this exercise we implemented simple animation using
react-transition-group.
Exercise (Video): React Animation Components
Exercise (Instructions): React Animation Components
Objectives and Outcomes
In this exercise you will learn to use react-animation-components to add
more subtle animations to your React app. At the end of this exercise
you will be able to:
- Use react-animation-components to add more subtle animations to your React app.
Installing React-Animation-Components
- Install react-animation-components into your React app as follows:
```
> yarn add [email protected]
>
> yarn add [email protected]
```
Adding Animations
- Open HomeComponents.js and update as follows:
```
> . . .
>
> import { FadeTransform } from 'react-animation-components';
> . . .
> in
> transformProps={{
> exitTransform: 'scale(0.5) translateY(-50%)'
> }}>
>
>
> {item.name}
> {item.designation ? {item.designation} : null }
> {item.description}
>
>
>
> . . .
```
- Open DishdetailComponents.js and update it as follows:
```
> . . .
> import { FadeTransform, Fade, Stagger } from 'react-animation-components';
> . . .
> in
> transformProps={{
> exitTransform: 'scale(0.5) translateY(-50%)'
> }}>
>
>
> {dish.name}
> {dish.description}
>
>
>
> . . .
>
> {comments.map((comment) => {
> return (
>
>
> {comment.comment}
> -- {comment.author} , {new Intl.DateTimeFormat('en-US', { year: 'numeric', month: 'short', day: '2-digit'}).format(new Date(Date.parse(comment.date)))}
>
>
> );
> })}
>
> . . .
```
- Save all the changes and do a Git commit with the message "React Animation Components".
Conclusions
In this exercise you saw yet another way of adding subtle animations
using react-animation-components.
React Animations: Additional Resources
PDFs of Presentations
7-Animations.pdf
React Animations
- [Animation Add-Ons](https://reactjs.org/docs/animation.html)
- [react-transition-group](https://github.com/reactjs/react-transition-group)
- [React Transition Group
Documents](https://reactcommunity.org/react-transition-group/)
- [react-animation-components](https://github.com/unruffledBeaver/react-animation-components)
Other Resources
- How to build animated microinteractions in React
- UI Animations with React --- The Right Way
- React Animations in Depth
- What's the most developer-friendly React animation library?
- Amazing React animation with react-pose
Assignment 4: Redux, Client-Server Communication and Fetch
Peer-graded Assignment: Redux, Client-Server Communication and Fetch
Deadline Nov 13, 11:59 PM PST
Ready for the assignment?
You will find instructions below to submit.
In this assignment, you will update the web application to get data from
the server to render the information corresponding to the leadership
team of the company. In addition, you will handle the submission of the
feedback form by posting the feedback to the server.
Step-By-Step Assignment Instructions
Assignment Overview
At the end of this assignment, you should have completed the following:
- Introduced new action types and action creators to support the
fetching of the leaders information from the server and update the
Redux store.
- Updated the Home and the About component to render the information
about the leaders using the downloaded data from the server
- Add simple animations to the About component where the leaders
information is displayed.
- Enabled the users to submit feedback through the feedback form by
creating a new feedback service that accepts the form data and
uses Restangular to record their feedback on the server.
Assignment Requirements
Task 1
In this task, you will update the Redux actions and the Home and About
components to use the data from the server for rendering the leader
information:
- Add new action types in ActionTypes.js to support the fetching of
the leaders information from the server
- Add new action creators in ActionCreators.js to enable the
fetching of the leaders information from the server and update the
Redux store
- Update the code in leaders.js to respond to the dispatched Redux
actions and update the Redux store and appropriately handle the
loading and errors.
- Update the code in MainComponent.js to fetch and use the leaders
information.
- Update HomeComponent.js to render the leader information.
- Update AboutComponent.js to render the leaders information. You
should handle the loading and error condition appropriately.
Task 2
In this task, you will enable the saving of the feedback data submitted
using the feedback form in the Contact component. You will save the
feedback form data submitted by the user to the server:
- Implement a new action creator named postFeedback() that takes a
Feedback object as a parameter and submits the feedback to the
server using Fetch. Recall that the feedback data is accessible at
on the json-server.
- Update MainComponent.js to make the new dispatch method
postFeedback() available to ContactComponent.
- Update the ContactComponent.js to submit the form data using the
postFeedback() method by passing the feedback form data.
Task 3
In this task you will use simple animation using
react-animation-components to enable a staggered rendering of the list
of leaders in AboutComponent:
- Use the expand animation that we have already used earlier to judiciously apply animation to the various stages of the form submission.
Screenshots
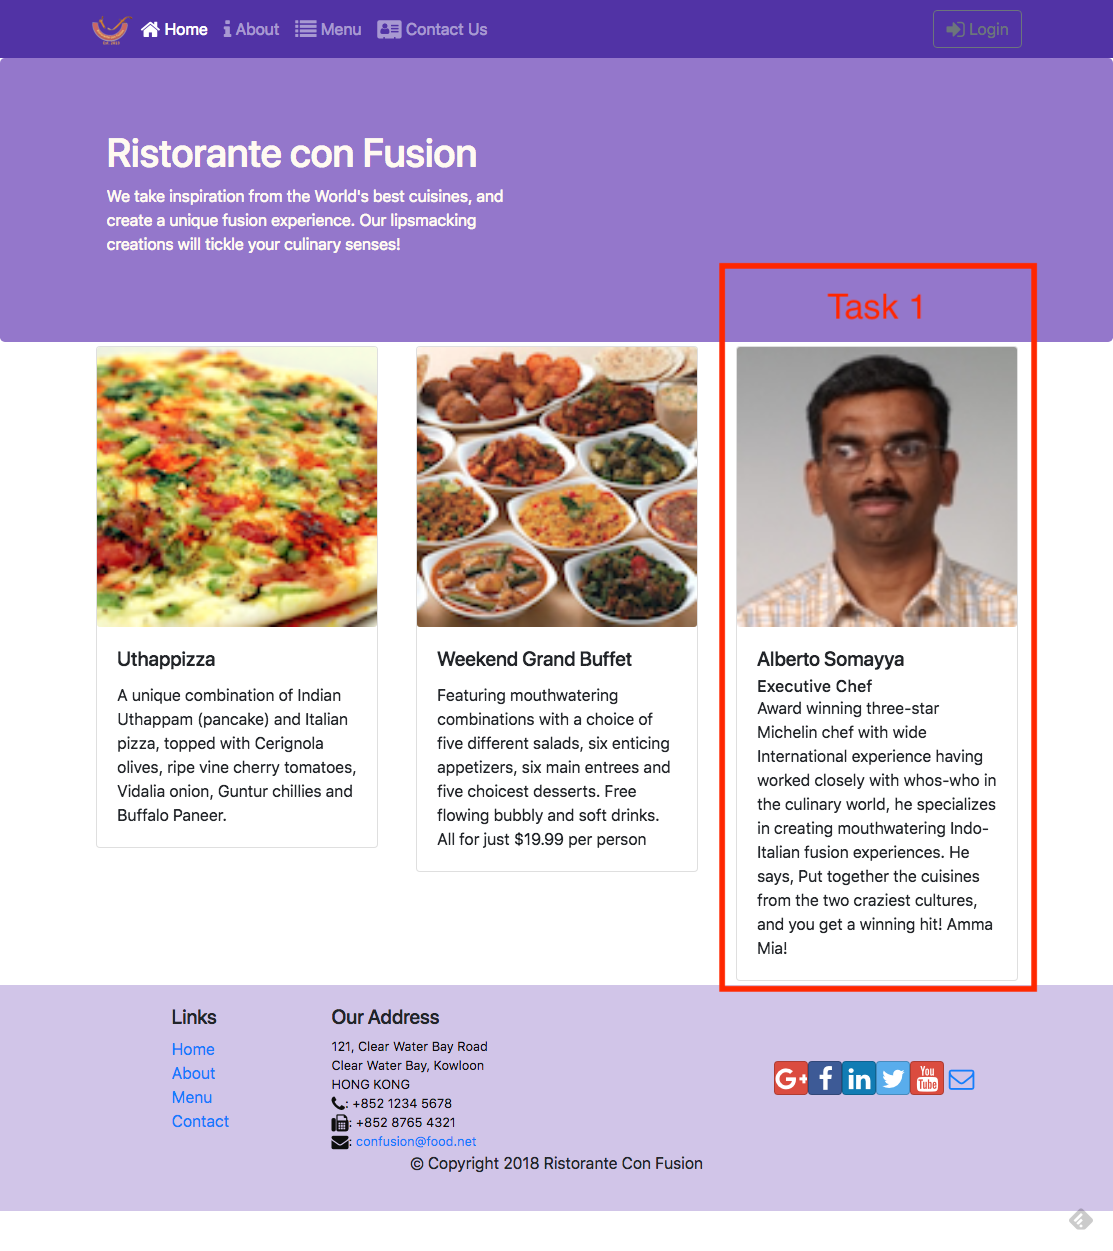
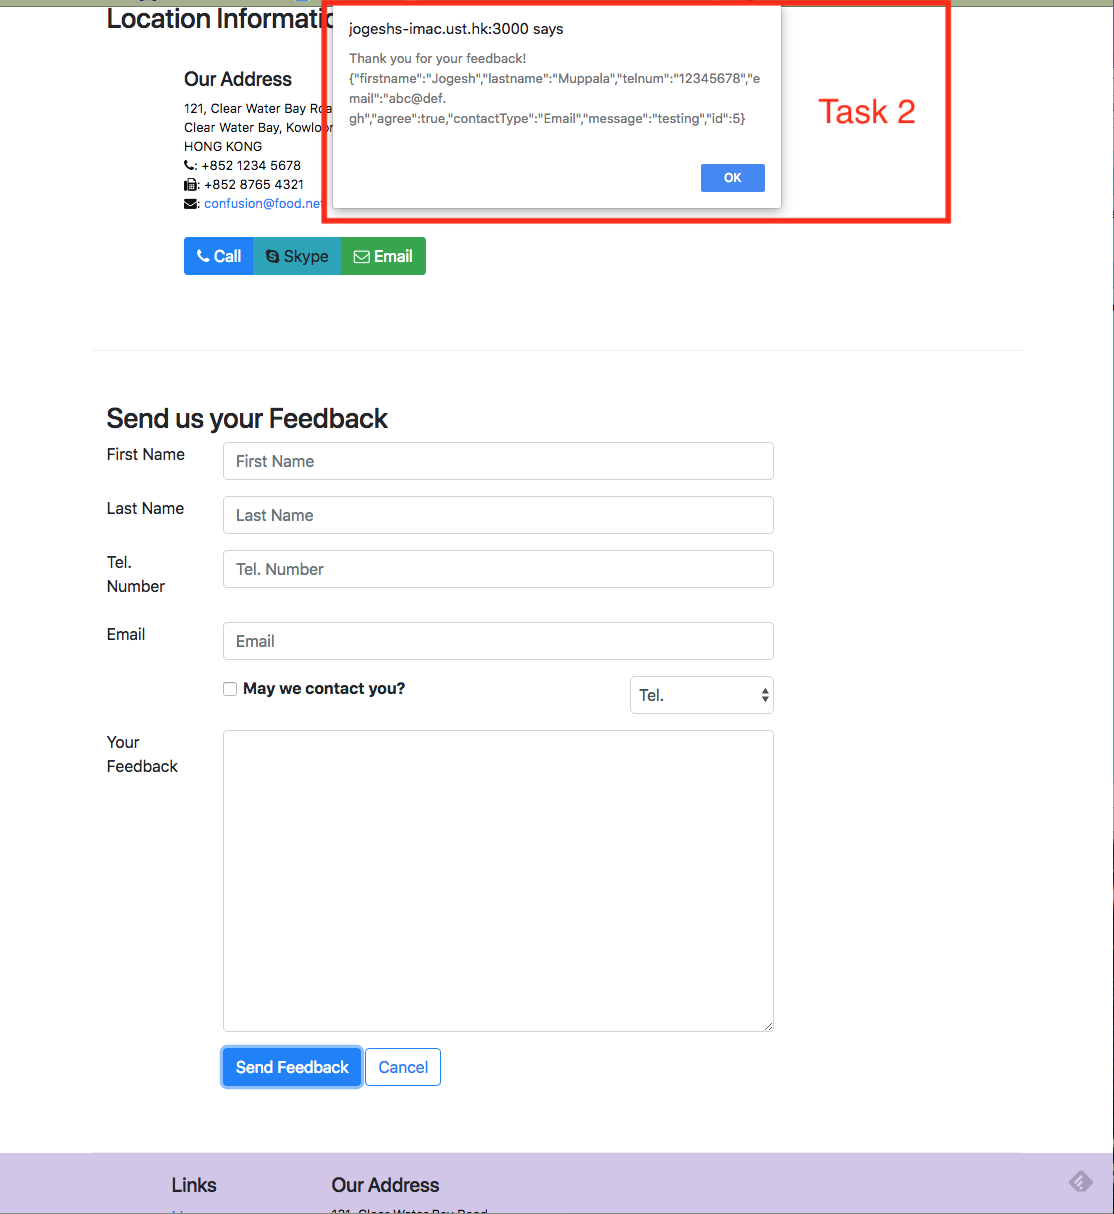
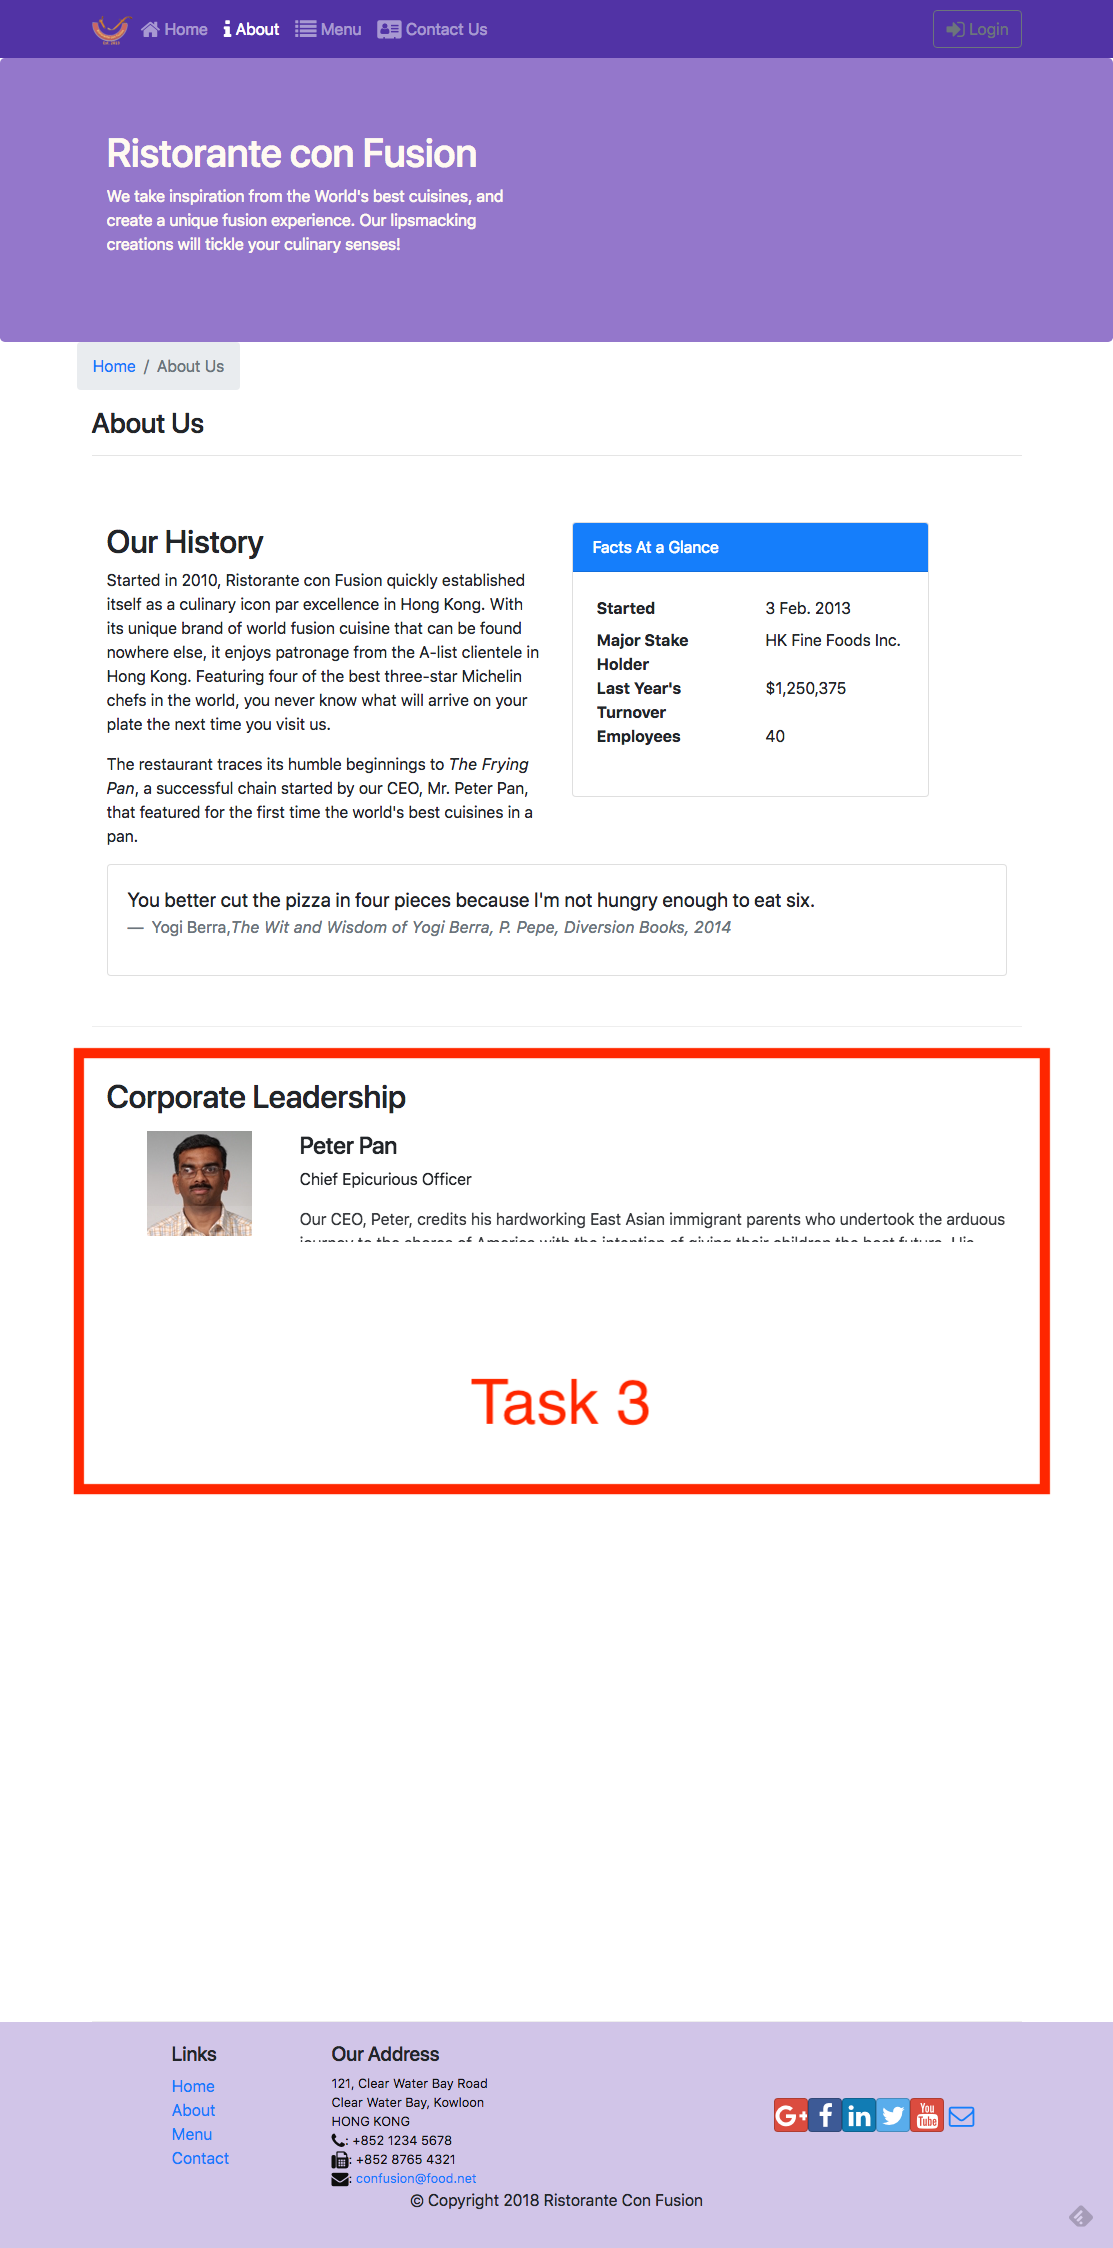
Review criteria
less
Your assignment will be assessed based on the following criteria:
Task 1
- Appropriate action types and action creators have been added.
- The Home component is correctly using the leader data, and handling
any errors that might arise.
- The About component is correctly using the leader data, and handling
any errors that might arise.
Task 2
- A new postFeedback() action creator is correctly implemented to post the feedback data to the server.
- The Contact component has been correctly updated to use postFeedback() to post the form data to the server.
Task 3
- Appropriate animation has been added to stagger the rendering of the leaders in the AboutComponent.
Assignment 4: Redux, Client-Server Communication and Fetch: Additional Resources
Assignment Screenshots
React Resources
- Redux Actions
- Redux Reducers
- Redux Usage with React
- Cross-Fetch
- Animation Add-Ons
- react-transition-group
- React Transition Group Documents
- react-animation-components
Module xx: Building and Deployment: Objectives and Outcomes
In this lesson you will learn about Webpack and how react-scripts uses webpack to package your React application to create a distribution folder. At the end of this exercise you will be able to:
- Understand the Webpack way of packaging applications into bundles
- Use react-scripts to build a distribution folder with your React application bundled using Webpack
Introduction to Webpack
Exercise (Video): Building and Deploying the React Application
Exercise (Instructions): Building and Deploying the React Application
Objectives and Outcomes
In this exercise you will learn to use the react-scripts to build a distribution folder with the set of application files that can be copied to a server to deploy your React application. At the end of this
exercise you will be able to:
- Build your React application using the react-scripts to create a distribution folder
- Deploy your application to a server by copying the built files to your server
Building the Distribution Folder
- To build the distribution folder containing your React application, type the following at the prompt:
$ npm run build
- This should build a distribution folder named build containing all your application files.
Deploying your React Application
- To deploy your React application you need a server. Fortunately we already have the json-server available on our computer.
- Copy the contents of the build folder to the public folder of your json-server.
- Now your React application can be accessed at the link <http://localhost:3001/>.
- If you are setting up a server on the cloud or anywhere, all that you need to do is copy the contents of the build folder to the server side to deploy your React application. The exact procedure depends on the cloud service provider that you choose to use. Please consult their documentation to see the procedure to set up the server.
Conclusions
In this exercise you learnt to use the react-scripts to build and deploy
your React application.
Building and Deployment: Additional Resources
PDFs of Presentations
8-Webpack.pdf
React Resources
Other Resources
Project Implementation: Objectives and Outcomes
This is the final stretch before you complete your project.
By this time you should already have a good scaffolding for your website.
As you flesh out your project and race towards completion, it is time to pause and take stock of the current situation.
Perhaps a critical look back at the past, with the view of learning from our experience and consolidating this learning into an effective, organized and repeatable process is in order.
Upon completion of the project it is important not only to demonstrate the working project, but also summarize the process of reaching the final goal. At the end of this lesson, you will be able to:
- Document the process of starting from an idea and reaching the conclusion of the project, not just the implementation, but also recognizing the process of reaching the end.
- Learn lessons from the process in understanding what worked and what did not, and being able to make intelligent choices in the future based on the experience.
- Understand the design and development process through the practice.
Final Report Template
Project Title
1. Introduction
- Briefly describe the salient features of your project.
2. Design and Implementation
Give a detailed system description and design and implementation details.
In particular, this section should contain:
- Details of how you converted from design to the actual realization of your project in terms of implementing the code.
- Any choices that you made, and any modifications that you made to the design, in response to difficulties that you might have encountered while implementing the project.
- A brief discussion of various modules and libraries that you used in implementing your project. In particular highlight the reasons for your choices briefly.
- Include a few screen shots of your website in the report.
3. Conclusions
- Briefly state what results you obtained from your project.
- Discuss any features and shortcomings of the project.
- Discuss any choices that you might have made differently, in hindsight after completing the project.
4. References
- Give references to any material / websites / books etc. relevant to your project.
Honors Peer-graded Assignment: Project Implementation and Final Report
Ready for the assignment?
You will find instructions below to submit.
It's finally time to submit your Capstone project for evaluation.
In addition, you will also submit your source code after uploading it to
any suitable site like Github, Bitbucket or others that can be publicly
accessed by providing the URL of the site.
Make sure that you have sufficiently documented the implementation of your project code by
adding appropriate comments within the code so that reviewers can easily
understand the code.
If your server is running on any publicly hosted server, please submit the URL of the site.
Review criteria
less
Your final project submission will be evaluated by your peers considering the following items:
- Have the details of the implementation been briefly described in the final report?
- Have any justifications for the choices made been provided in the final report?
- Has the source code been made available for review?
- Has the URL to the server where the project is running been provided?
..the end.
Last updated 4-17-23 10:48pm
Home
> > > > ); > > } > > > > export default Home; ```Configuring the Router
- Open MainComponent.js file and update it as follows: ``` > . . . > > import Home from './HomeComponent'; > > . . . > > import { Switch, Route, Redirect } from 'react-router-dom'; > > . . . > > render() { > > const HomePage = () => { > return( >Conclusions
In this exercise you learn about installing, configuring and using the React Router for navigation within your React app.React Router: Additional Resources
PDFs of Presentations
3-VirtualDOM.pdf PDF File 4-React-Router.pdf PDF FileReact Resources
- [react-router](https://github.com/ReactTraining/react-router) - [react-router-dom](https://github.com/ReactTraining/react-router/tree/master/packages/react-router-dom) - [React Router Documentation](https://reacttraining.com/react-router/) - [React Router Dom Documentation](https://reacttraining.com/react-router/web/guides/philosophy)Other Resources
- [React Router DOM: set-up, essential components, & parameterized routes](https://blog.logrocket.com/react-router-dom-set-up-essential-components-parameterized-routes-505dc93642f1) - [Basic intro to React Router v4](https://medium.com/@thejasonfile/basic-intro-to-react-router-v4-a08ae1ba5c42) - [A Simple React Router v4 Tutorial](https://medium.com/@pshrmn/a-simple-react-router-v4-tutorial-7f23ff27adf)Module 09: Single Page Applications: Objectives and Outcomes
In this lesson you will explore single page applications (SPA) and React support for SPA. You will learn to use the routes and React router that enables the development of SPAs. At the end of this lesson, you will be able to: - Design SPA using React - Use the React router to construct SPASingle Page Applications (video)
Exercise (Video): Single Page Applications Part 1
Exercise (Instructions): Single Page Applications Part 1
Objectives and Outcomes
In this exercise you will continue to develop the React application as a single page application, integrating the various components. At the end of this exercise you will be able to: - Leverage the React router to enable the development of single page applications - Provide a way of navigating among various pages using the React router support.Exercise Resources
dishes JS File promotions JS File leaders JS File comments JS FileIntegrating the Contact Component
- Add a new file named ContactComponent.js file and update its contents as follows: ``` > import React from 'react'; > > function Contact(props) { > return( >Location Information
>Our Address
> > 121, Clear Water Bay RoadMap of our Location
> >Updating the Home Component
- First update dishes.js file in the shared folder to update the dishes as follows. (NOTE: Alternately you can download dishes.js, comments.js, promotions.js and leaders.js given above in Exercise resources and move them to the shared folder): ``` > export const DISHES = > [ > { > id: 0, > name:'Uthappizza', > image: '/assets/images/uthappizza.png', > category: 'mains', > label:'Hot', > price:'4.99', > featured: true, > > description:'A unique combination of Indian Uthappam (pancake) and Italian pizza, topped with Cerignola olives, ripe vine cherry tomatoes, Vidalia onion, Guntur chillies and Buffalo Paneer.' > }, > { > id: 1, > name:'Zucchipakoda', > image: '/assets/images/zucchipakoda.png', > category: 'appetizer', > label:'', > price:'1.99', > featured: false, >description:'Deep fried Zucchini coated with mildly spiced Chickpea flour batter accompanied with a sweet-tangy tamarind sauce' > > }, > { > id: 2, > name:'Vadonut', > image: '/assets/images/vadonut.png', > category: 'appetizer', > label:'New', > price:'1.99', > featured: false, > description:'A quintessential ConFusion experience, is it a vada or is it a donut?' > }, > { > id: 3, > name:'ElaiCheese Cake', > image: '/assets/images/elaicheesecake.png', > category: 'dessert', > label:'', > price:'2.99', > featured: false, ``` - Now add a new file named comments.js to the shared folder and update it as follows. We are now moving the comments about the dishes into its own file: ``` > export const COMMENTS = > > [ > > { > > id: 0, > > dishId: 0, > > rating: 5, > > comment: "Imagine all the eatables, living in conFusion!", > > author: "John Lemon", > > date: "2012-10-16T17:57:28.556094Z" > > }, > > { > > id: 1, > > dishId: 0, > > rating: 4, > > comment: "Sends anyone to heaven, I wish I could get my mother-in-law to eat it!", > > author: "Paul McVites", > > date: "2014-09-05T17:57:28.556094Z" > > }, > > { > > id: 2, > > dishId: 0, > > rating: 3, > > comment: "Eat it, just eat it!", > > author: "Michael Jaikishan", > > date: "2015-02-13T17:57:28.556094Z" > > }, > > { > > id: 3, > > dishId: 0, > > rating: 4, > > comment: "Ultimate, Reaching for the stars!", > > author: "Ringo Starry", > > date: "2013-12-02T17:57:28.556094Z" > > }, > > { > > id: 4, > > dishId: 0, > > rating: 2, > > comment: "It's your birthday, we're gonna party!", > > author: "25 Cent", - Next add a new file named promotions.js file to the shared folder and update its contents as follows: > export const PROMOTIONS = [ > > { > > id: 0, > > name: 'Weekend Grand Buffet', > > image: '/assets/images/buffet.png', > > label: 'New', > > price: '19.99', > > featured: true, > > description: 'Featuring mouthwatering combinations with a choice of five different salads, six enticing appetizers, six main entrees and five choicest desserts. Free flowing bubbly and soft drinks. All for just $19.99 per person' > > } > > ]; - Next add a new file named leaders.js file to the shared folder and update its contents as follows: > export const LEADERS = [ > > { > > id: 0, > > name: 'Peter Pan', > > image: '/assets/images/alberto.png', > > designation: 'Chief Epicurious Officer', > > abbr: 'CEO', > > featured: false, > > description: "Our CEO, Peter, credits his hardworking East Asian immigrant parents who undertook the arduous journey to the shores of America with the intention of giving their children the best future. His mother's wizardy in the kitchen whipping up the tastiest dishes with whatever is available inexpensively at the supermarket, was his first inspiration to create the fusion cuisines for which The Frying Pan became well known. He brings his zeal for fusion cuisines to this restaurant, pioneering cross-cultural culinary connections." > > }, > > { > > id: 1, > > name: 'Dhanasekaran Witherspoon', > > image: '/assets/images/alberto.png', > > designation: 'Chief Food Officer', > > abbr: 'CFO', > > featured: false, > > description: 'Our CFO, Danny, as he is affectionately referred to by his colleagues, comes from a long established family tradition in farming and produce. His experiences growing up on a farm in the Australian outback gave him great appreciation for varieties of food sources. As he puts it in his own words, Everything that runs, wins, and everything that stays, pays!' > > }, > > { > > id: 2, > > name: 'Agumbe Tang', > > image: '/assets/images/alberto.png', > > designation: 'Chief Taste Officer', > > abbr: 'CTO', > > featured: false, > > description: 'Blessed with the most discerning gustatory sense, Agumbe, our CFO, personally ensures that every dish that we serve meets his exacting tastes. Our chefs dread the tongue lashing that ensues if their dish does not meet his exacting standards. He lives by his motto, You click only if you survive my lick.' > > }, > > { > > id: 3, > > name: 'Alberto Somayya', > > image: '/assets/images/alberto.png', > > designation: 'Executive Chef', > > abbr: 'EC', > > featured: true, > > description: 'Award winning three-star Michelin chef with wide International experience having worked closely with whos-who in the culinary world, he specializes in creating mouthwatering Indo-Italian fusion experiences. He says, Put together the cuisines from the two craziest cultures, and you get a winning hit! Amma Mia!' > > } > > ]; - Now update the HomeComponent.ts file to fetch and display the featured dish, promotion and leader as follows: ``` > import React from 'react'; > import { Card, CardImg, CardText, CardBody, > CardTitle, CardSubtitle} from 'reactstrap'; > function RenderCard({item}) { > return( >Conclusions
In this exercise you developed the Angular application further by integrating the components into a single page application.Module 7: React Router: Parameters
Exercise (Video): Single Page Applications Part 2
Exercise (Instructions): Single Page Applications Part 2
Objectives and Outcomes
In this exercise you will integrate the DishdetailComponent into your single page application. You will use a route parameter in the URL to pass in the details of the selected dish to the DishdetailComponent. At the end of this exercise you will be able to: - Configure the routes in your React router configuration to enable the use of route parameters within the URL to pass information to a component.Updating to Use Parameters on Routes
- Open MenuComponent.js and add the following changes to it to enable the information about the selected dish to be passed to the DishdetailComponent: ``` . . . > > import { Card, CardImg, CardImgOverlay, > CardTitle, Breadcrumb, BreadcrumbItem } from 'reactstrap'; > import { Link } from 'react-router-dom'; > > function RenderMenuItem ({dish, onClick}) { > return ( >Menu
>Updating DishDetail Component
- Open DishdetailComponent.js and update it as follows: ``` > . . . > import { Card, CardImg, CardText, CardBody, > CardTitle, Breadcrumb, BreadcrumbItem } from 'reactstrap'; > import { Link } from 'react-router-dom'; > . . . > return ( >{props.dish.name}
>Adding Breadcrumbs to ContactComponent
- Open ContactComponent.js and add Breadcrumbs to it as follows:
Contact Us
- Save all the changes and do a Git commit with the message \"Single Page Applications Part 2\".
Conclusions
In this exercise you have seen the use of parameters within the URL to pass information to another component.
Single Page Applications: Additional Resources
PDFs of Presentations
5-Single-Page-Apps.pdfPDF File
6-React-Router-Parameters.pdfPDF File
React Resources
- [react-router](https://github.com/ReactTraining/react-router) - [react-router-dom](https://github.com/ReactTraining/react-router/tree/master/packages/react-router-dom) - [React Router Documentation](https://reacttraining.com/react-router/) - [React Router Dom Documentation](https://reacttraining.com/react-router/web/guides/philosophy)Other Resources
- [Arrow Functions](https://developer.mozilla.org/en-US/docs/Web/JavaScript/Reference/Functions/Arrow_functions) - [Single Page Applications (Wikipedia)](https://en.wikipedia.org/wiki/Single-page_application) - [Deep linking](https://en.wikipedia.org/wiki/Deep_linking) - [Single Page Apps in depth](http://singlepageappbook.com/) - [SPA and the Single Page Myth](http://www.johnpapa.net/pageinspa/)Assignment 2: React Router and Single Page Applications
Peer-graded Assignment: React Router and Single Page Applications
DeadlineOct 30, 11:59 PM PDT Ready for the assignment? You will find instructions below to submit. 1. [Instructions](https://www.coursera.org/learn/front-end-react/peer/ptyN7/react-router-and-single-page-applications) 2. [My submission](https://www.coursera.org/learn/front-end-react/peer/ptyN7/react-router-and-single-page-applications/submit) 3. [Discussions](https://www.coursera.org/learn/front-end-react/peer/ptyN7/react-router-and-single-page-applications/discussions) In this assignment you will continue working with the React application by adding a new component named AboutComponent to serve up the details of the corporate leaders, and you will then integrate the AboutComponent into the single page application.Step-By-Step Assignment Instructions
less Assignment Resources AboutComponent JS File Objectives and Outcomes At the end of this assignment, you should have completed the following tasks: - Integrated the AboutComponent given above into the single page application. - Added a new functional component named <RenderLeader> through the RenderLeader() function to AboutComponent.js that renders the details of a given leader using the reactstrap <Media> component. - Construct and render the list of leaders in the About Us page using the <RenderLeader> component implemented above. Assignment Requirements This assignment requires you to complete the following tasks. Detailed instructions for each task are given below. The picture of the completed web page included below indicates the location within the web page that will be updated by the three tasks. Task 1 In this task you will be integrating the AboutComponent into the single page application: - First, download the AboutComponent.js given above and move it to the components folder, and - Update the MainComponent.js file to integrate the AboutComponent into the single page application. You should be able to navigate to the AboutComponent by clicking the links in the navigation bar and the footer. Task 2 In this task you will implement a new functional component named <RenderLeader> through the RenderLeader() function:- The RenderLeader() function receives the details of a leader as its parameter,
- Implement RenderLeader() function to use the Leader information received as a parameter
and render the leader information as shown in the screenshot below using the reactstrap
<Media> component. Recall how we used the <Media> component in the first
module to render the details of a dish in the MenuComponent.
- This will make available the <RenderLeader> component for use within your AboutComponent.
- Update the leaders variable within the AboutComponent() function to make use of the <RenderLeader> component to render the list of leaders.
Review criteria
lessUpon completion of the assignment, your submission will be reviewed based on the following criteria:
Task 1: - The AboutComponent.js file has been downloaded and integrated into our React application. - The React application has been appropriately updated to enable navigation to the About Us page of our application. Task 2: - Implemented a new <RenderLeader> functional component in your application. - Used the reactstrap <Media> component to render the details of a leader. Task 3:- Updated the leaders variable within the AboutComponent() function to make use of the <RenderLeader> component to render the list of leaders.
Assignment 2: React Router and Single Page Applications: Additional Resources
Assignment Resources
AboutComponentJS File
Screenshots
React Resources
- [react-router](https://github.com/ReactTraining/react-router) - [react-router-dom](https://github.com/ReactTraining/react-router/tree/master/packages/react-router-dom) - [React Router Documentation](https://reacttraining.com/react-router/) - [React Router Dom Documentation](https://reacttraining.com/react-router/web/guides/philosophy) - [reactstrap <Media> component](https://reactstrap.github.io/components/media/)UI Design and Prototyping: Objectives and Outcomes
Now that you are more clear about your project idea, it\'s time to conceive how your project is going to look like for the end-users. This is the time to design the user interface and the flow of your application. User interface design and prototyping helps you to conceptualize the look and feel of your application. This can be achieved in two ways: using wireframe diagrams, or using prototyping tools. We provide links to wireframing and prototyping tools in the additional resources. The focus in this lesson is to be able to visually represent various UI elements to enable designing your application. The aim is to deliver a reasonable representation of the end-user experience with your application At the end of this lesson, you should be able to: - Construct a wireframe diagram to visually represent the structure of your user interface - Construct a prototype to enable understanding the flow of your applicationUI Design and Prototyping Report Template
Project Title
1. Introduction
- Give a brief introduction to your project and the list of features. Summarize in a few sentences what you proposed in the ideation report.2. User Interface Design and Prototype
- Give some sample user interface layouts for your application. You can use either wireframe diagrams or prototyping tools to construct the mock representations of your UI design - Briefly explain the rationale behind designing your UI and how it is geared towards supporting the list of features for your application.3. Navigation Structure
- Give a brief overview of the navigation structure for your application. - Briefly indicate a typical flow of your application in terms of user experience. You can use any way of representing the flow. You can also construct a prototype using one of the prototyping tools to illustrate this.4. References
- Provide any references relevant to the report.Honors Peer-graded Assignment: UI Design and Prototyping
DeadlineOct 30, 11:59 PM PDT Ready for the assignment? You will find instructions below to submit. 1. [Instructions](https://www.coursera.org/learn/front-end-react/peer/ivQry/ui-design-and-prototyping) 2. [My > submission](https://www.coursera.org/learn/front-end-react/peer/ivQry/ui-design-and-prototyping/submit) 3. [Discussions](https://www.coursera.org/learn/front-end-react/peer/ivQry/ui-design-and-prototyping/discussions) In this assignment you will be submitting a written report that includes some user interface designs and the flow of your application and the navigation structure. The report should follow the report template structure given earlier in this lesson.Review criteria
less Your submission will be reviewed based on the following criteria by peers in order to provide you with constructive feedback on your project idea: 1. Does the report provide a brief overview of the project and the list > of features ? 2. Does the report contain some user interface designs that showcase > the realization of the features listed above? 3. Does the report contain information about the application flow and > navigation structure? 4. Does the report provide references to suitable sources in support of > the project?UI Design and Prototyping: Additional Resources
Wireframing, Mockups and UI Design
- [Wireframe.cc](https://wireframe.cc/) - [Moqups.com](https://moqups.com/) - [Axure](http://www.axure.com/) - [proto.io](https://proto.io/) - [framerjs.com](http://framerjs.com/) - [The 20 best wireframe tools](http://www.creativebloq.com/wireframes/top-wireframing-tools-11121302) - [Web Design Inspirations](http://www.webdesign-inspiration.com/) - [Adobe Experience Design](http://www.adobe.com/products/experience-design.html) - [Free Bootstrap Wireframing Set for PowerPoint](https://onextrapixel.com/free-bootstrap-wireframing-set-for-powerpoint/)UI Templates
- [Bootstrap Expo](http://expo.getbootstrap.com/) - [Ionic Showcase](http://showcase.ionicframework.com/)Information Architecture
- [A visual vocabulary for describing information architecture and interaction design](http://www.jjg.net/ia/visvocab/) - [The Elements of User Experience](http://www.jjg.net/elements/) - [The Elements of User Experience: User-Centered Design for the Web and Beyond (2nd Edition) (Voices That Matter)](http://www.amazon.com/The-Elements-User-Experience-User-Centered/dp/0321683684/ref=pd_cp_14_1?ie=UTF8&refRID=0RXJWKFHY0TNF5QM2764)Controlled Forms: Objectives and Outcomes
In this lesson you will learn about controlled components and how they can be used to design controlled forms in your React application. At the end of this exercise you will be able to: - Design a controlled form in your React application.Controlled Forms
Exercise (Video): Controlled Forms
Exercise (Instructions): Controlled Forms
Objectives and Outcomes
In this exercise you will learn about using controlled components to design controlled forms in your React application. At the end of this exercise you will be able to: - Design a controlled form in your React application.Importing the Necessary Components
- You will start out by importing the necessary components from reactstrap into ContactComponent.js as follows: ``` > . . . > import React, { Component } from 'react'; > import { Breadcrumb, BreadcrumbItem, > Button, Form, FormGroup, Label, Input, Col } from 'reactstrap'; > . . . ``` - You will then change the ContactComponent to a class-based component as follows: ``` . . . class Contact extends Component { render() { . . . } } ```Creating the Controlled Form
- Update the ContactComponent.js file as follows to set up the Controlled Form: ``` . . . constructor(props) { super(props); this.state = { firstname: '', lastname: '', telnum: '', email: '', agree: false, contactType: 'Tel.', message: '' }; this.handleInputChange = this.handleInputChange.bind(this); this.handleSubmit = this.handleSubmit.bind(this); } handleInputChange(event) { const target = event.target; const value = target.type === 'checkbox' ? target.checked : target.value; const name = target.name; this.setState({ [name]: value }); } handleSubmit(event) { console.log('Current State is: ' + JSON.stringify(this.state)); alert('Current State is: ' + JSON.stringify(this.state)); event.preventDefault(); } . . . ``` - Then add the controlled form to it as follows: ``` > . . . >Send us your Feedback
> >Conclusions
In this exercise you have learnt to create a controlled form within your React application.Exercise (Video): Controlled Form Validation
Exercise (Instructions): Controlled Form Validation
Objectives and Outcomes
In this exercise you will be introduced to simple form validation for controlled forms in React. At the end of this exercise you will be able to: - Configure and perform simple form validation for your controlled formsSimple Form Validation
- Open ContactComponent.js and update it as follows to introduce the support to track form errors and perform validation: ``` > . . . > > import { Breadcrumb, BreadcrumbItem, Button, Form, FormGroup, Label, Input, Col, Row, FormFeedback } from 'reactstrap'; > > . . . > > > > class Contact extends Component { > > > > constructor(props) { > > super(props); > > > > this.state = { > > firstname: '', > > lastname: '', > > telnum: '', > > email: '', > > agree: false, > > contactType: 'Tel.', > > message: '', > > touched: { > > firstname: false, > > lastname: false, > > telnum: false, > > email: false > > } > > } > > this.handleSubmit = this.handleSubmit.bind(this); > > this.handleInputChange = this.handleInputChange.bind(this); > > this.handleBlur = this.handleBlur.bind(this); > > } > > > > . . . > > > > handleBlur = (field) => (evt) => { > > this.setState({ > > touched: { ...this.state.touched, [field]: true } > > }); > > } > > > > validate(firstname, lastname, telnum, email) { > > const errors = { > > firstname: '', ``` - Now that we have introduced some functions that can be used for form validation, let us update the form itself to make use of these as follows: ``` > . . . > > > >Conclusions
In this exercise you have learnt about doing simple form validation for controlled forms in React.Controlled Forms: Additional Resources
PDFs of Presentations
1-Controlled-Components-Forms.pdf PDF FileReact Resources
- [Controlled Components](https://reactjs.org/docs/forms.html) - [reactstrap Form](https://reactstrap.github.io/components/form/)Other Resources
- [Controlled / Uncontrolled React Components](https://www.viget.com/articles/controlling-components-react/) - [Controlled and Uncontrolled Input Values in React](https://medium.com/@peter.yun.kim/controlled-and-uncontrolled-input-values-in-react-907119cc98d4) - [Controlled and uncontrolled form inputs in React don\'t have to be complicated](https://goshakkk.name/controlled-vs-uncontrolled-inputs-react/) - [How to Work with Forms, Inputs and Events in React](https://medium.com/capital-one-developers/how-to-work-with-forms-inputs-and-events-in-react-c337171b923b) - [Some Thoughts On Forms in React](https://medium.com/javascript-inside/some-thoughts-on-forms-in-react-9ca2d9078c20) - [Instant form field validation with React\'s controlled inputs](https://goshakkk.name/instant-form-fields-validation-react/)Module 8: Uncontrolled Forms: Objectives and Outcomes
Forms in React can be approached in two ways, either through uncontrolled components, or controlled components. In this lesson we will deal with uncontrolled forms. At the end of this lesson you will be able to: - Create uncontrolled forms through uncontrolled components in React - Handle the form submission in the React applicationUncontrolled Components
Exercise (Video): Uncontrolled Forms
Exercise (Instructions): Uncontrolled Forms
In this exercise we will create an uncontrolled form within our React application using the uncontrolled component approach. At the end of this exercise you will be able to: - Create uncontrolled forms through uncontrolled components in React - Handle the form submission in the React applicationAdding a Modal to Host the Form
- Update HeaderComponent.js as follows to add a new Modal to the application to host the form: ``` > . . . > import { Navbar, NavbarBrand, Nav, NavbarToggler, Collapse, NavItem, Jumbotron, > Button, Modal, ModalHeader, ModalBody, > Form, FormGroup, Input, Label } from 'reactstrap'; > . . . > this.state = { > isNavOpen: false, > isModalOpen: false > }; > . . . > this.toggleModal = this.toggleModal.bind(this); > . . . > toggleModal() { > this.setState({ > isModalOpen: !this.state.isModalOpen > }); > } > . . . > <Modal isOpen={this.state.isModalOpen} toggle={this.toggleModal}> > <ModalHeader toggle={this.toggleModal}>Login</ModalHeader> >Adding the Uncontrolled Form
- Add the form to the modal body as shown below: . . . ``` >Conclusions
In this exercise we learnt to use an uncontrolled component approach to add a form to our React application.Uncontrolled Forms: Additional Resources
PDFs of Presentations
2-Uncontrolled-Components-Forms.pdf PDF FileReact Resources
- [Uncontrolled Components](https://reactjs.org/docs/uncontrolled-components.html) - [reactstrap Form](https://reactstrap.github.io/components/form/) - [reactstrap Modal Component](https://reactstrap.github.io/components/modals/)Other Resources
- [Controlled / Uncontrolled React Components](https://www.viget.com/articles/controlling-components-react/) - [Controlled and Uncontrolled Input Values in React](https://medium.com/@peter.yun.kim/controlled-and-uncontrolled-input-values-in-react-907119cc98d4) - [Controlled and uncontrolled form inputs in React don\'t have to be complicated](https://goshakkk.name/controlled-vs-uncontrolled-inputs-react/) - [How to Work with Forms, Inputs and Events in React](https://medium.com/capital-one-developers/how-to-work-with-forms-inputs-and-events-in-react-c337171b923b) - [Some Thoughts On Forms in React](https://medium.com/javascript-inside/some-thoughts-on-forms-in-react-9ca2d9078c20)Introduction to Redux: Objectives and Outcomes
In this lesson you will learn about the Flux architecture as a way of structuring your React application. You will also be introduced to Redux, a realization of the flux architecture. At the end of this lesson you will be able to: - Install and Configure Redux in your application - Enable your React app to make use of ReduxModule 9: The Model-View-Controller Framework
Module 10: The Flux Architecture
Module xx: Introduction to Redux
Chapter 1: Exercise (Video): Introduction to Redux
Chapter 2: Exercise (Instructions): Introduction to Redux
Objectives and Outcomes
In this exercise you will learn to use Redux. You will install and configure Redux and use it within your React application. At the end of this exercise you will be able to: - Install and configure Redux within your application - Configure your React application to make use of ReduxInstalling and Configuring Redux
- As a first step you will install Redux and React-Redux into your application as follows: ``` $ yarn add [email protected] > $ yarn add [email protected] ``` - Next, create a folder named redux in the src folder and then add a file named reducer.js with the code below: ``` > import { DISHES } from '../shared/dishes'; > import { COMMENTS } from '../shared/comments'; > import { PROMOTIONS } from '../shared/promotions'; > import { LEADERS } from '../shared/leaders'; > > export const initialState = { > dishes: DISHES, > comments: COMMENTS, > promotions: PROMOTIONS, > leaders: LEADERS > }; > > export const Reducer = (state = initialState, action) => { > return state; > }; ``` - Then, add a file named configureStore.js in the redux folder and add the following code to it: ``` > import {createStore} from 'redux'; > > import { Reducer, initialState } from './reducer' > > export const ConfigureStore = () => { > const store = createStore( > Reducer, // reducer > initialState, // our initialState > ); > > return store; > } ``` - Next, open App.js and update it as follows: ``` > . . . > > import { Provider } from 'react-redux'; > import { ConfigureStore } from './redux/configureStore'; > > const store = ConfigureStore(); > > . . . > >Conclusions
In this exercise you learnt to install and configure Redux and use it in your React application.Introduction to Redux: Additional Resources
PDFs of Presentations
3-MVC.pdf PDF File 4-Flux-Arch.pdf PDF File 5-Intro-Redux.pdf PDF FileReact Resources
- [Redux](https://redux.js.org/) - [Redux on Github](https://github.com/reactjs/redux) - [React and Redux](https://redux.js.org/basics/usage-with-react) - [Redux Basics Documentation](https://redux.js.org/basics) ```{=html} ``` - [The Flux Architecture](https://facebook.github.io/flux/)Other Resources
- [Redux Tutorials](https://github.com/markerikson/react-redux-links/blob/master/redux-tutorials.md) - [Flux Architecture In Depth Overview](https://facebook.github.io/flux/docs/in-depth-overview.html#content)Module xx: React Redux Form: Objectives and Outcomes
In this lesson we will learn to create forms using react-redux-form that enables us to store form information in the Redux store, and brings additional benefits. At the end of this lesson you will be able to: - Configure and use react-redux-form to create Controlled forms - Store the form state in the Redux storeChapter 1. React Redux Forms
Chapter 2. Exercise (Video): React Redux Form
Chapter 3. Exercise (Instructions): React Redux Form
Objectives and Outcomes
In this exercise you will install react-redux-form and then convert the controlled form that we created earlier into a form supported by react-redux-form. At the end of this exercise you will be able to: - Install and configure react-redux-form - Implement a controlled form using react-redux-formInstalling and Using react-redux-form
- We first install the react-redux-form into our project as follows: ``` > yarn addModule xx: Exercise (Video): React Redux Form Validation
Chapter 2: Exercise (Instructions): React Redux Form Validation
Objectives and Outcomes
In this exercise we will explore simple form validation for react-redux-form. At the end of this exercise you will be able to: - Configure and implement simple form validation for controlled forms designed using react-redux-form.Implementing Simple Form Validation
- Open ContactComponent.js and update it as follows to implement form validation: ``` > . . . > const required = (val) => val && val.length; > const maxLength = (len) => (val) => !(val) || (val.length <= len); > const minLength = (len) => (val) => val && (val.length >= len); > const isNumber = (val) => !isNaN(Number(val)); > const validEmail = (val) => /^[A-Z0-9._%+-]+@[A-Z0-9.-]+.[A-Z]{2,4}$/i.test(val); > . . . >Conclusions
In this exercise you learnt about implementing simple form validation using react-redux-form.Chapter 2: React Redux Form: Additional Resources
PDFs of Presentations
6-React-Redux-Form.pdf PDF FileReact Resources
- [React Redux Form Documentation](https://davidkpiano.github.io/react-redux-form/docs.html)Other Resources
- [The boring React Redux forms](https://medium.com/@steida/the-boring-react-redux-forms-a15ee8a6b52b) - [How to populate react-redux-form with dynamic default values](https://swizec.com/blog/populate-react-redux-form-dynamic-default-values/swizec/8158) - [Should you store your form state in Redux?](https://goshakkk.name/should-i-put-form-state-into-redux/)Assignment 3: React Forms and Redux
Peer-graded Assignment: React Forms and Redux
DeadlineNov 6, 11:59 PM PST Ready for the assignment? You will find instructions below to submit. In this assignment you will be updating the React application with a react-redux-form based local form and do the form validation in code.Step-By-Step Assignment Instructions
less Assignment Overview In this assignment you will update the DishdetailComponent.js to include a form and do the form validation in code. At the end of this assignment, you should have completed the following tasks to update the page: - Added a new class component named CommentForm to > DishdetailComponent.js. - Provide a form to enable users to submit their comments - Validate the information entered by the users in the form Assignment Requirements Task 1 In this task you will add a new class component named CommentForm. You need to complete the following: - Add a new class component named CommentForm that will add a button > to the view as shown in the image below. - When the button is clicked, it toggles a modal that will display the > comment form. - The CommentForm component is used by the RenderComments function to > display the button for toggling the modal. Task 2 In this task you will construct the form for users to submit their comments as shown in the image below. You need to complete the following: - Set up the form as a local form using the react-redux-form with the > three fields: author, rating and comment. - The rating field in the comment form is implemented using a select, > the author is implemented using a text field, while the comment > uses a textarea with six rows. Task 3 In this task, you will enable form validation as shown in the images below. You need to complete the following: - The author field should at least be three characters long. - The author field should be less than or equal to 15 characters. - The user should be alerted by showing the invalid message displayed at the bottom of the field.
Review criteria
less Upon completion of the assignment, your submission will be reviewed based on the following criteria: Task 1: - A CommentForm component is implemented that adds a button to the view, which when clicked will toggle a modal containing the form. Task 2: - The form is set up with the three fields correctly. - A select is included in the form to enable users to submit the rating, a text field for author and a text area for the comment. Task 3: - The author field is being properly validated. If incorrect, the user is alerted.Assignment 3: React Forms and Redux: Additional Resources
Assignment Screenshots
React Resources
- [reactstrap Modal Component](https://reactstrap.github.io/components/modals/) - [React Redux Form Documentation](https://davidkpiano.github.io/react-redux-form/docs.html)Redux Actions: Objectives and Outcomes
In this lesson we will look at how to create redux actions and how action creators can be designed to return the action objects. Thereafter we look at how to dispatch actions. We also look at how to split the reducer into simpler functions and combine them. At the end of this exercise, you will be able to: - Define Redux actions - Create action creator functions that return action objects - Split the reducer function into multiple simpler functions and combine the reducer functionsModule xx: Redux Actions
Module xx: Exercise (Video): Combining Reducers
Exercise (Instructions): Combining Reducers
Objectives and Outcomes
In this exercise you will learn about how we can have separate reducers managing parts of the state, and how they can be combined together to manage the whole state. At the end of this exercise you will be able to: - Implement reducers that are responsible for only part of the state - Combine the reducers to manage the entire stateSplitting the Reducer
- In the redux folder, create a new file named dishes.js and add the following to it: ``` > import { DISHES } from '../shared/dishes'; > export const Dishes = (state = DISHES, action) => { > switch (action.type) { > default: > return state; > } > }; ``` - Then, create a file named comments.js and add the following to it: ``` > import { COMMENTS } from '../shared/comments'; > export const Comments = (state = COMMENTS, action) => { > switch (action.type) { > default: > return state; > } > }; ``` - Similarly, create a new file named promotions.js and add the following to it: ``` > import { PROMOTIONS } from '../shared/promotions'; > export const Promotions = (state = PROMOTIONS, action) => { > switch (action.type) { > default: > return state; > } > }; ``` - And finally, create a new file named leaders.js and add the following to it: ``` > import { LEADERS } from '../shared/leaders'; > export const Leaders = (state = LEADERS, action) => { > switch (action.type) { > default: > return state; > } > }; ``` - Now that we have split the management of state into different reducers that manage partial state, we need to combine them together. Open configureStore.js and update it as follows: ``` > import {createStore, combineReducers} from 'redux'; > import { Dishes } from './dishes'; > import { Comments } from './comments'; > import { Promotions } from './promotions'; > import { Leaders } from './leaders'; > > export const ConfigureStore = () => { > const store = createStore( > combineReducers({ > dishes: Dishes, > comments: Comments, > promotions: Promotions, > leaders: Leaders > }) > ); > return store; > } ``` - Now we can safely delete the reducer.js file from the project. - Save all the changes and do a Git commit with the message \"Combining Reducers\".Conclusions
In this exercise we have learnt to split the reducer into multiple reducers that manage partial state, and then combine them together.Module xx: Exercise (Video): Redux Actions
Exercise (Instructions): Redux Actions
Objectives and Outcomes
In this exercise we will learn to define various Redux actions and implement the action creators to dispatch the actions to the Redux store. At the end of this exercise you will be able to: - Define Redux actions and implement the action creators - Dispatch actions from the action creators to update the system state in the Redux storeCreating Actions
- In the redux folder create a new file named ActionTypes.js and add the following to it: ``` > export const ADD_COMMENT = 'ADD_COMMENT'; ``` - Then, create a file named ActionCreators.js and add the following to it: ``` > import as ActionTypes from './ActionTypes'; > export const addComment = (dishId, rating, author, comment) => ({ > type: ActionTypes.ADD_COMMENT, > payload: { > dishId: dishId, > rating: rating, > author: author, > comment: comment > } > }); ``` - Next, update comments.js to initiate action when the action is dispatched by the ActionCreator as follows: ``` > import { COMMENTS } from '../shared/comments'; > import as ActionTypes from './ActionTypes'; > export const Comments = (state = COMMENTS, action) => { > switch (action.type) { > case ActionTypes.ADD_COMMENT: > var comment = action.payload; > comment.id = state.length; > comment.date = new Date().toISOString(); > console.log("Comment: ", comment); > return state.concat(comment); > default: > return state; > } > }; ``` - Now update MainComponent.js to make the action available for use within the DishdetailComponent as follows: ``` > . . . > import { addComment } from '../redux/ActionCreators'; > . . . > const mapDispatchToProps = dispatch => ({ > addComment: (dishId, rating, author, comment) => dispatch(addComment(dishId, rating, author, comment)) > }); > . . . >Conclusions
In this exercise we have learnt to create and dispatch actions to update the system state in the Redux store.Redux Actions: Additional Resources
PDFs of Presentations
Redux Resources
- [Redux Actions](https://redux.js.org/basics/actions) - [Redux Reducers](https://redux.js.org/basics/reducers) - [Redux Usage with React](https://redux.js.org/basics/usage-with-react)Module xx: Redux Thunk: Objectives and Outcomes
Redux Thunk [middleware](https://github.com/reactjs/redux/blob/master/docs/advanced/Middleware.md) allows you to write action creators that return a function instead of an action. In this lesson you will see the use of redux thunk to return a function. At the end of this lesson you will be able to: - Use Redux Thunk middleware to return a function instead of an action - Use a logger middleware to print a log of actions initiated on the Redux store.Redux Thunk
Exercise (Video): Redux Thunk
NotesExercise (Instructions): Redux Thunk
Objectives and Outcomes
Redux Thunk [middleware](https://github.com/reactjs/redux/blob/master/docs/advanced/Middleware.md) allows you to write action creators that return a function instead of an action. In this exercise you will see the use of redux thunk to return a function. At the end of this exercise you will be able to: - Use Redux Thunk middleware to return a function instead of an action - Use a logger to print a log of actions initiated on the Redux store.Installing Redux Thunk and Logger
- Install Redux Thunk and Logger as shown below: ``` > yarn add [email protected] > > yarn add [email protected] ``` - Then open configureStore.js and update it to use the Thunk and Logger as follows: ``` > import {createStore, combineReducers, applyMiddleware } from \'redux\'; > . . . > import thunk from 'redux-thunk'; > import logger from 'redux-logger'; > . . . > combineReducers({ > dishes: Dishes, > comments: Comments, > promotions: Promotions, > leaders: Leaders > }), > applyMiddleware(thunk, logger) > . . . ``` - Next, open ActionTypes.js and add new action types as follows: ``` . . . export const DISHES_LOADING = \'DISHES_LOADING\'; export const DISHES_FAILED = \'DISHES_FAILED\'; export const ADD_DISHES = \'ADD_DISHES\'; ``` - Then open ActionCreators.js and add new actions: ``` > . . . > import { DISHES } from '../shared/dishes'; > . . . > export const fetchDishes = () => (dispatch) => { > dispatch(dishesLoading(true)); > setTimeout(() => { > dispatch(addDishes(DISHES)); > }, 2000); > } > export const dishesLoading = () => ({ > type: ActionTypes.DISHES_LOADING > }); > export const dishesFailed = (errmess) => ({ > type: ActionTypes.DISHES_FAILED, > payload: errmess > }); > export const addDishes = (dishes) => ({ > type: ActionTypes.ADD_DISHES, > payload: dishes > }); ``` - Next, open dishes.js and add the code to respond to actions as follows: ``` > import as ActionTypes from './ActionTypes'; > export const Dishes = (state = { isLoading: true, > errMess: null, > dishes:[]}, action) => { > switch (action.type) { > case ActionTypes.ADD_DISHES: > return {...state, isLoading: false, errMess: null, dishes: action.payload}; > case ActionTypes.DISHES_LOADING: > return {...state, isLoading: true, errMess: null, dishes: []} > case ActionTypes.DISHES_FAILED: > return {...state, isLoading: false, errMess: action.payload}; > default: > return state; > } > }; ``` - Add a new component named LoadingComponent.js to display a loading message as follows: ``` > import React from 'react'; > export const Loading = () => { > return( >Loading . . .
>{props.errMess}
> > > ); > } > else if (props.dish != null) > . . . ``` - Open HomeComponent.js and update it as follows: ``` > . . . > import { Loading } from './LoadingComponent'; > . . . > function RenderCard({item, isLoading, errMess}) { > if (isLoading) { > return( >{errMess}
> ); > } > else > return( >{props.dishes.errMess}
> > > > ); > } > else > . . . ``` - Save all the changes and do a Git commit with the message \"Redux Thunk\".Conclusions
In this exercise we saw the use of Redux Thunk and the Logger.Exercise (Video): React-Redux-Form Revisited
Exercise (Instructions): React-Redux-Form Revisited
Objectives and Outcomes
In this exercise we will explore the interaction between react-redux-form and the Redux store. We will see how to map the form into the store so that the state of the form will be persisted in the store. At the end of this exercise you will be able to: - Use react-redux-form to interact with Redux store and store the state of the form in the store.Updating the Feedback Form
- Add a new file named forms.js in the redux folder and add the following to it: ``` > export const InitialFeedback = { > firstname: '', > lastname: '', > telnum: '', > email: '', > agree: false, > contactType: 'Tel.', > message: '' > }; ``` - Then, open configureStore.js and update it to add the form to the reducers: ``` > . . . > import { createForms } from 'react-redux-form'; > . . . > import { InitialFeedback } from './forms'; > . . . > combineReducers({ > dishes: Dishes, > comments: Comments, > promotions: Promotions, > leaders: Leaders, > ...createForms({ > feedback: InitialFeedback > }) > }), > . . . ``` - Next, open MainComponent.js and update it as follows: ``` > . . . > import { actions } from \'react-redux-form'; > . . . > resetFeedbackForm: () => { dispatch(actions.reset('feedback'))} > . . . >Conclusions
In this exercise we have seen how to use react-redux-form together with Redux to persist form state.Redux Thunk: Additional Resources
PDFs of Presentations
2-Redux-Thunk.pdf PDF FileRedux Resources
- [Redux Middleware](https://redux.js.org/advanced/middleware) - [Redux Thunk](https://github.com/gaearon/redux-thunk) - [Redux Logger](https://github.com/evgenyrodionov/redux-logger) - [React-redux-form](https://davidkpiano.github.io/react-redux-form/docs.html)Module: Client-Server Communication: Objectives and Outcomes
In this lesson you will learn about communication between your React application and a server. You will establish a simple server using the json-server node module. At the end of this lesson, you will be able to: - Set up a simple server that makes data available for clients - Access the data from the server using a browser. - Use the json-server as a simple static web server.Networking Essentials
Brief Representational State Transfer (REST)
Exercise (Video): Setting up a Server using json-server
Exercise (Instructions): Setting up a Server using json-server
Exercise Resources
db JSON File images ZIP FileObjectives and Outcomes
The Node module, json-server, provides a very simple way to set up a web server that supports a full-fledged REST API server. It can also serve up static web content from a folder. This lesson will leverage these two features to provide the back-end for your React application. In this exercise, you will configure and start a server using json-server to enable serving your application data to your Angular application. At the end of this exercise, you will be able to: - Configure and start a simple server using the json-server module - Configure your server to serve up static web content stored in a folder named public.Installing json-server
- json-server is a node module, and hence can be installed globally by typing the following at the command prompt: npm install json-server -g If you are using OSX or Linux, use sudo at the front of the command. This will install json-server that can be started from the command line from any folder on your computer.Configuring the Server
- At any convenient location on your computer, create a new folder named json-server, and move to this folder. - Download the db.json file provided above to this folder. - Move to this folder in your terminal window, and type the following at the command prompt to start the server: ``` > json-server --watch db.json -p 3001 -d 2000 ``` - This should start up a server at port number 3001 on your machine. The data from this server can be accessed by typing the following addresses into your browser address bar: ``` > [http://localhost:3001/dishes]{.underline} > > [http://localhost:3001/promotions]{.underline} > > [http://localhost:3001/leaders]{.underline} > > [http://localhost:3001/feedback]{.underline} ``` - Type these addresses into the browser address and see the JSON data being served up by the server. This data is obtained from the db.json file - The json-server also provides a static web server. Any resources that you put in a folder named public in the json-server folder above, will be served by the server at the following address: ``` > <http://localhost:3001/> ``` - Shut down the server by typing ctrl-C in the terminal window.Serving up the Images
- Create a public folder in your json-server folder. - Download the images.zip file that we provide above, unzip it and move the images folder containing the images to the public folder. - Restart the json-server as we did before. Now your server will serve up the images for our React app. You can view these images by typing the following into your browser address bar: ``` > [http://localhost:3001/images/]Conclusions
In this exercise, you learnt how to configure and start a simple server using the json-server node module. You also learnt how the server can serve up static web content.Client-Server Communication: Additional Resources
PDFs of Presentations
3-Networking-Essentials.pdf 4-REST.pdfExercise Resources
db JSON File images ZIP FileOther Resources
- [json-server](https://github.com/typicode/json-server) - [Creating Demo APIs with json-server](https://egghead.io/lessons/nodejs-creating-demo-apis-with-json-server) - [JSON](http://www.json.org/)Fetch: Objectives and Outcomes
In this lesson you will learn about Fetch as a means of communication between your React application and a REST API server. At the end of this lesson you will be able to: - Install Fetch in your React application - Use Fetch to communicate from your React application with a REST API serverPromises
Fetch
Exercise (Video): Fetch from Server
Exercise (Instructions): Fetch from Server
Objectives and Outcomes
In this exercise you will incorporate Fetch into your React app and then use it to communicate with the REST API server. At the end of this exercise you will be able to: - Incorporate Fetch into your React app - Use Fetch to communicate with the REST API serverFetch
- As a first step, let us install Fetch into our project as follows: > yarn add [email protected] - Now that we have installed Fetch, let us configure your application to connect to the server. First, create a file named baseUrl.js in the shared folder and add the following to it: ``` > export const baseUrl = '[http://localhost:3001/]{.underline}'; ``` - Make sure that the json-server is running and servi - ng up the data as illustrated in the previous exercise - Next, open ActionTypes.js and add the following: ``` . . . export const ADD_COMMENTS = 'ADD_COMMENTS'; export const COMMENTS_FAILED = 'COMMENTS_FAILED'; export const PROMOS_LOADING = 'PROMOS_LOADING'; export const ADD_PROMOS = 'ADD_PROMOS'; export const PROMOS_FAILED = 'PROMOS_FAILED\'; ``` - Then, open ActionCreators.js and update it as follows: ``` > . . . > import { baseUrl } from '../shared/baseUrl'; > . . . > return fetch(baseUrl + 'dishes') > .then(response => response.json()) > .then(dishes => dispatch(addDishes(dishes))); > . . . > export const fetchComments = () => (dispatch) => { > return fetch(baseUrl + 'comments') > .then(response => response.json()) > .then(comments => dispatch(addComments(comments))); > }; > export const commentsFailed = (errmess) => ({ > type: ActionTypes.COMMENTS_FAILED, > payload: errmess > }); > export const addComments = (comments) => ({ > type: ActionTypes.ADD_COMMENTS, > payload: comments > }); > export const fetchPromos = () => (dispatch) => { > dispatch(promosLoading()); > return fetch(baseUrl + 'promotions') > .then(response => response.json()) > .then(promos => dispatch(addPromos(promos))); > } > export const promosLoading = () => ({ > type: ActionTypes.PROMOS_LOADING ``` - Next, open comments.js and update it as follows: ``` > import as ActionTypes from './ActionTypes'; > export const Comments = (state = { errMess: null, comments:[]}, action) => { > switch (action.type) { > case ActionTypes.ADD_COMMENTS: > return {...state, errMess: null, comments: action.payload}; > case ActionTypes.COMMENTS_FAILED: > return {...state, errMess: action.payload}; > case ActionTypes.ADD_COMMENT: > var comment = action.payload; > comment.id = state.comments.length; > comment.date = new Date().toISOString(); > return { ...state, comments: state.comments.concat(comment)}; > default: > return state; > } > }; ``` - Similarly, open promotions.js and update it as follows: ``` > import as ActionTypes from './ActionTypes'; > export const Promotions = (state = { isLoading: true, > errMess: null, > promotions:[]}, action) => { > switch (action.type) { > case ActionTypes.ADD_PROMOS: > return {...state, isLoading: false, errMess: null, promotions: action.payload}; > case ActionTypes.PROMOS_LOADING: > return {...state, isLoading: true, errMess: null, promotions: []} > case ActionTypes.PROMOS_FAILED: > return {...state, isLoading: false, errMess: action.payload}; > default: > return state; > } > }; ``` - Now that the Redux actions are all updated, it\'s time to update the components. - Open MainComponent.js and update it as follows: ``` > . . . > import { addComment, fetchDishes, fetchComments, fetchPromos } from '../redux/ActionCreators'; > . . . > const mapDispatchToProps = dispatch => ({ > addComment: (dishId, rating, author, comment) => dispatch(addComment(dishId, rating, author, comment)), > fetchDishes: () => { dispatch(fetchDishes())}, > resetFeedbackForm: () => { dispatch(actions.reset('feedback'))}, > fetchComments: () => dispatch(fetchComments()), > fetchPromos: () => dispatch(fetchPromos()) > }); > . . . > componentDidMount() { > this.props.fetchDishes(); > this.props.fetchComments(); > this.props.fetchPromos(); > } > . . . >Conclusions
In this exercise you have learnt to install Fetch and use it communicate with the server.Exercise (Video): Fetch Handling Errors
Exercise (Instructions): Fetch Handling Errors
Objectives and Outcomes
In this exercise you will learn how to handle errors encountered while communicating with the server. At the end of this exercise you will be able to: - Configure your app to appropriately handle errors encountered while communicating with the serverHandling Errors
- Open ActionCreators.js and update it as follows: ``` > . . . > export const fetchDishes = () => (dispatch) => { > dispatch(dishesLoading(true)); > return fetch(baseUrl + 'dishes') > .then(response => { > if (response.ok) { > return response; > } else { > var error = new Error('Error ' + response.status + ': ' + response.statusText); > error.response = response; > throw error; > } > }, > error => { > var errmess = new Error(error.message); > throw errmess; > }) > .then(response => response.json()) > .then(dishes => dispatch(addDishes(dishes))) > .catch(error => dispatch(dishesFailed(error.message))); > } > . . . > export const fetchComments = () => (dispatch) => { > return fetch(baseUrl + 'comments') > .then(response => { > if (response.ok) { > return response; > } else { > var error = new Error('Error ' + response.status + ': ' + response.statusText); > error.response = response; > throw error; > } > }, > error => { > var errmess = new Error(error.message); ``` - Save all the changes and do a Git commit with the message \"Fetch Handling Errors\".Conclusions
In this exercise you learnt how to configure your app to handle errors in communicating with the server.Exercise (Video): Fetch Post Comment
Exercise (Instructions): Fetch Post Comment
Objectives and Outcomes
In this exercise you will learn how to configure Fetch to be able to post data to the server. At the end of this exercise, you will be able to: - Configure Fetch to post data to the server - Receive and process the response to the POST operation on the serverPosting a Comment
- Open ActionCreators.js and update it as follows: ``` > . . . > export const addComment = (comment) => ({ > type: ActionTypes.ADD_COMMENT, > payload: comment > }); > export const postComment = (dishId, rating, author, comment) => (dispatch) => { > const newComment = { > dishId: dishId, > rating: rating, > author: author, > comment: comment > }; > newComment.date = new Date().toISOString(); > return fetch(baseUrl + 'comments', { > method: "POST", > body: JSON.stringify(newComment), > headers: { > "Content-Type": "application/json" > }, > credentials: "same-origin" > }) > .then(response => { > if (response.ok) { > return response; > } else { > var error = new Error('Error ' + response.status + ': ' + response.statusText); > error.response = response; > throw error; > } > }, > error => { > throw error; > }) > .then(response => response.json()) > .then(response => dispatch(addComment(response))) > .catch(error => { console.log('post comments', error.message); alert('Your comment could not be postednError: '+error.message); }); ``` - Open comment.js and remove the following two lines from it: ``` > . . . > comment.id = state.comments.length; > comment.date = new Date().toISOString(); > . . . ``` - Open MainComponent.js and update it as follows: ``` > . . . > import { postComment, fetchDishes, fetchComments, fetchPromos } from '../redux/ActionCreators'; > . . . > > postComment: (dishId, rating, author, comment) => dispatch(postComment(dishId, rating, author, comment)) > . . . > postComment={this.props.postComment} > . . . ``` - Finally, open DishdetailComponent.js and update it as follows: ``` > . . . > function RenderComments({comments, postComment, dishId}) { > . . . >Conclusions
In this exercise you learnt to use Fetch to post data to the server.Fetch: Additional Resources
PDFs of Presentations
5-Promises.pdf 6-Fetch.pdfFetch Resources
- [Cross-Fetch](https://github.com/lquixada/cross-fetch)Promise Resources
- [JavaScript Promise](https://developer.mozilla.org/en/docs/Web/JavaScript/Reference/Global_Objects/Promise) - [JS Promise (Part 1 - Basics)](https://medium.com/@ramsunvtech/promises-of-promise-part-1-53f769245a53) - [JavaScript Promises for Dummies](https://scotch.io/tutorials/javascript-promises-for-dummies) - [JavaScript Promises: an Introduction](https://developers.google.com/web/fundamentals/getting-started/primers/promises)Other Resources
- [Introduction to fetch()](https://developers.google.com/web/updates/2015/03/introduction-to-fetch) - [Using Fetch](https://developer.mozilla.org/en-US/docs/Web/API/Fetch_API/Using_Fetch) - [Fetch vs. Axios.js for making http requests](https://medium.com/@thejasonfile/fetch-vs-axios-js-for-making-http-requests-2b261cdd3af5)Module xx: React Animations: Objectives and Outcomes
In this lesson we will learn about adding various subtle animations to our React app for a better user experience. At the end of this lesson you will be able to: - Add subtle animations using the react-transition-group - Add additional component animations using react-animation-componentsReact Animations
Exercise (Video): React Animations
Exercise (Instructions): React Animations
Objectives and Outcomes
In this exercise you will learn to implement animations in your React app using react-transition-group. At the end of this exercise you will be able to: - Configure your app to use react-transition-group for animations - Implement simple animation using the react-transition-groupInstalling React-Transition-Group
- Install react-transition-group in your React project as follows: ``` yarn add [email protected] ``` - Configure CSS classes for use in animation. Open App.css and add the following classes: ``` > . . . > .page-enter { > opacity: 0.01; > transform: translateX(-100%); > } > .page-enter-active { > opacity: 1; > transform: translateX(0%); > transition: all 300ms ease-in; > } > .page-exit { > opacity: 1; > transform: translateX(0%); > } > .page-exit-active { > opacity: 0.01; > transform: translateX(100%); > transition: all 300ms ease-out; > } ``` - Then, open MainComponent.js and add in the following to configure the animation: ``` > . . . > import { TransitionGroup, CSSTransition } from 'react-transition-group'; > . . . >Conclusions
In this exercise we implemented simple animation using react-transition-group.
Exercise (Video): React Animation Components
Exercise (Instructions): React Animation Components
Objectives and Outcomes
In this exercise you will learn to use react-animation-components to add more subtle animations to your React app. At the end of this exercise you will be able to:
- Use react-animation-components to add more subtle animations to your React app.
Installing React-Animation-Components
- Install react-animation-components into your React app as follows: ``` > yarn add [email protected] > > yarn add [email protected] ```Adding Animations
- Open HomeComponents.js and update as follows:
- Open DishdetailComponents.js and update it as follows:
{comment.comment}
>-- {comment.author} , {new Intl.DateTimeFormat('en-US', { year: 'numeric', month: 'short', day: '2-digit'}).format(new Date(Date.parse(comment.date)))}
> > > ); > })} > > . . . ```- Save all the changes and do a Git commit with the message "React Animation Components".
Conclusions
In this exercise you saw yet another way of adding subtle animations using react-animation-components.React Animations: Additional Resources
PDFs of Presentations
7-Animations.pdfReact Animations
- [Animation Add-Ons](https://reactjs.org/docs/animation.html) - [react-transition-group](https://github.com/reactjs/react-transition-group) - [React Transition Group Documents](https://reactcommunity.org/react-transition-group/) - [react-animation-components](https://github.com/unruffledBeaver/react-animation-components)Other Resources
- How to build animated microinteractions in React
- UI Animations with React --- The Right Way
- React Animations in Depth
- What's the most developer-friendly React animation library?
- Amazing React animation with react-pose
Assignment 4: Redux, Client-Server Communication and Fetch
Peer-graded Assignment: Redux, Client-Server Communication and Fetch
Deadline Nov 13, 11:59 PM PST Ready for the assignment?You will find instructions below to submit.
In this assignment, you will update the web application to get data from the server to render the information corresponding to the leadership team of the company. In addition, you will handle the submission of the feedback form by posting the feedback to the server.
Step-By-Step Assignment Instructions
Assignment OverviewAt the end of this assignment, you should have completed the following:
- Introduced new action types and action creators to support the fetching of the leaders information from the server and update the Redux store. - Updated the Home and the About component to render the information about the leaders using the downloaded data from the server - Add simple animations to the About component where the leaders information is displayed. - Enabled the users to submit feedback through the feedback form by creating a new feedback service that accepts the form data and uses Restangular to record their feedback on the server. Assignment Requirements Task 1 In this task, you will update the Redux actions and the Home and About components to use the data from the server for rendering the leader information: - Add new action types in ActionTypes.js to support the fetching of the leaders information from the server - Add new action creators in ActionCreators.js to enable the fetching of the leaders information from the server and update the Redux store - Update the code in leaders.js to respond to the dispatched Redux actions and update the Redux store and appropriately handle the loading and errors. - Update the code in MainComponent.js to fetch and use the leaders information. - Update HomeComponent.js to render the leader information. - Update AboutComponent.js to render the leaders information. You should handle the loading and error condition appropriately. Task 2 In this task, you will enable the saving of the feedback data submitted using the feedback form in the Contact component. You will save the feedback form data submitted by the user to the server: - Implement a new action creator named postFeedback() that takes a Feedback object as a parameter and submits the feedback to the server using Fetch. Recall that the feedback data is accessible at- Use the expand animation that we have already used earlier to judiciously apply animation to the various stages of the form submission.
Review criteria
less Your assignment will be assessed based on the following criteria: Task 1- Appropriate action types and action creators have been added.
- The Home component is correctly using the leader data, and handling
any errors that might arise.
- The About component is correctly using the leader data, and handling any errors that might arise.
- A new postFeedback() action creator is correctly implemented to post the feedback data to the server.
- The Contact component has been correctly updated to use postFeedback() to post the form data to the server.
- Appropriate animation has been added to stagger the rendering of the leaders in the AboutComponent.
Assignment 4: Redux, Client-Server Communication and Fetch: Additional Resources
Assignment Screenshots
React Resources
- Redux Actions
- Redux Reducers
- Redux Usage with React
- Cross-Fetch
- Animation Add-Ons
- react-transition-group
- React Transition Group Documents
- react-animation-components
Module xx: Building and Deployment: Objectives and Outcomes
In this lesson you will learn about Webpack and how react-scripts uses webpack to package your React application to create a distribution folder. At the end of this exercise you will be able to:
- Understand the Webpack way of packaging applications into bundles
- Use react-scripts to build a distribution folder with your React application bundled using Webpack
Introduction to Webpack
Exercise (Video): Building and Deploying the React Application
Exercise (Instructions): Building and Deploying the React Application
Objectives and Outcomes
In this exercise you will learn to use the react-scripts to build a distribution folder with the set of application files that can be copied to a server to deploy your React application. At the end of this exercise you will be able to:
- Build your React application using the react-scripts to create a distribution folder
- Deploy your application to a server by copying the built files to your server
Building the Distribution Folder
- To build the distribution folder containing your React application, type the following at the prompt:
$ npm run build
- This should build a distribution folder named build containing all your application files.
Deploying your React Application
- To deploy your React application you need a server. Fortunately we already have the json-server available on our computer.
- Copy the contents of the build folder to the public folder of your json-server.
- Now your React application can be accessed at the link <http://localhost:3001/>.
- If you are setting up a server on the cloud or anywhere, all that you need to do is copy the contents of the build folder to the server side to deploy your React application. The exact procedure depends on the cloud service provider that you choose to use. Please consult their documentation to see the procedure to set up the server.
Conclusions
In this exercise you learnt to use the react-scripts to build and deploy your React application.
Building and Deployment: Additional Resources
PDFs of Presentations
8-Webpack.pdfReact Resources
Other Resources
Project Implementation: Objectives and Outcomes
This is the final stretch before you complete your project.
By this time you should already have a good scaffolding for your website.
As you flesh out your project and race towards completion, it is time to pause and take stock of the current situation.
Perhaps a critical look back at the past, with the view of learning from our experience and consolidating this learning into an effective, organized and repeatable process is in order.
Upon completion of the project it is important not only to demonstrate the working project, but also summarize the process of reaching the final goal. At the end of this lesson, you will be able to:
- Document the process of starting from an idea and reaching the conclusion of the project, not just the implementation, but also recognizing the process of reaching the end.
- Learn lessons from the process in understanding what worked and what did not, and being able to make intelligent choices in the future based on the experience.
- Understand the design and development process through the practice.
Final Report Template
Project Title
1. Introduction
- Briefly describe the salient features of your project.
2. Design and Implementation
Give a detailed system description and design and implementation details.
In particular, this section should contain:
- Details of how you converted from design to the actual realization of your project in terms of implementing the code.
- Any choices that you made, and any modifications that you made to the design, in response to difficulties that you might have encountered while implementing the project.
- A brief discussion of various modules and libraries that you used in implementing your project. In particular highlight the reasons for your choices briefly.
- Include a few screen shots of your website in the report.
3. Conclusions
- Briefly state what results you obtained from your project.
- Discuss any features and shortcomings of the project.
- Discuss any choices that you might have made differently, in hindsight after completing the project.
4. References
- Give references to any material / websites / books etc. relevant to your project.
Honors Peer-graded Assignment: Project Implementation and Final Report
Ready for the assignment?You will find instructions below to submit.
It's finally time to submit your Capstone project for evaluation.
Make sure that you have sufficiently documented the implementation of your project code by
adding appropriate comments within the code so that reviewers can easily
understand the code.
If your server is running on any publicly hosted server, please submit the URL of the site.
Review criteria
lessYour final project submission will be evaluated by your peers considering the following items:
- Have the details of the implementation been briefly described in the final report?
- Have any justifications for the choices made been provided in the final report?
- Has the source code been made available for review?
- Has the URL to the server where the project is running been provided?